
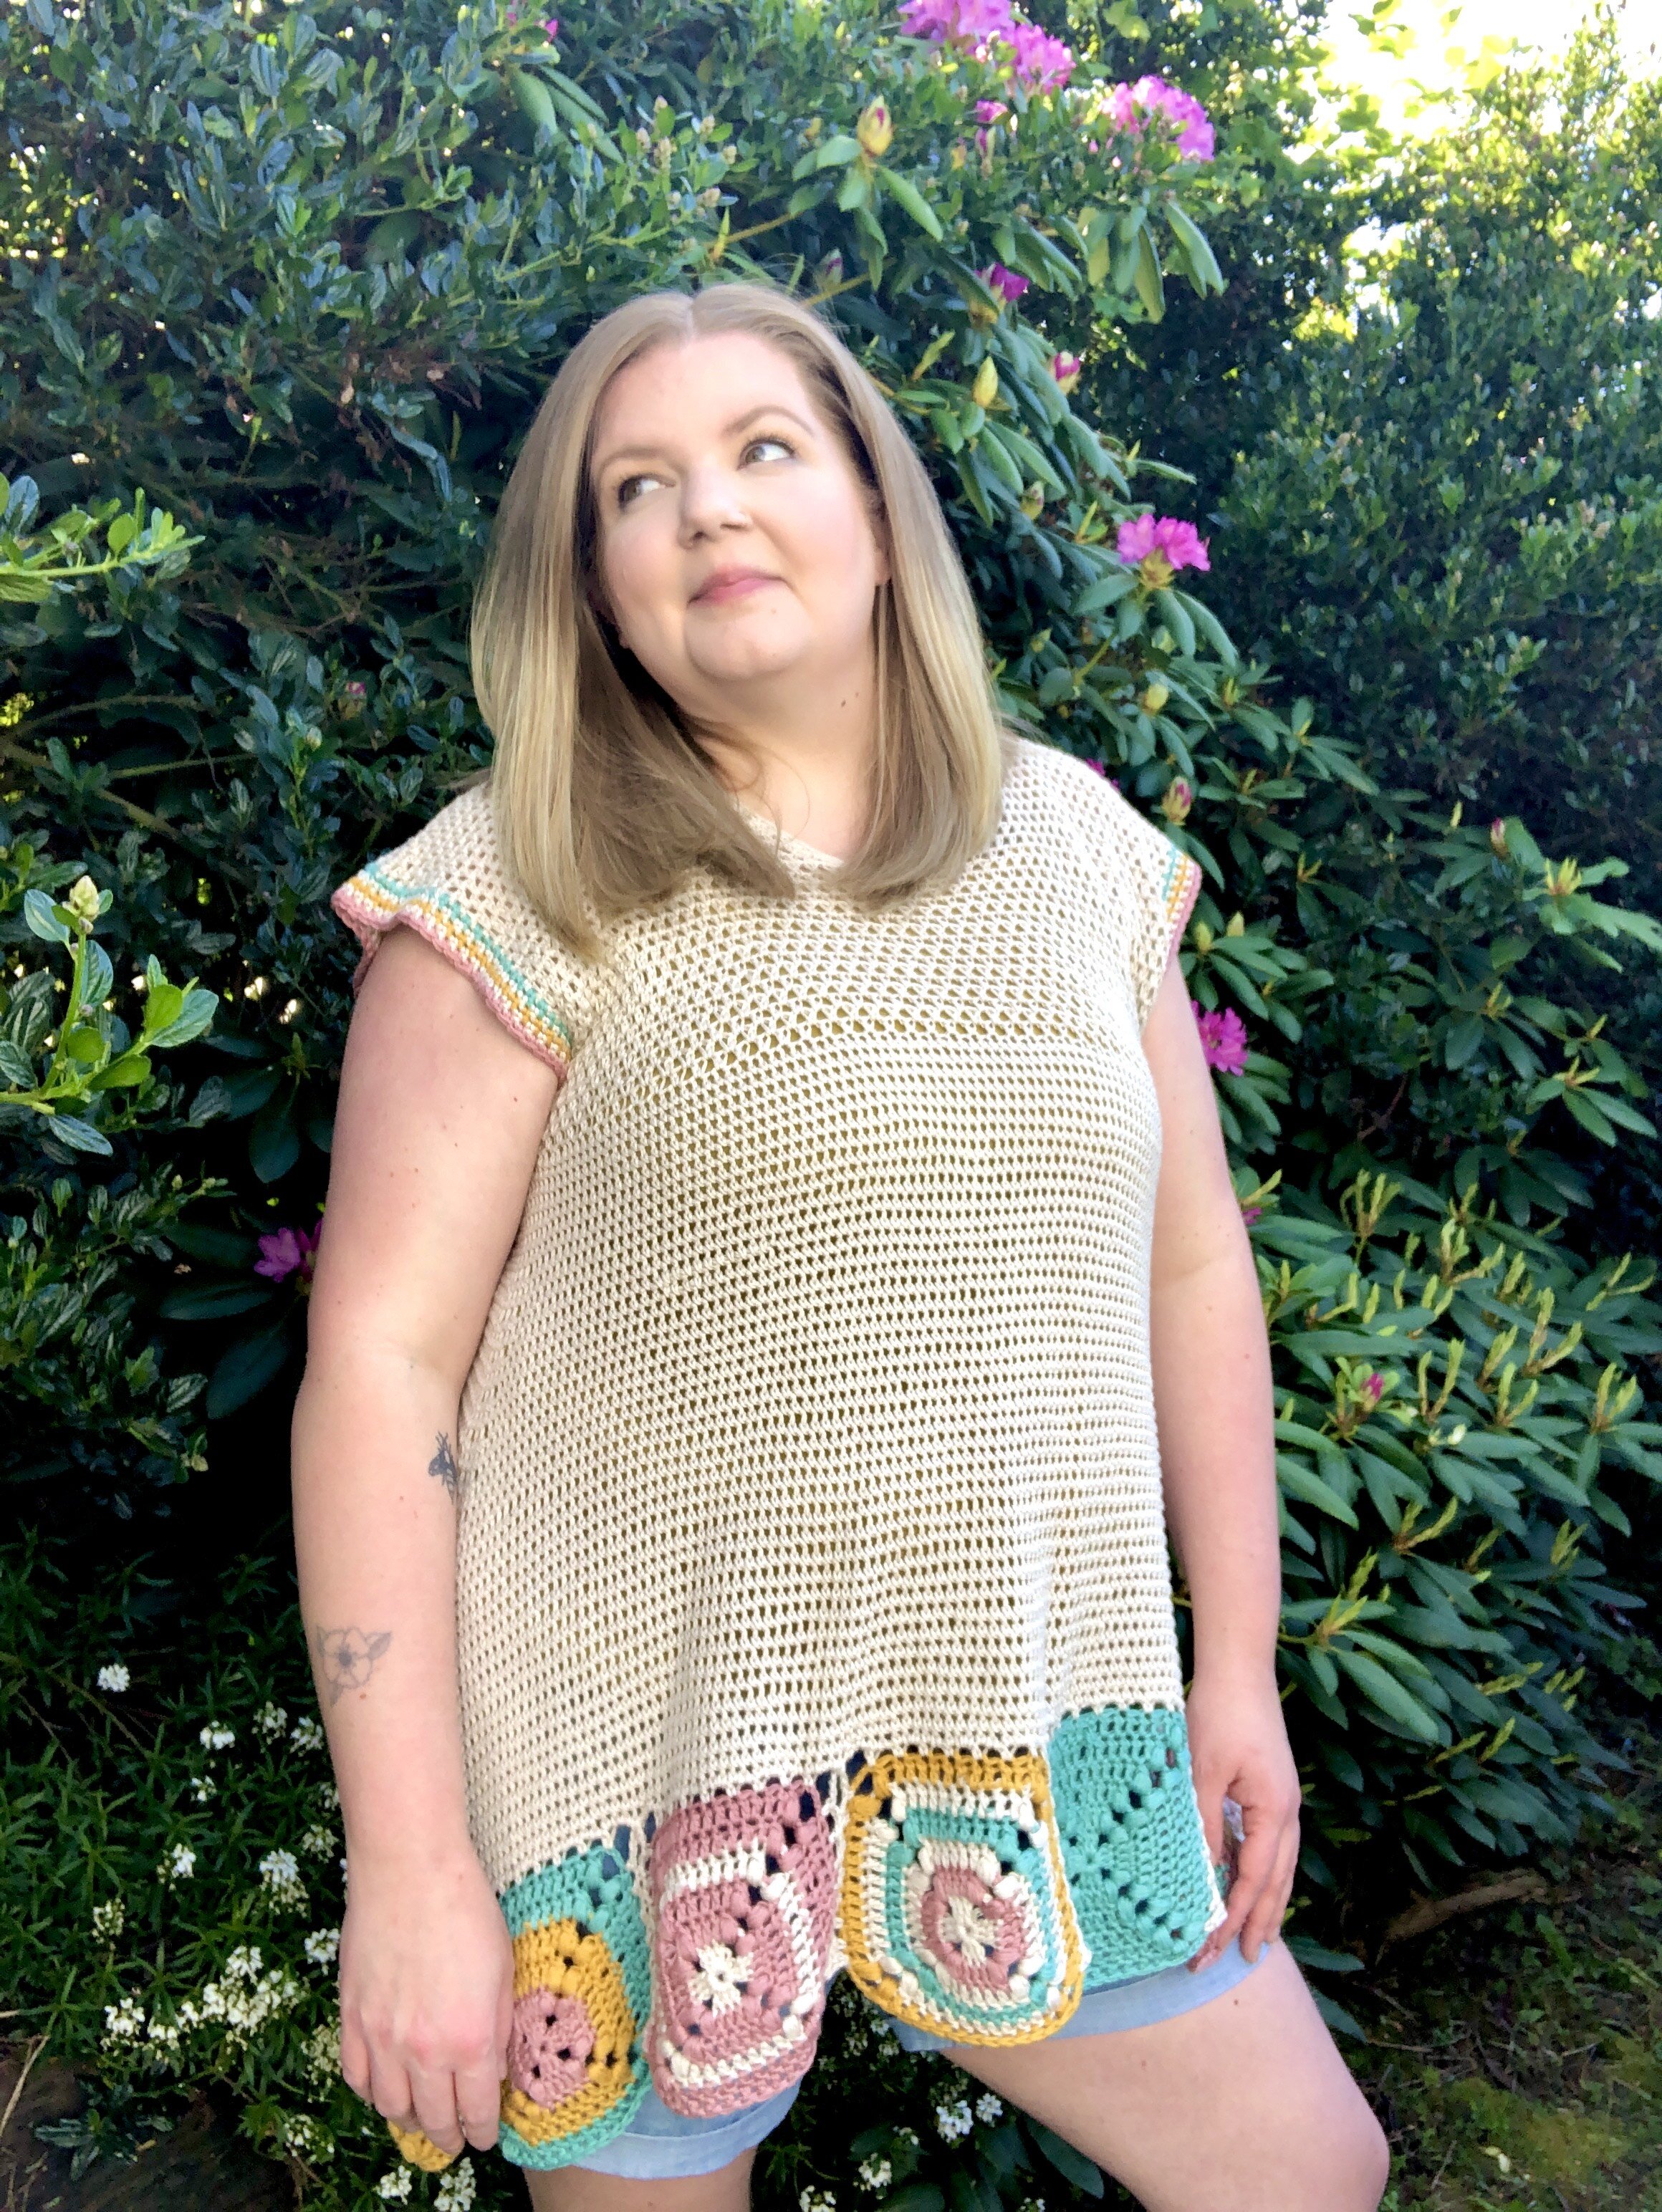
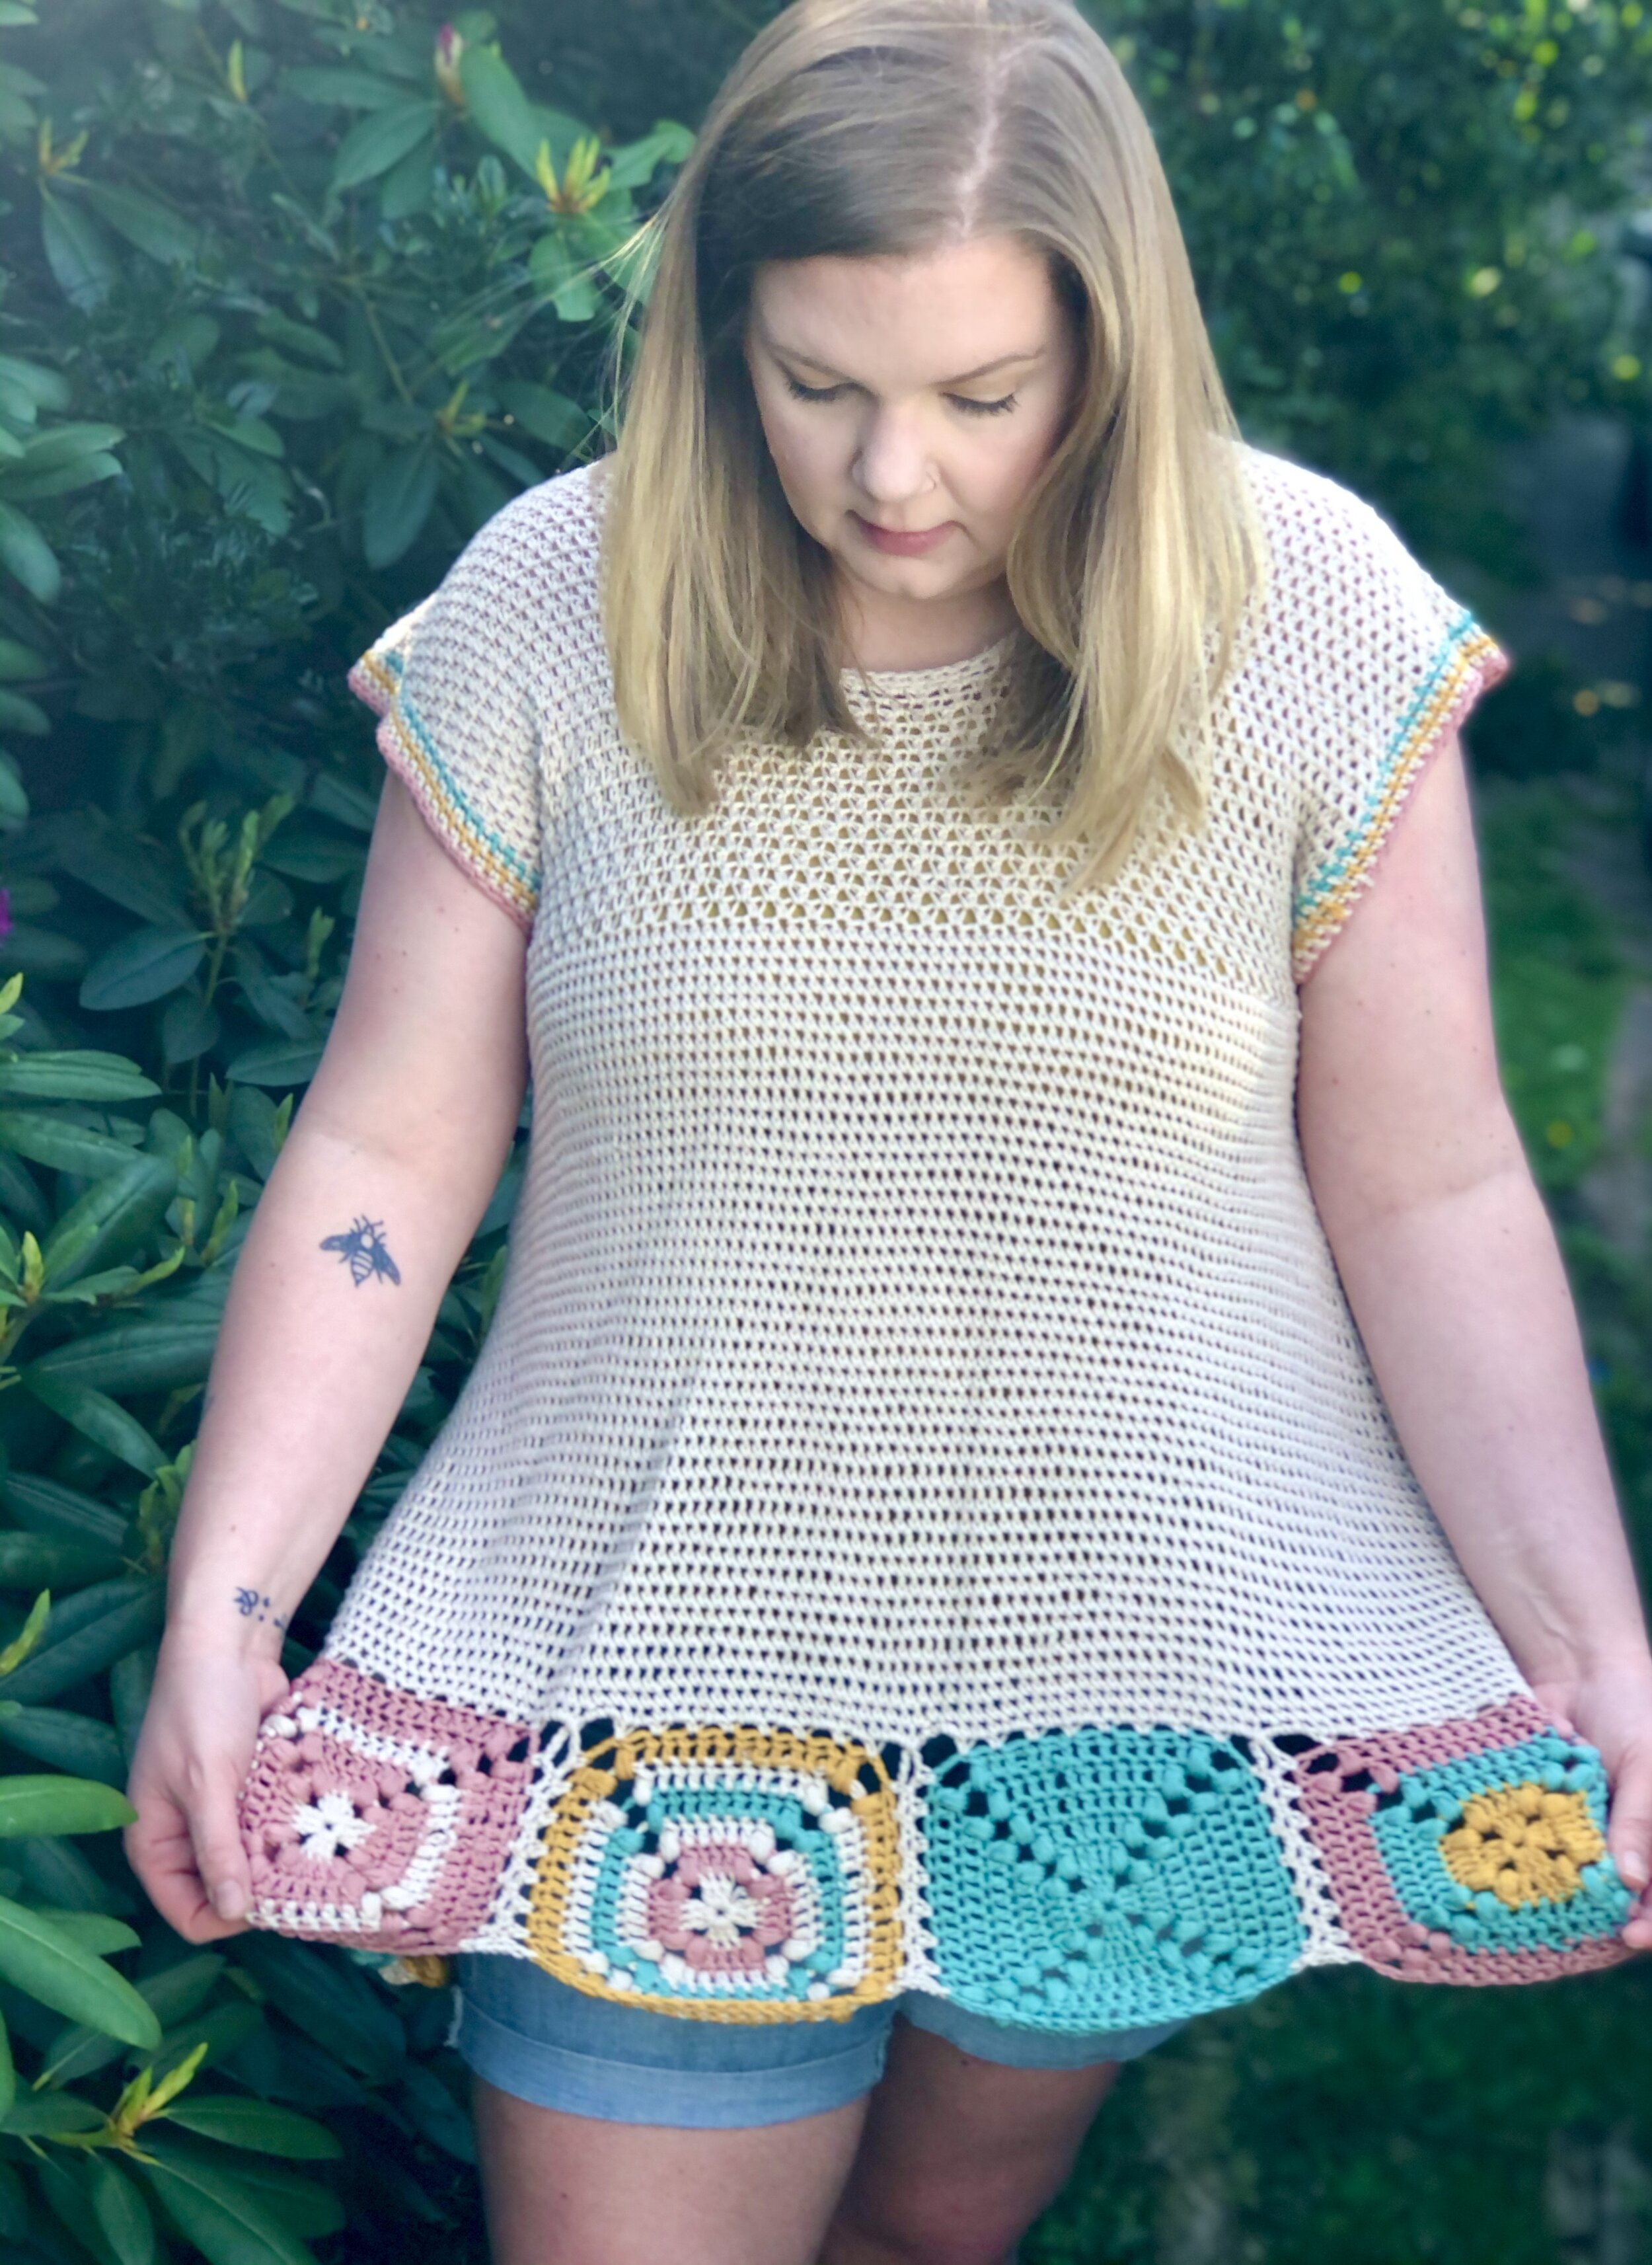
SerendipiTEE

WOO! We’ve been having some distinctively summer weather up here lately. But, we’re going back down to the 50s for a couple days again soon. That’s Montreal for you! I am READY for the warm weather though. Winter seamed to drag on for ages this year. Though, if I look back at the last 2 winters here, it does that every year.
ABOUT THIS Top:
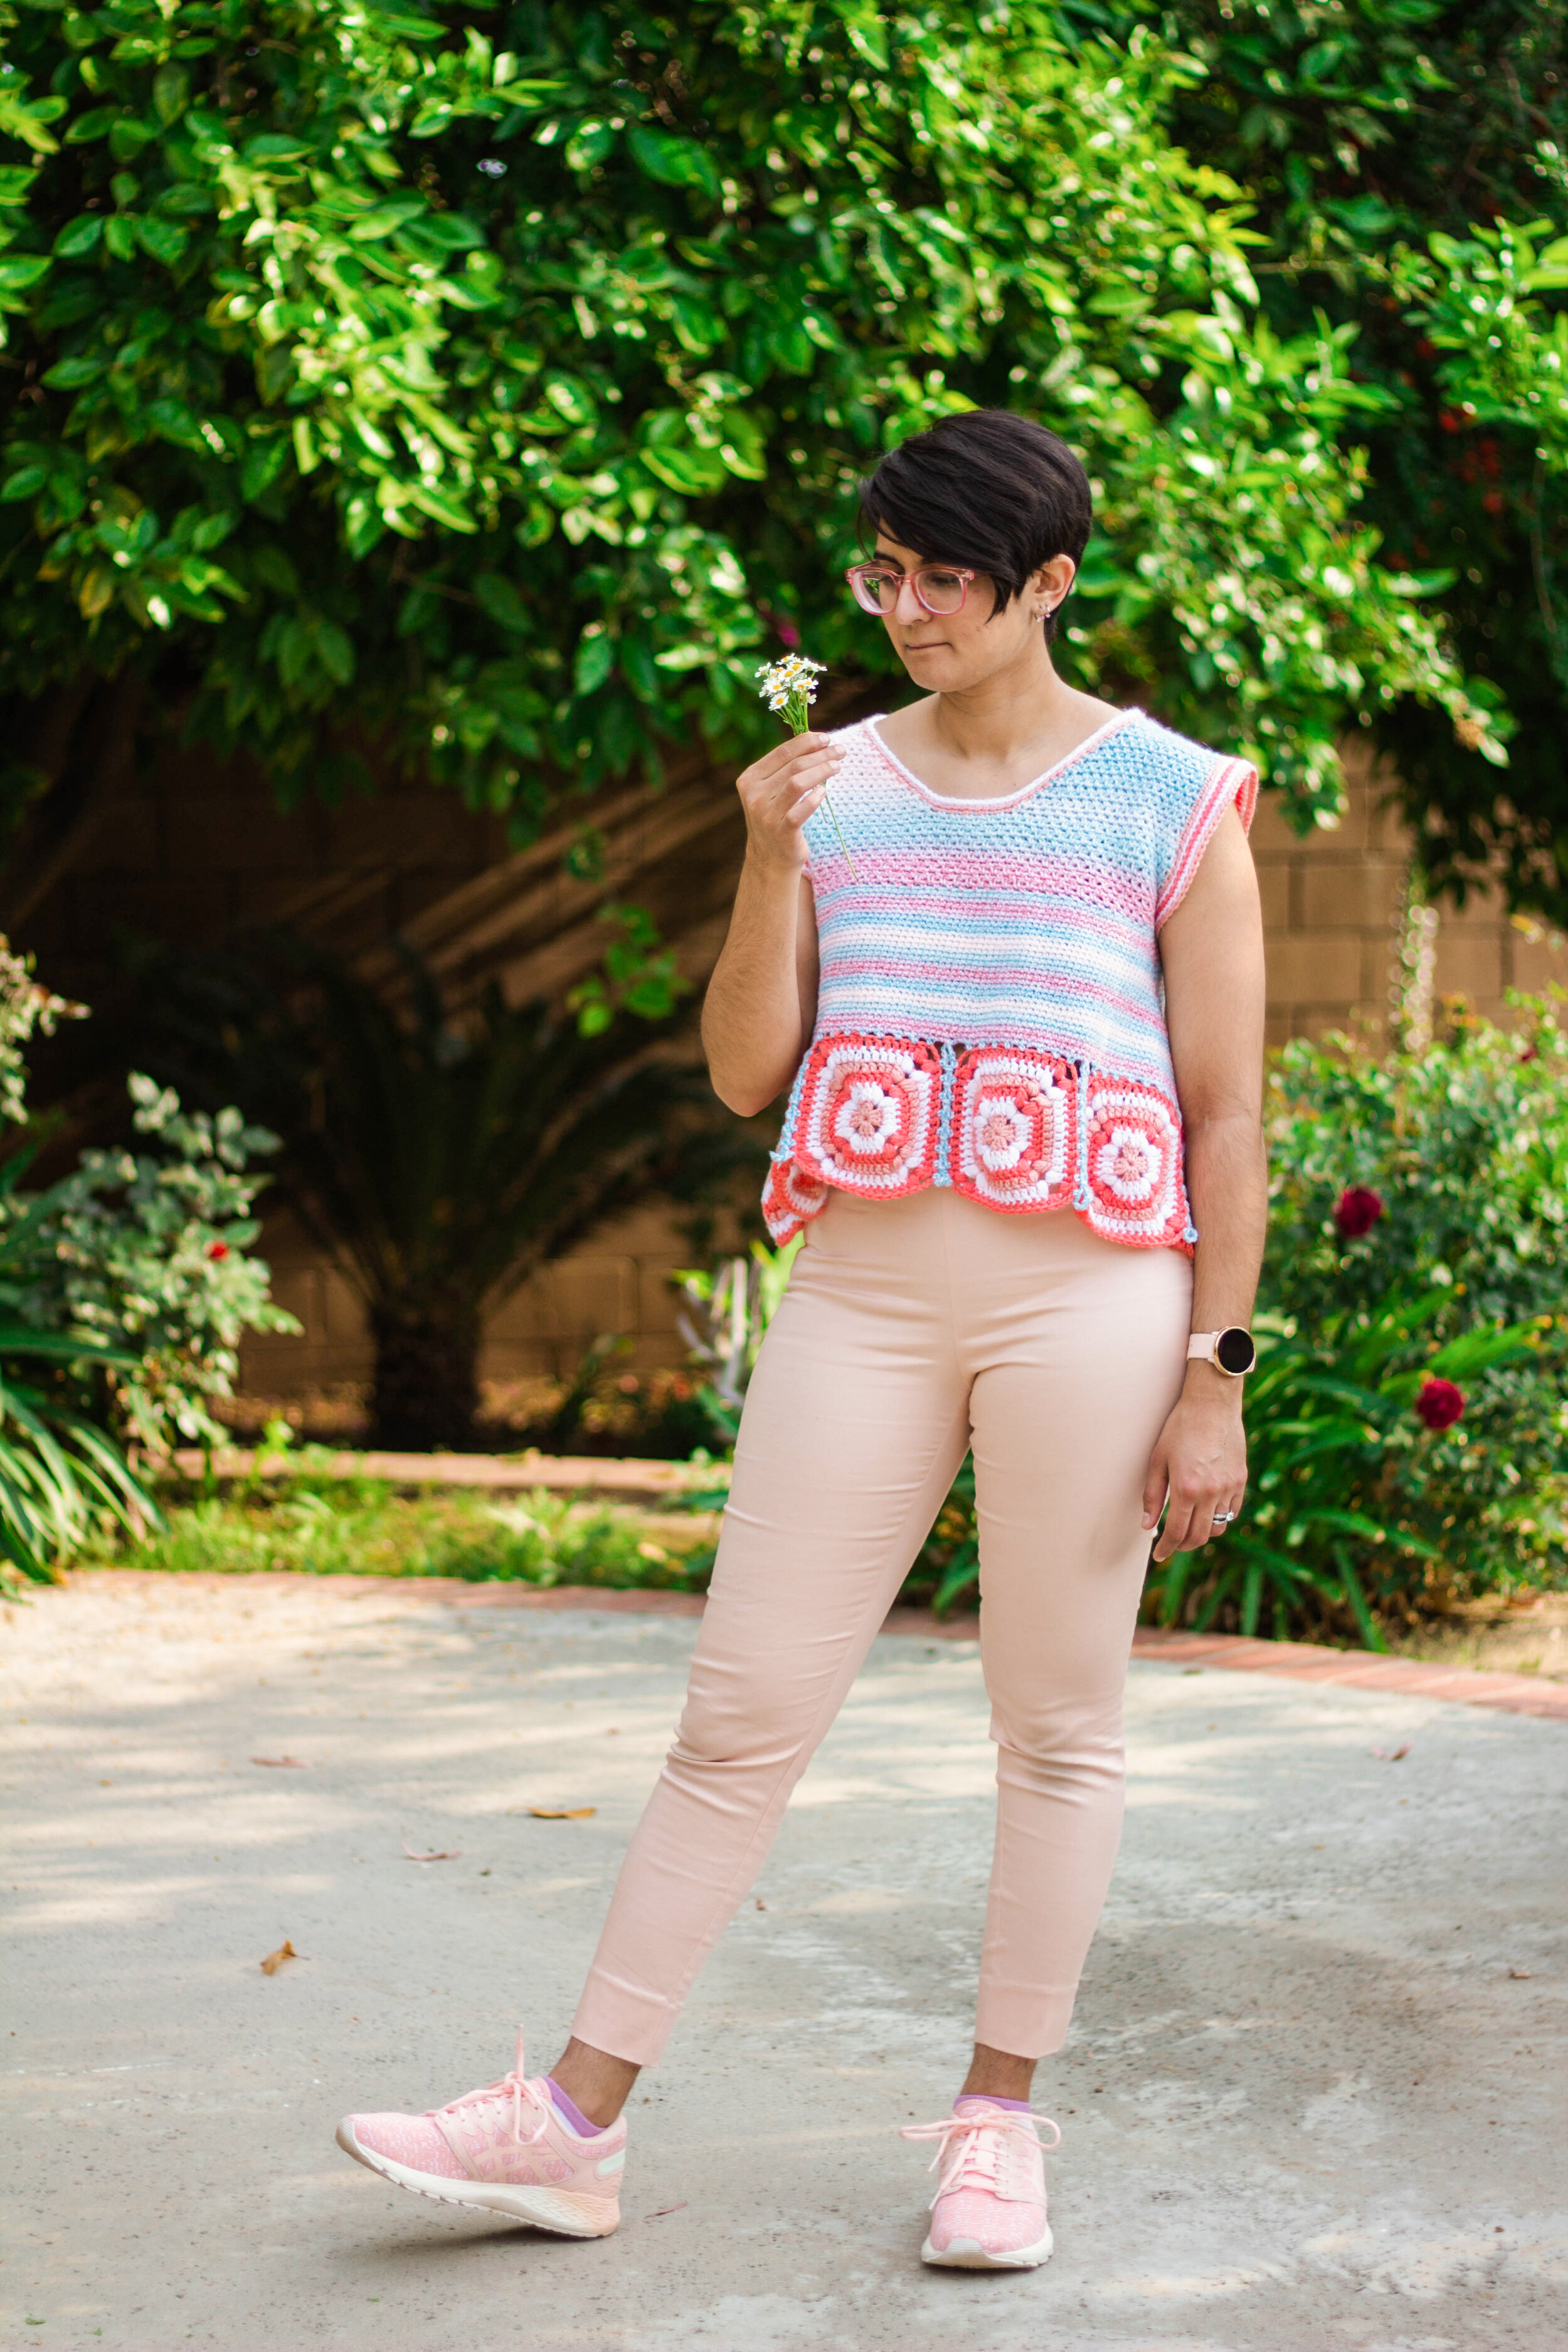
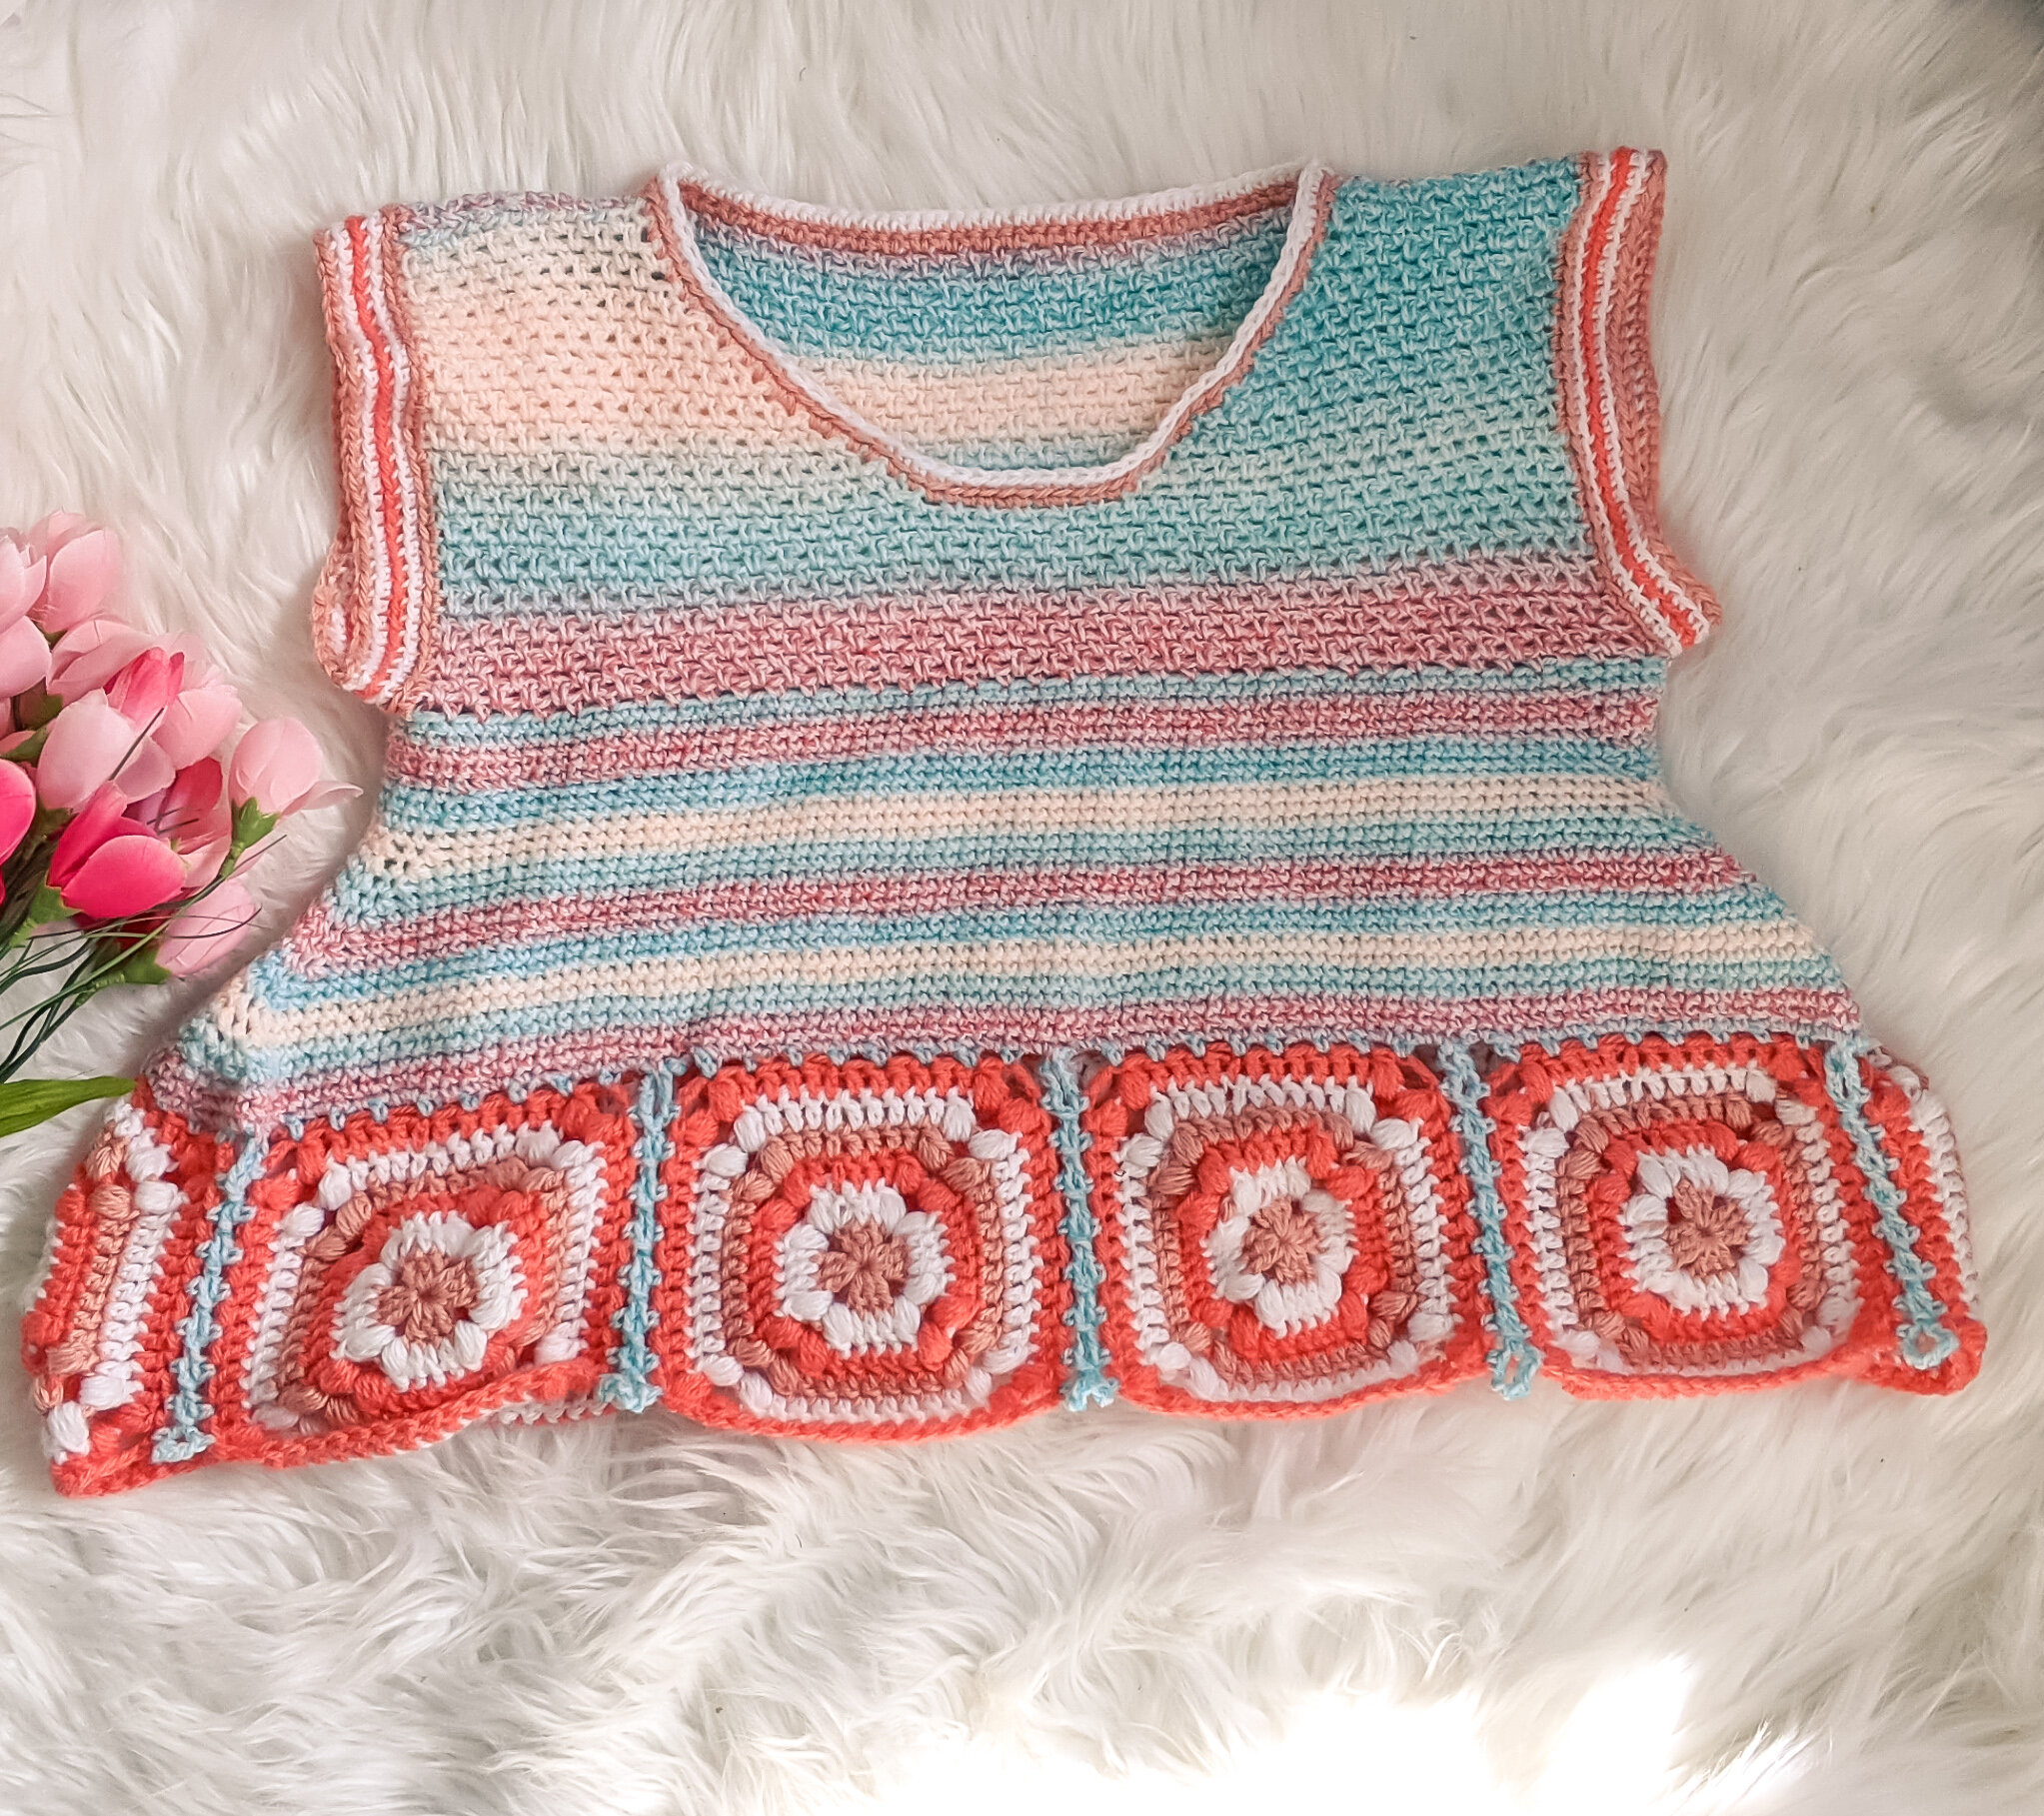
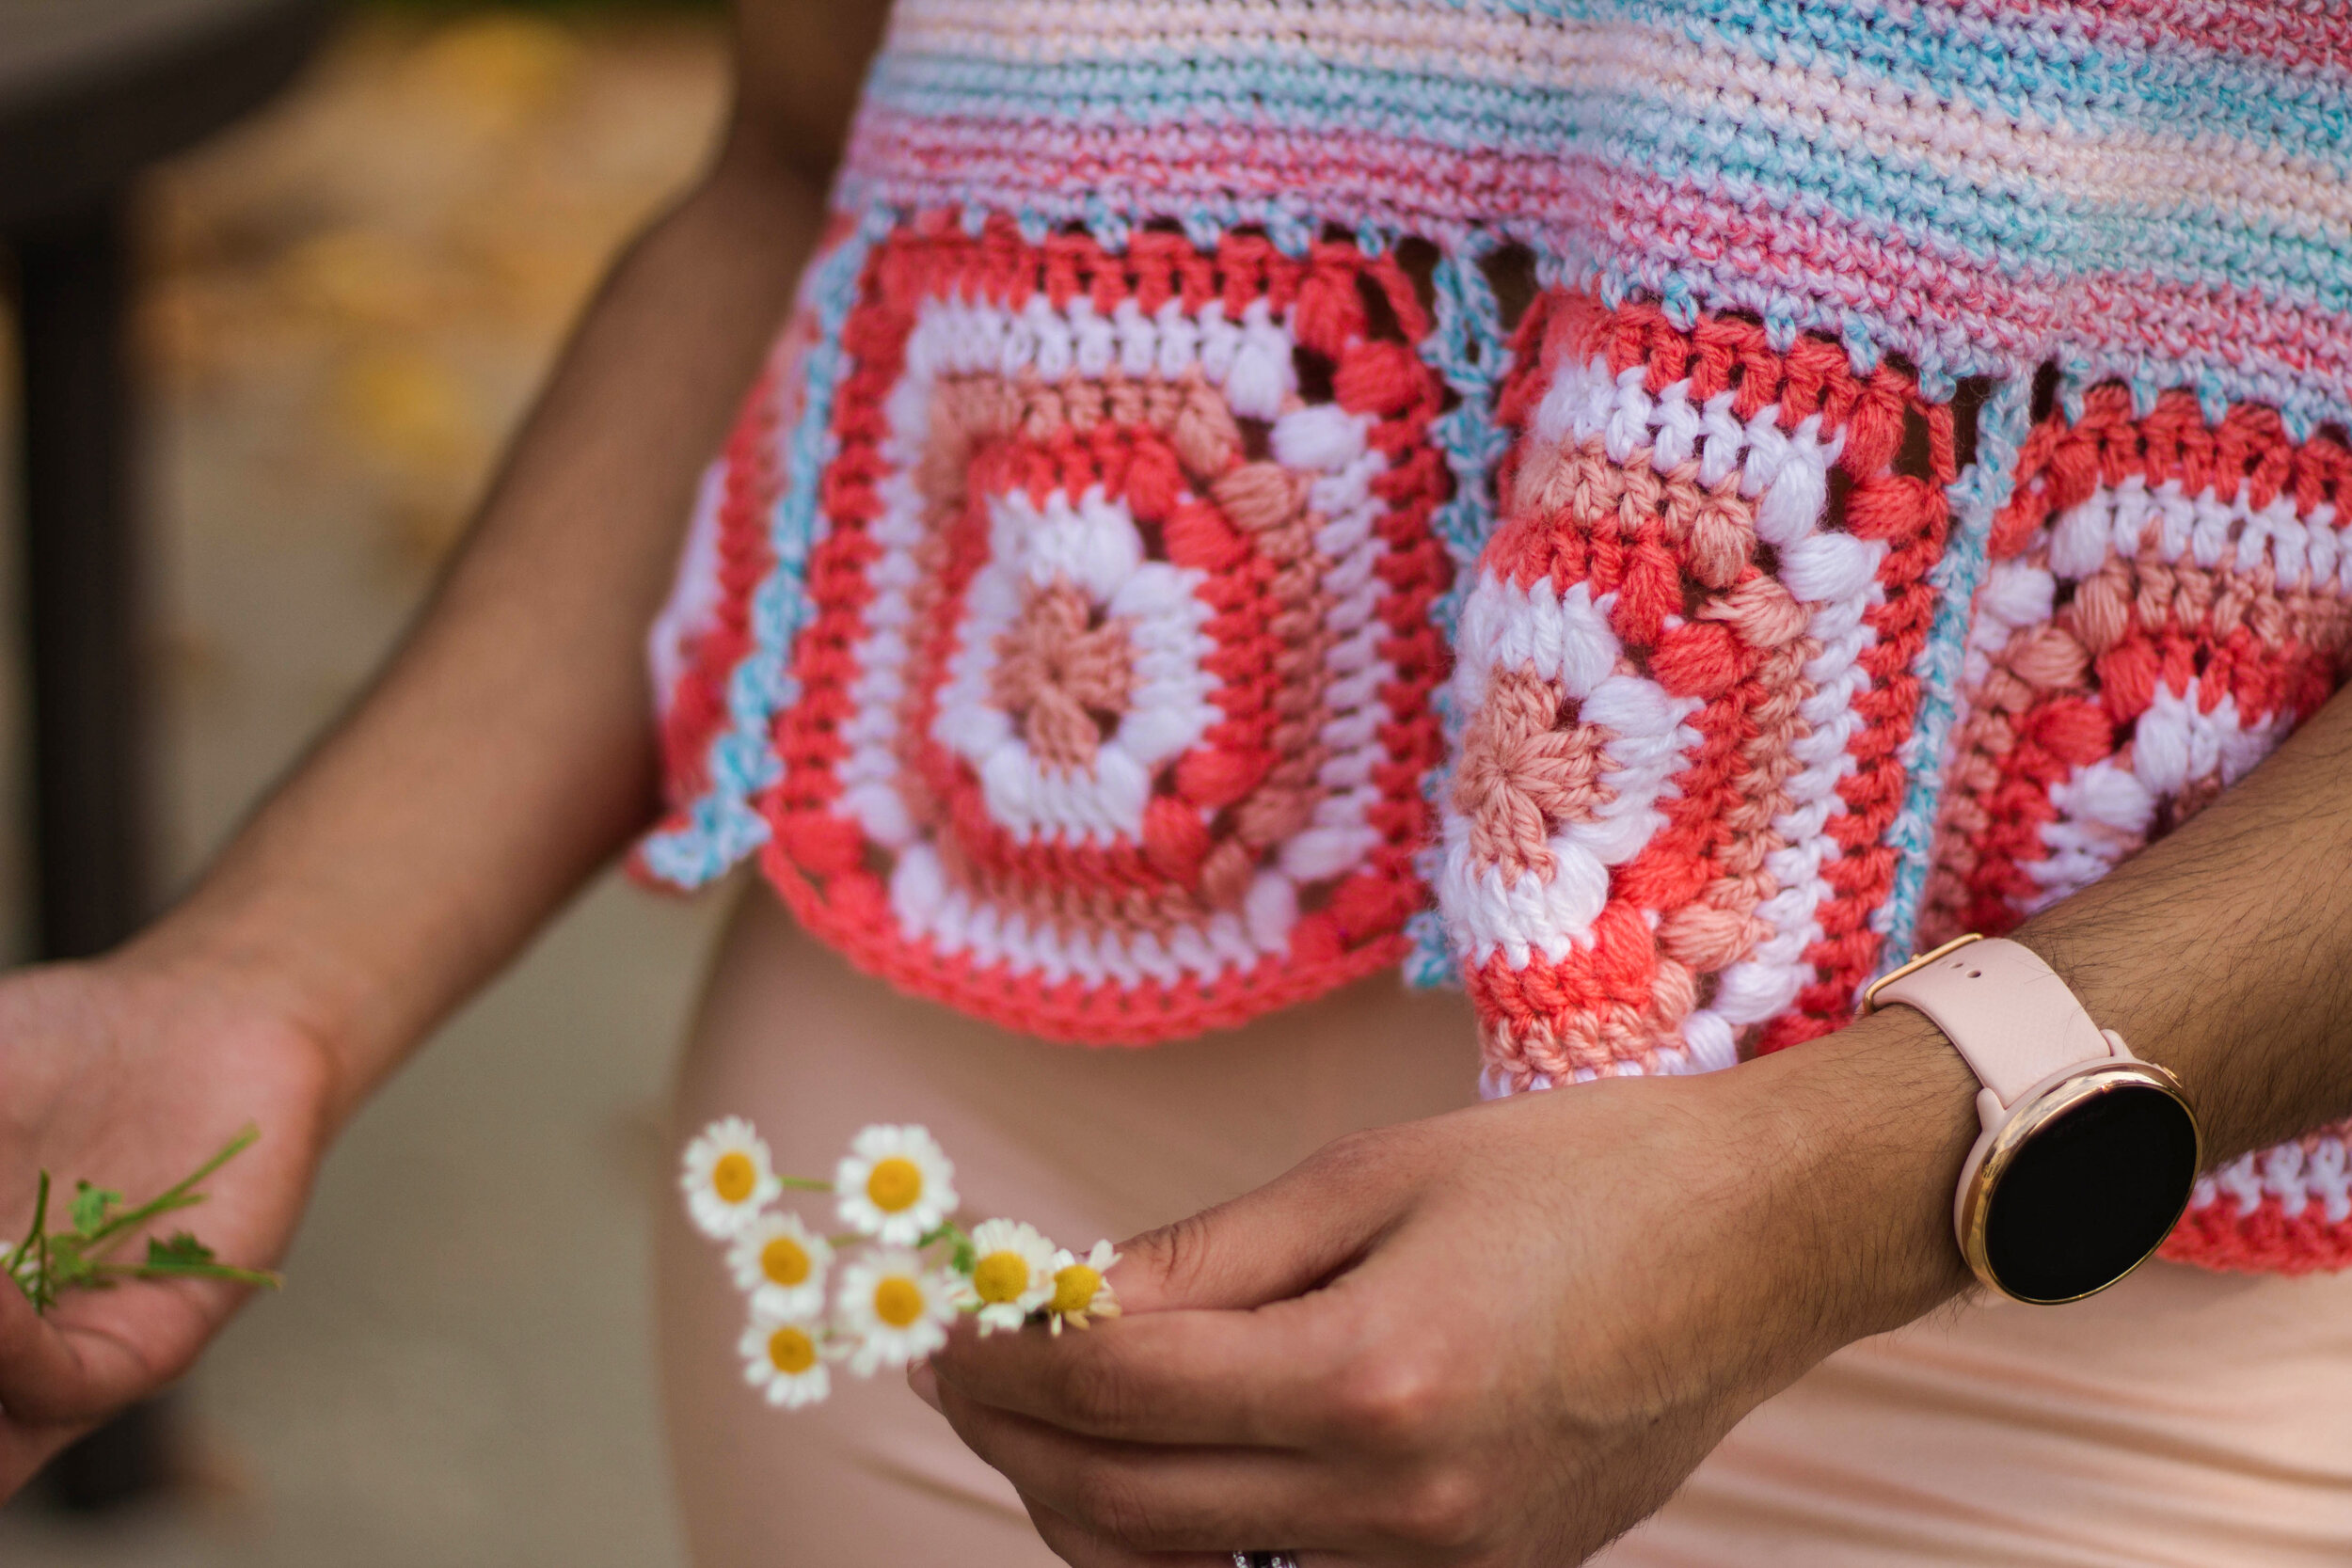
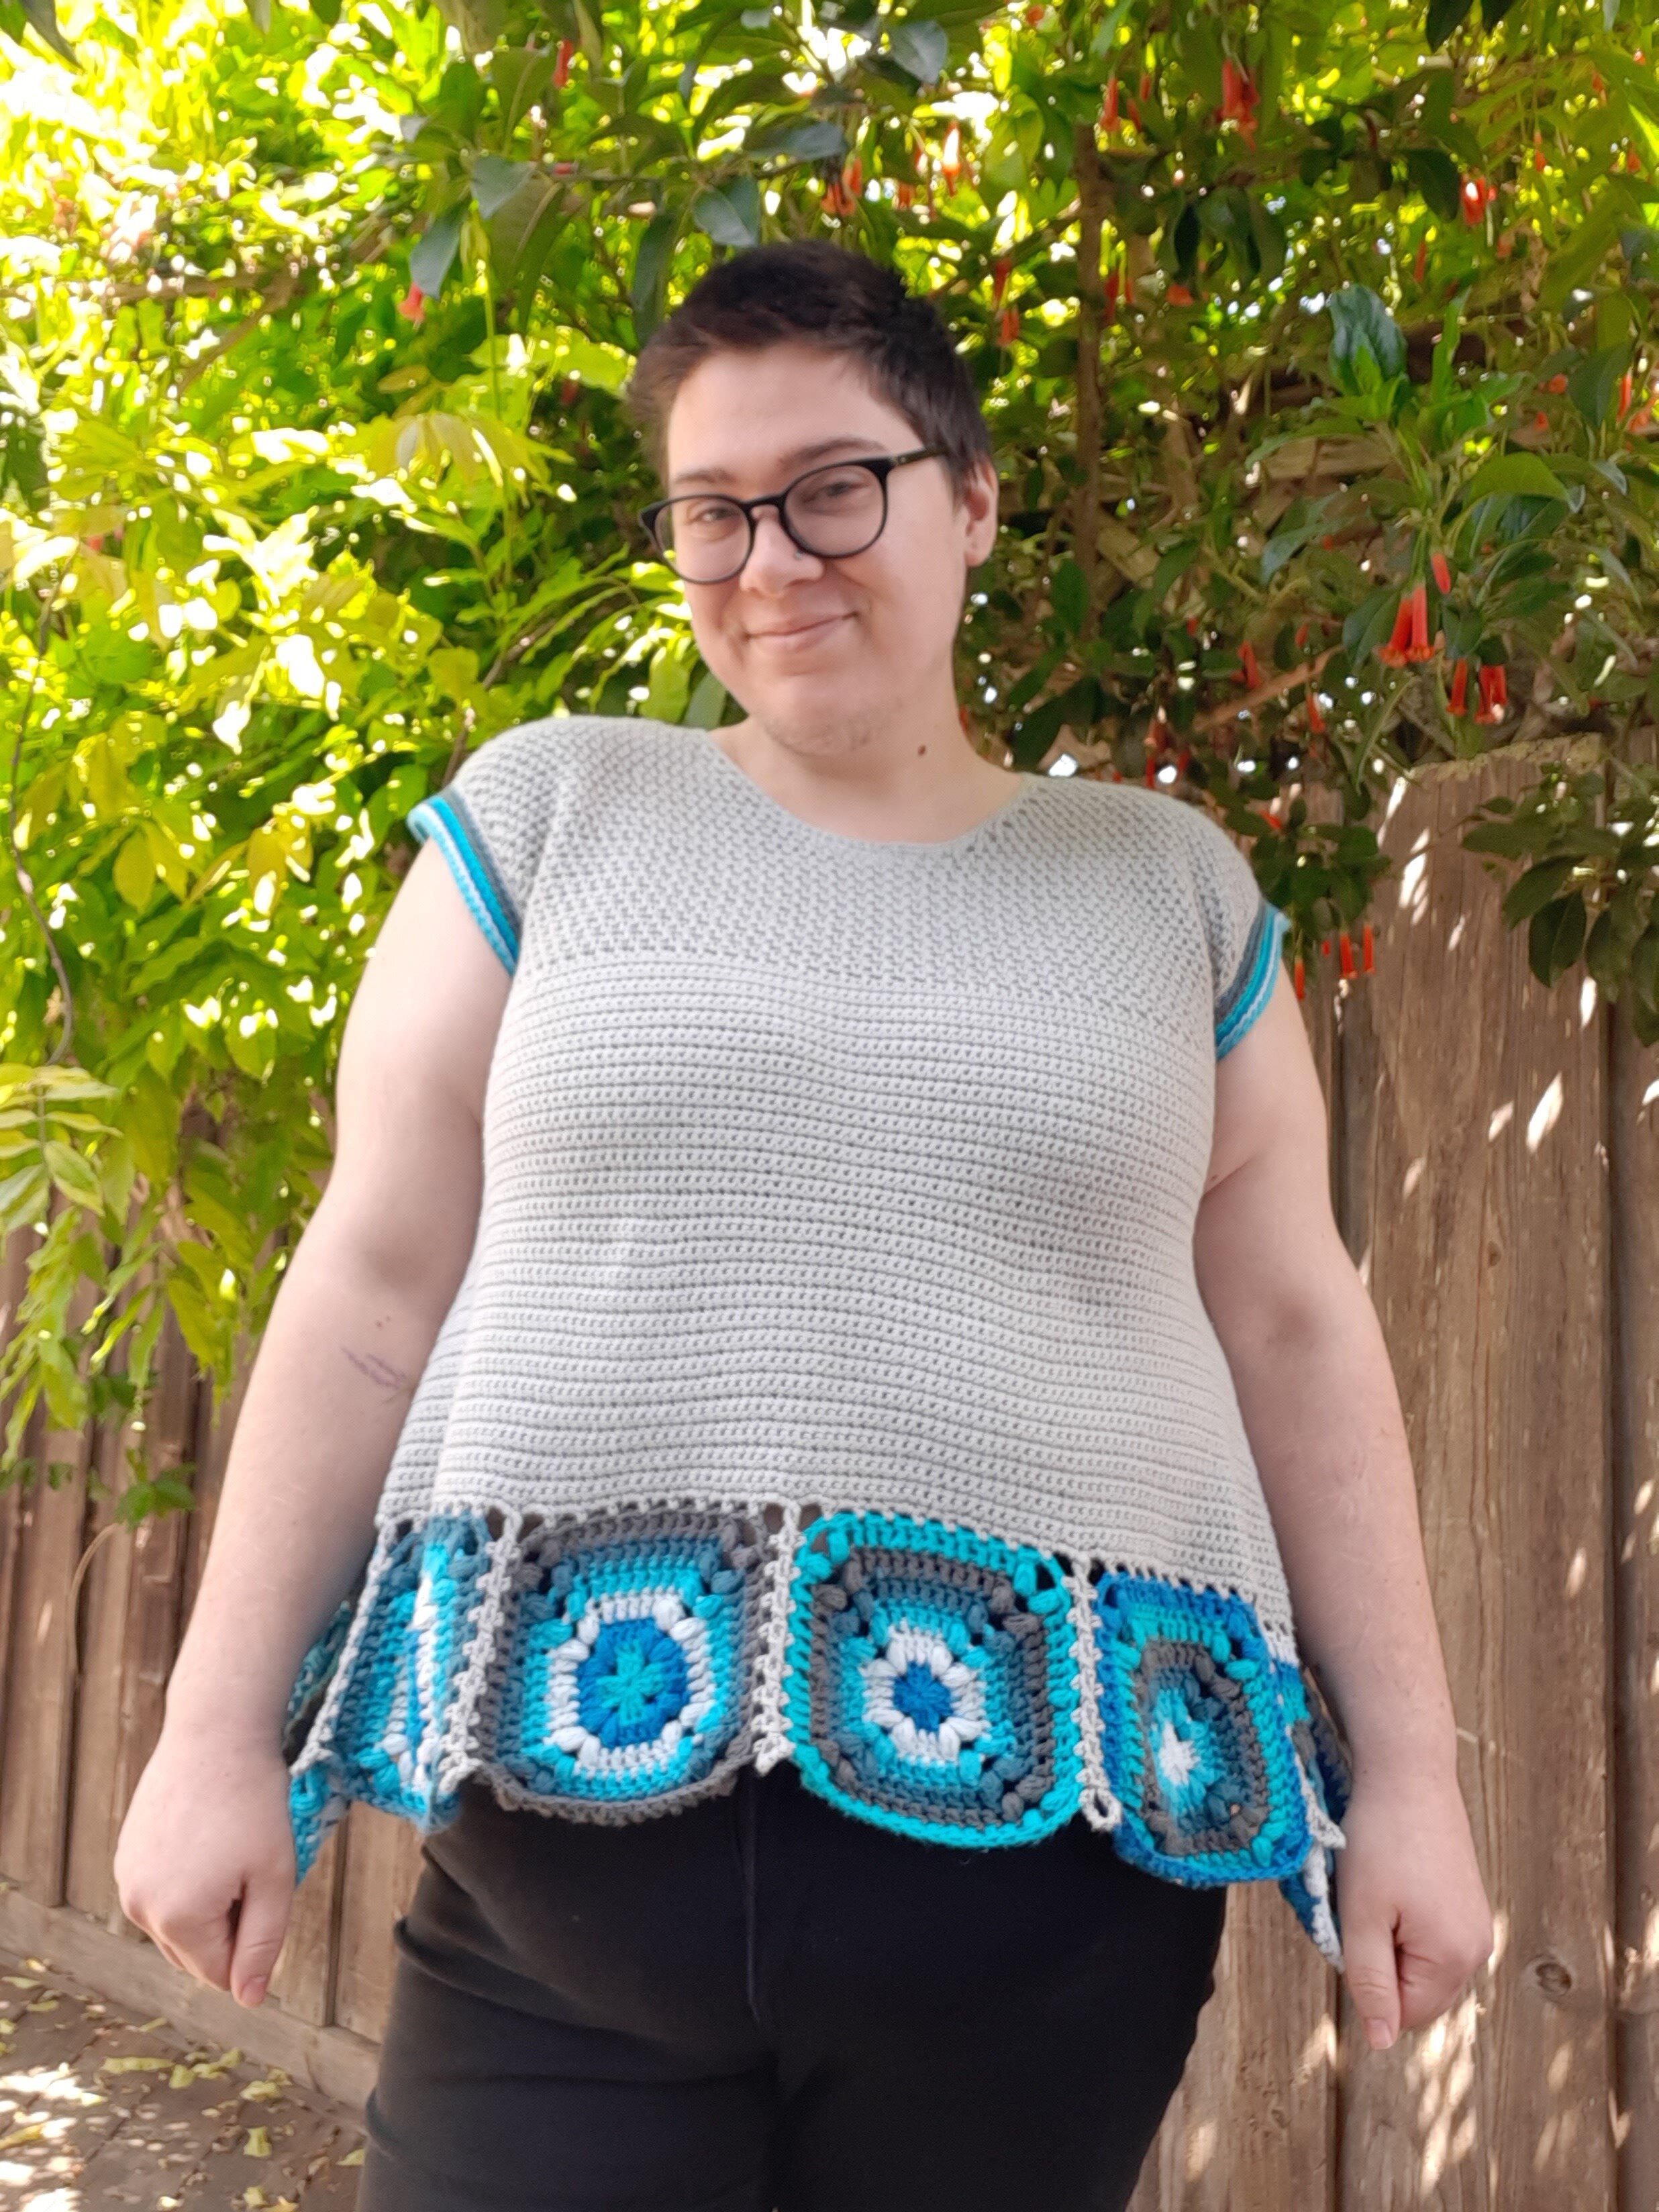
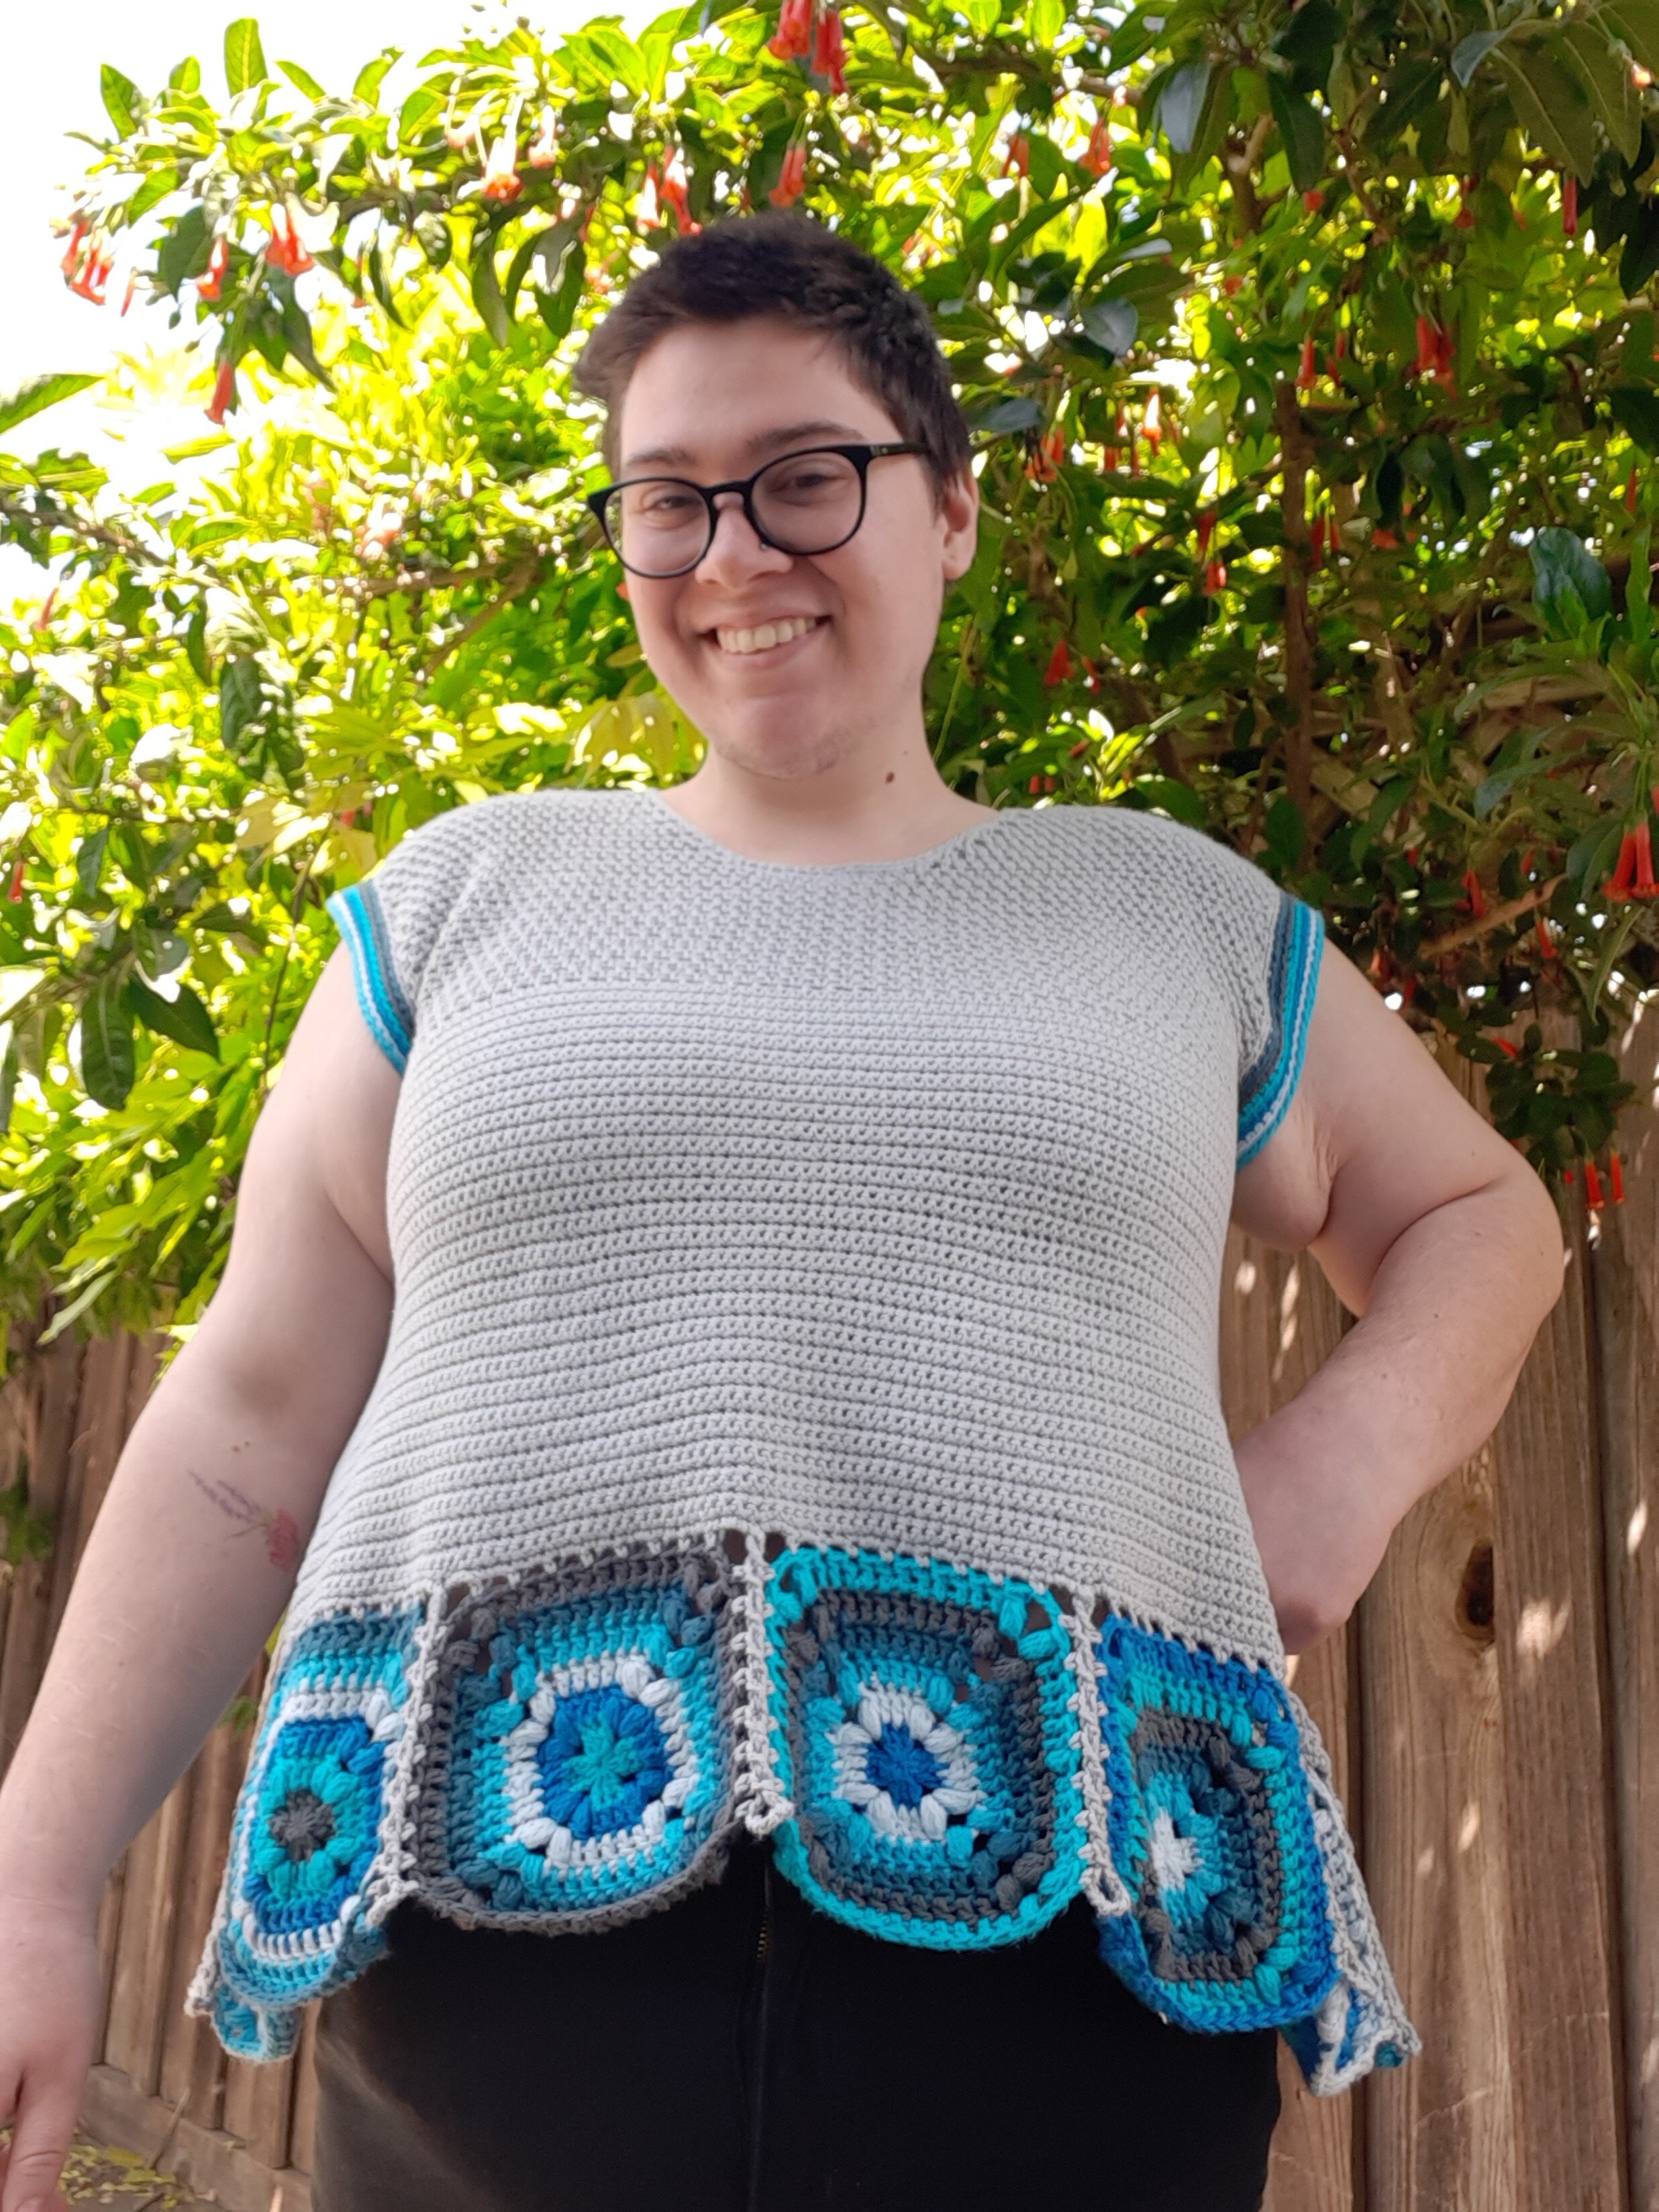
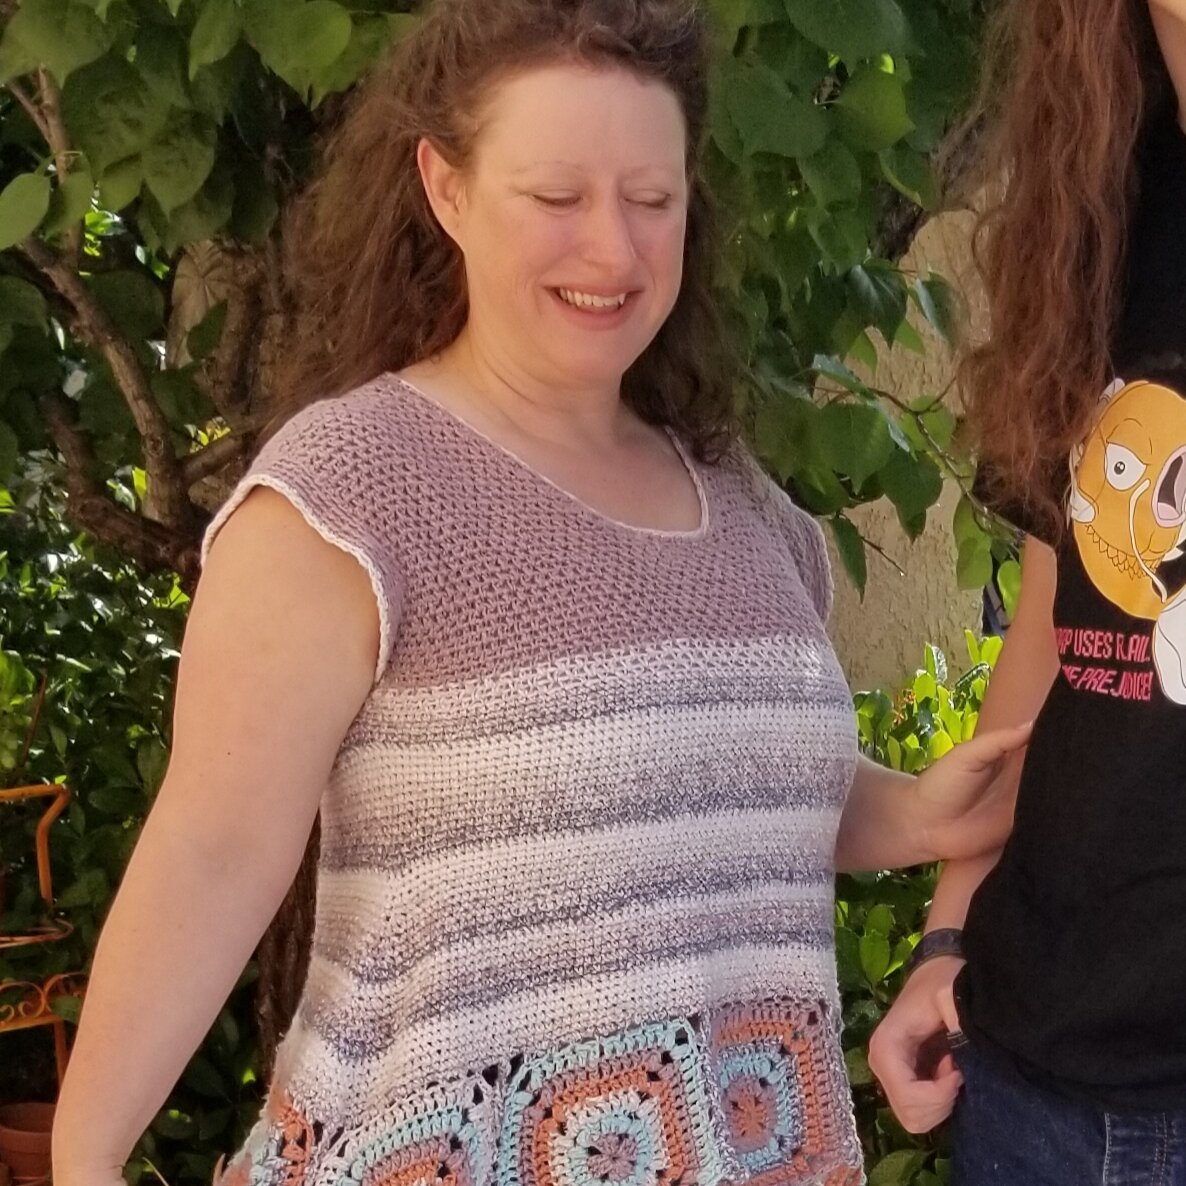
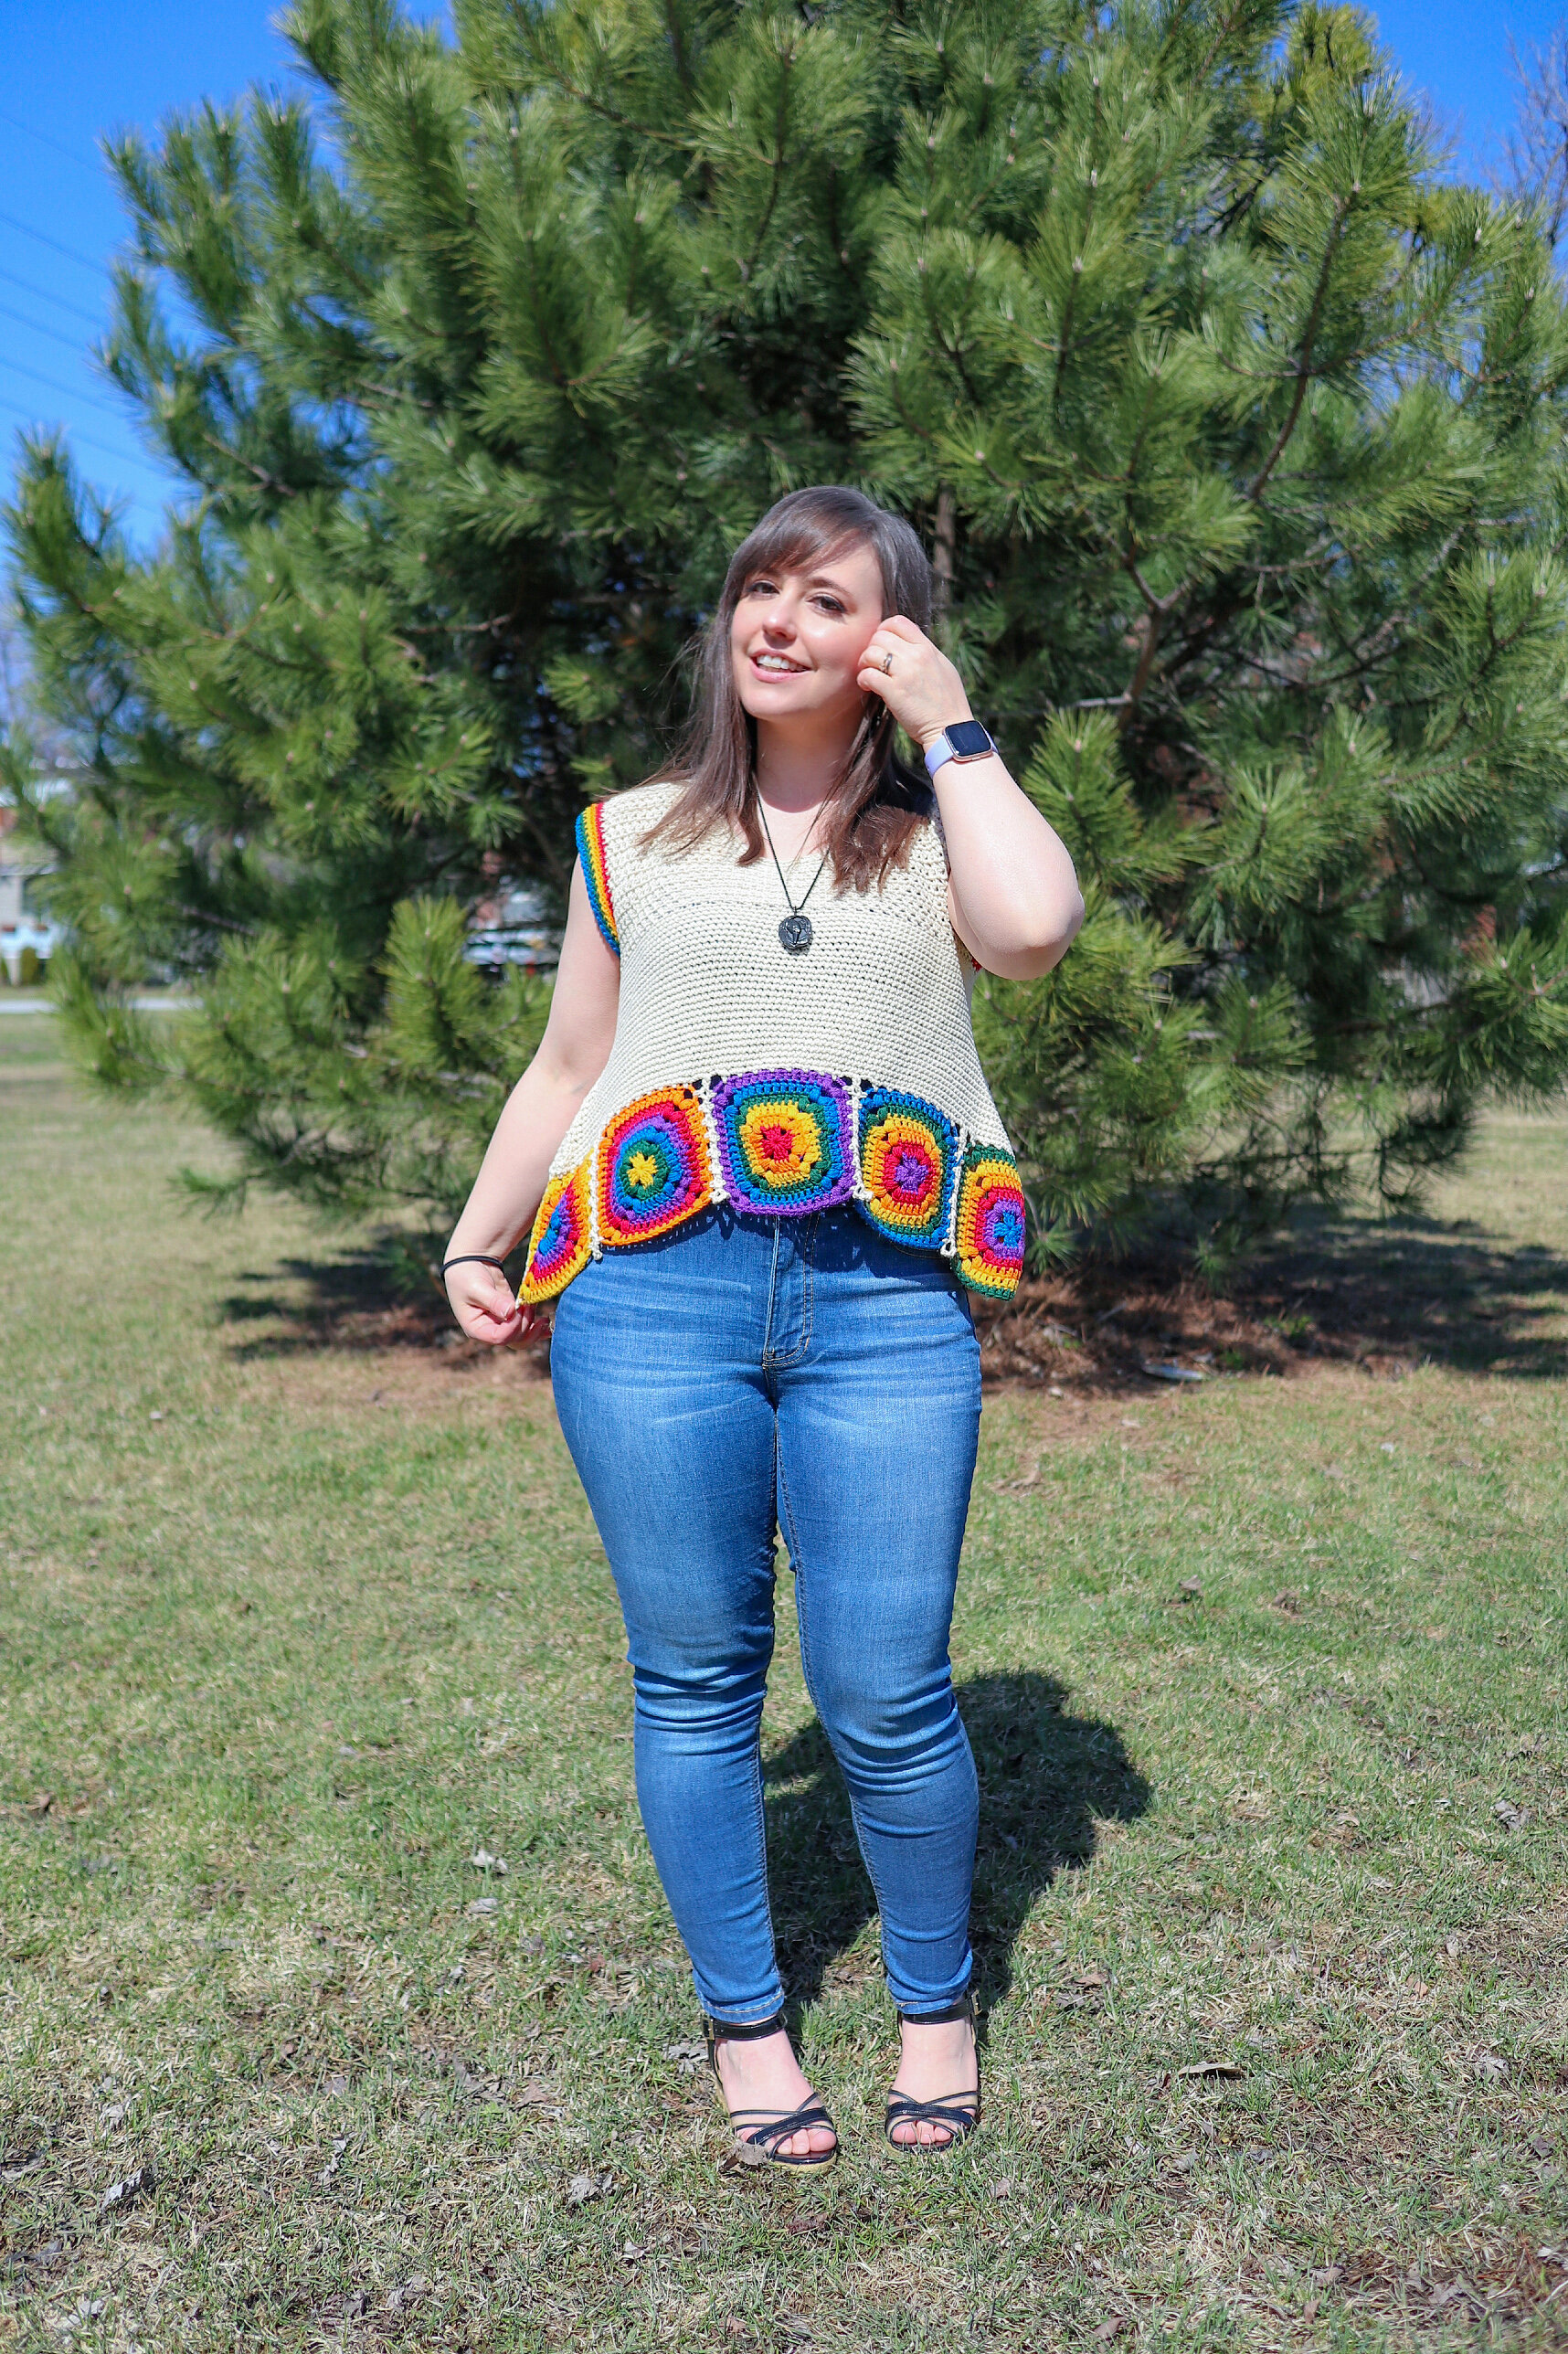
This is the SerendipiTEE! My friend Ilyssa came up with the name when I told her how the top came about as a happy accident! I was and I wasn’t trying to design a top like this. But, though this isn’t exactly what I was going for, the SerendipiTEE is exactly what I needed!
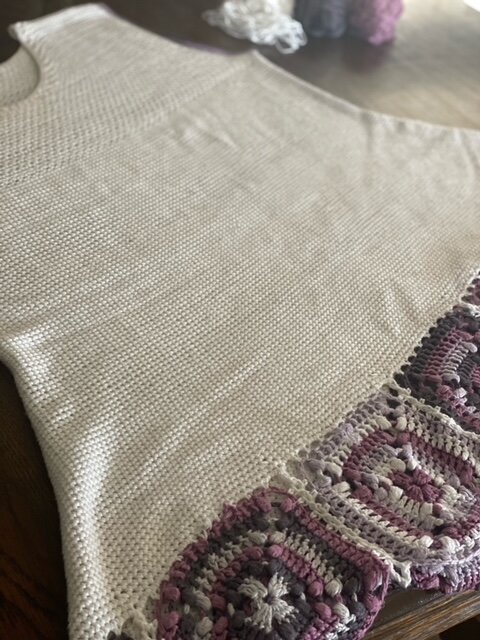
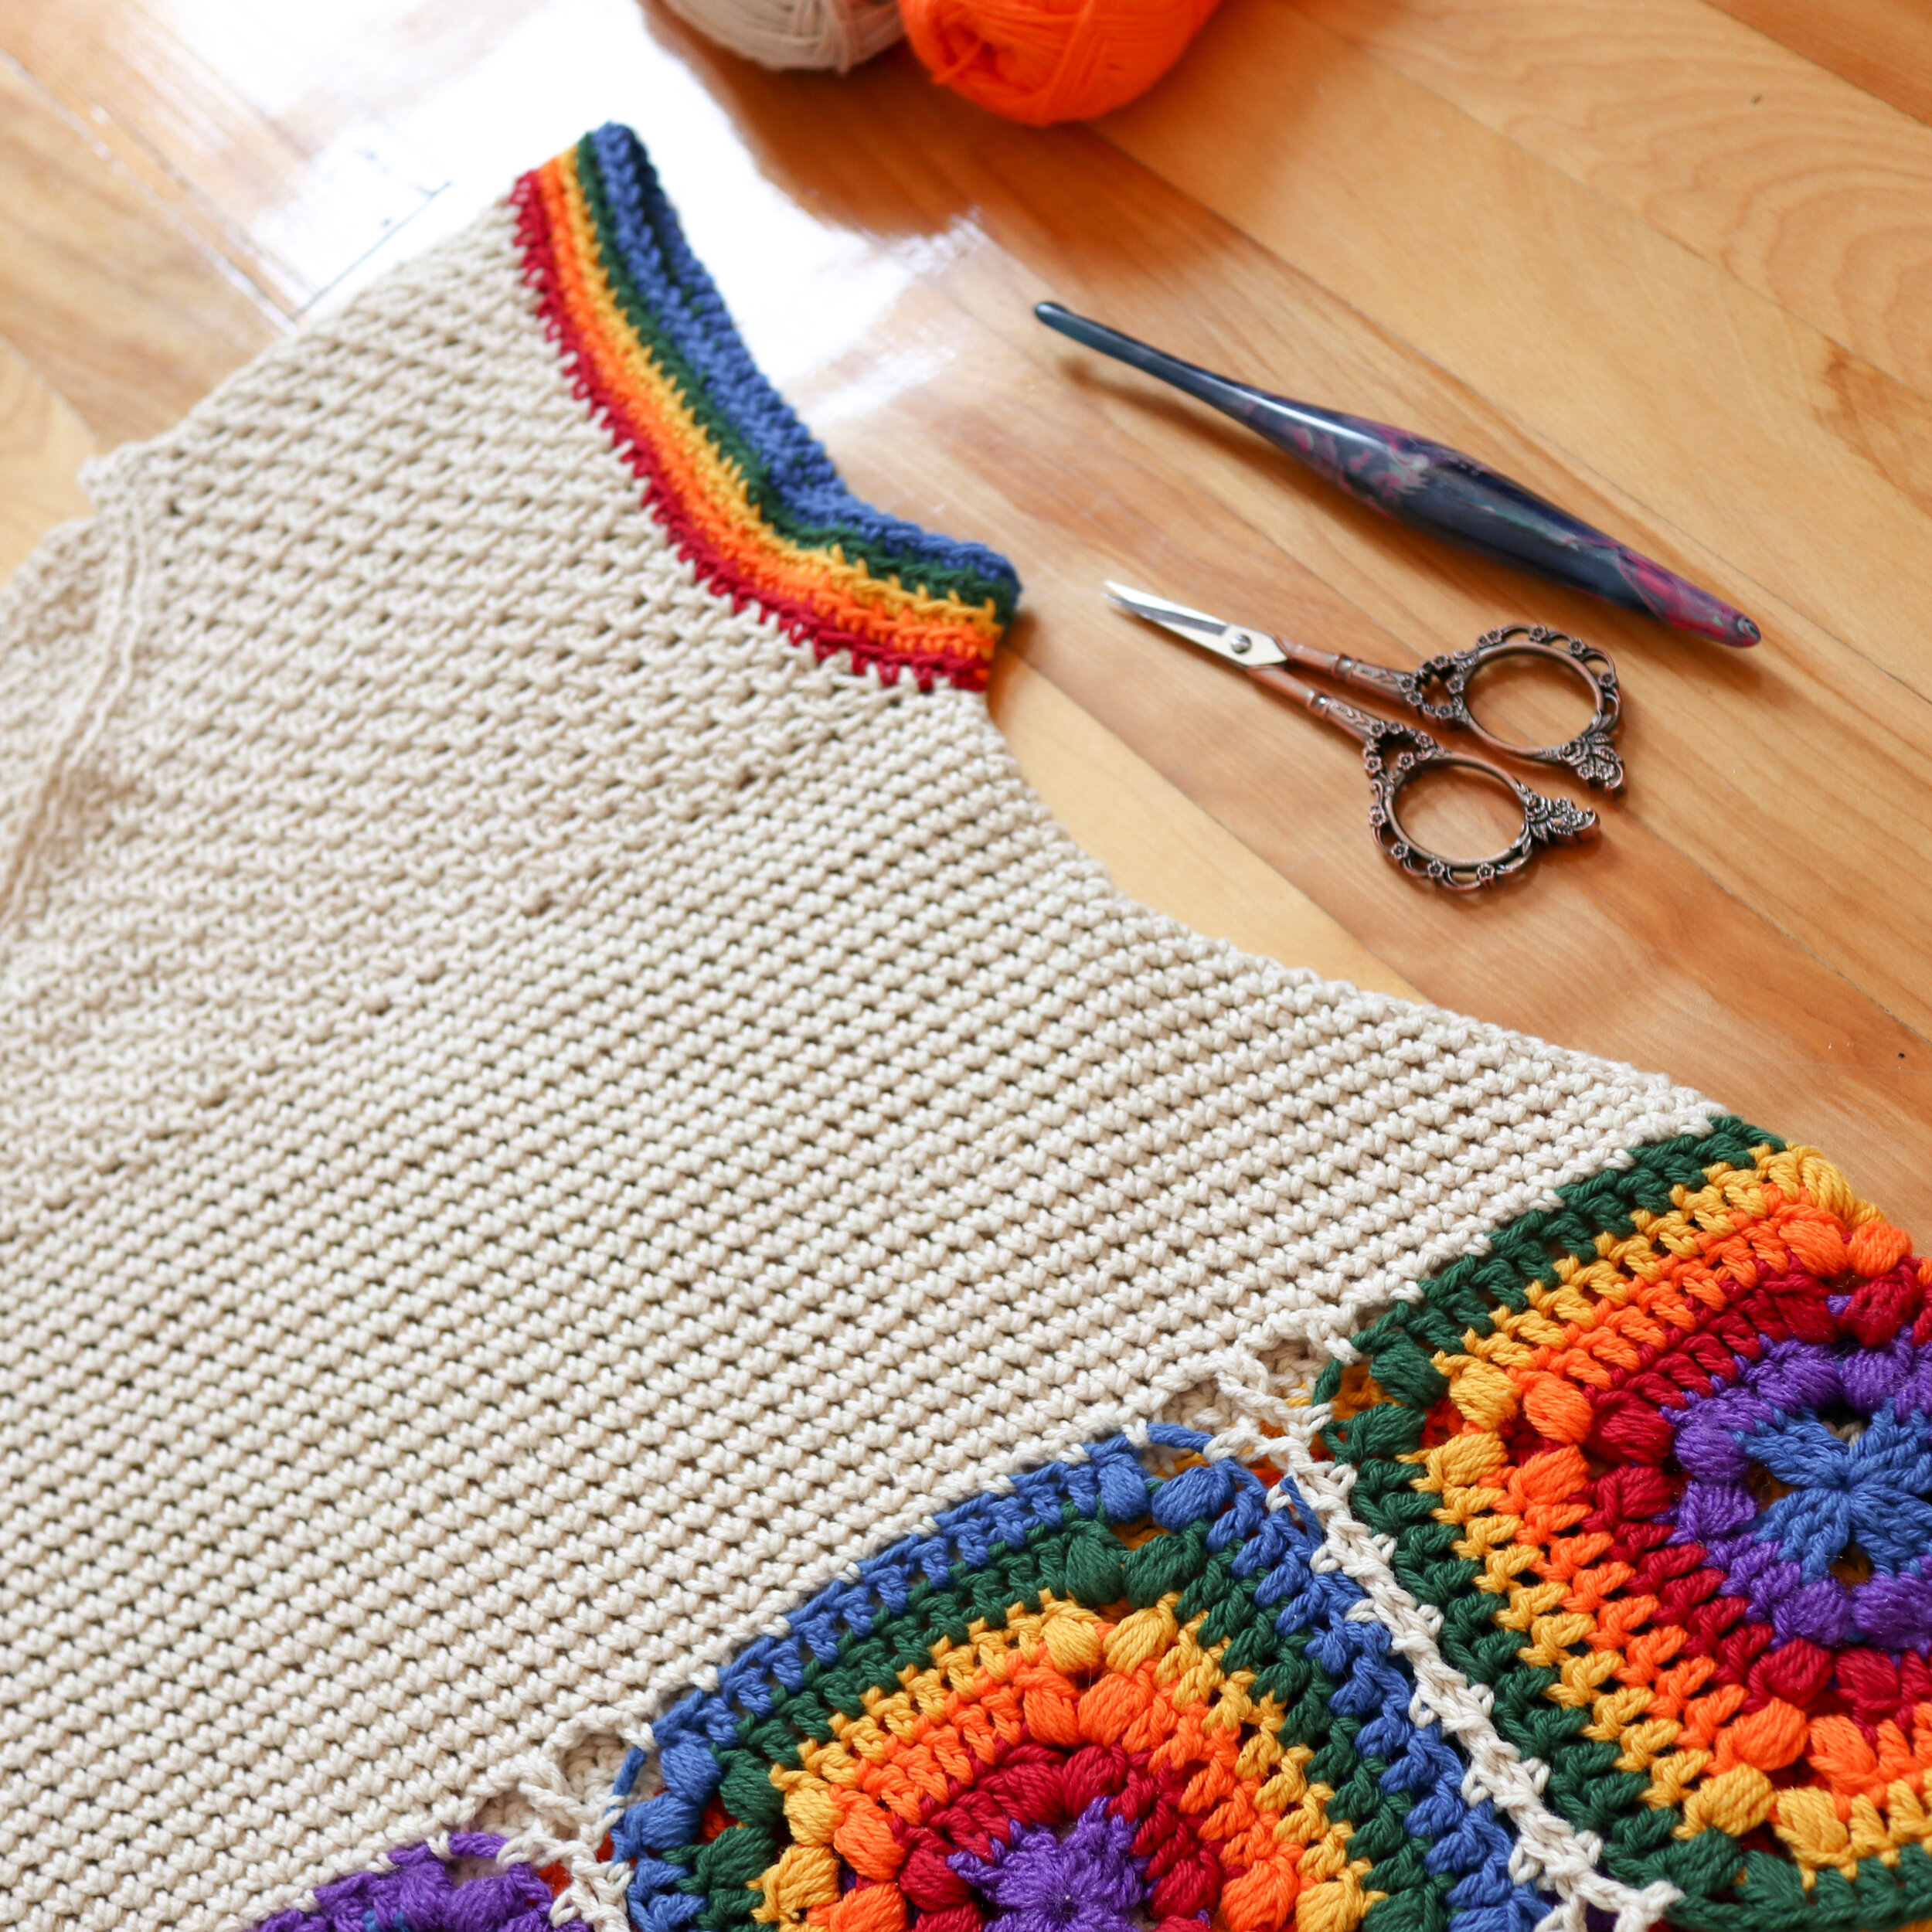
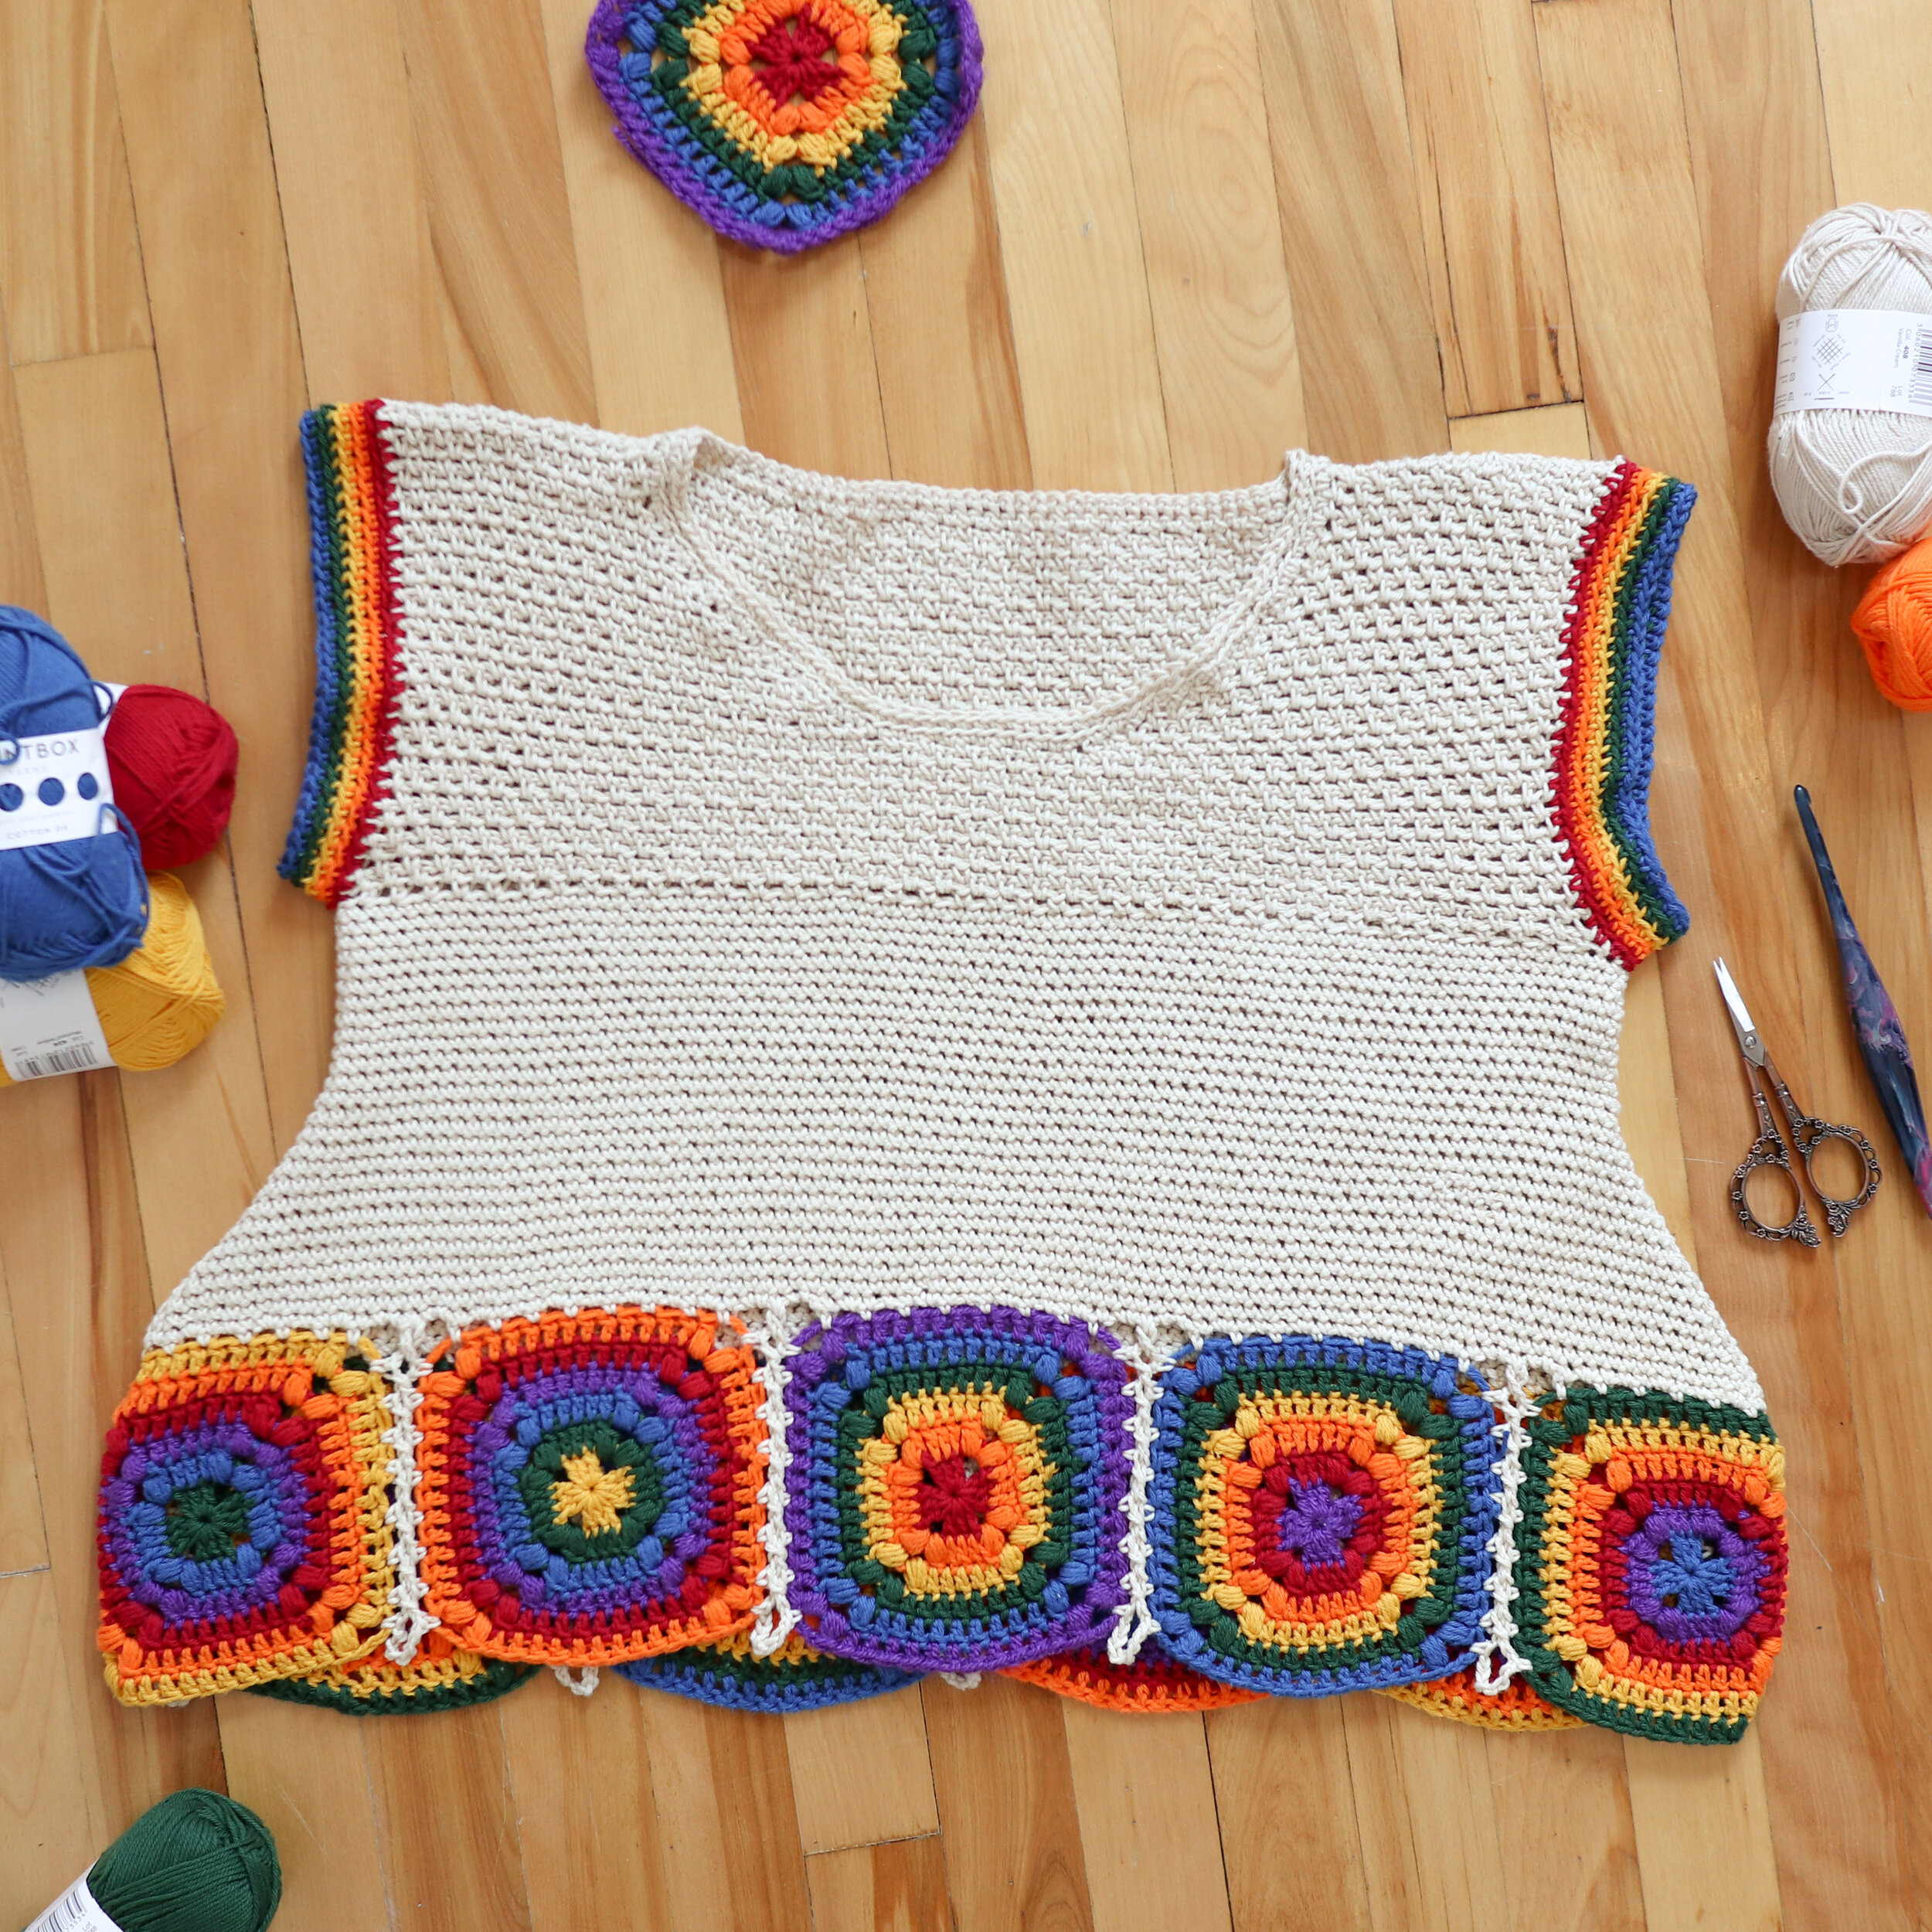
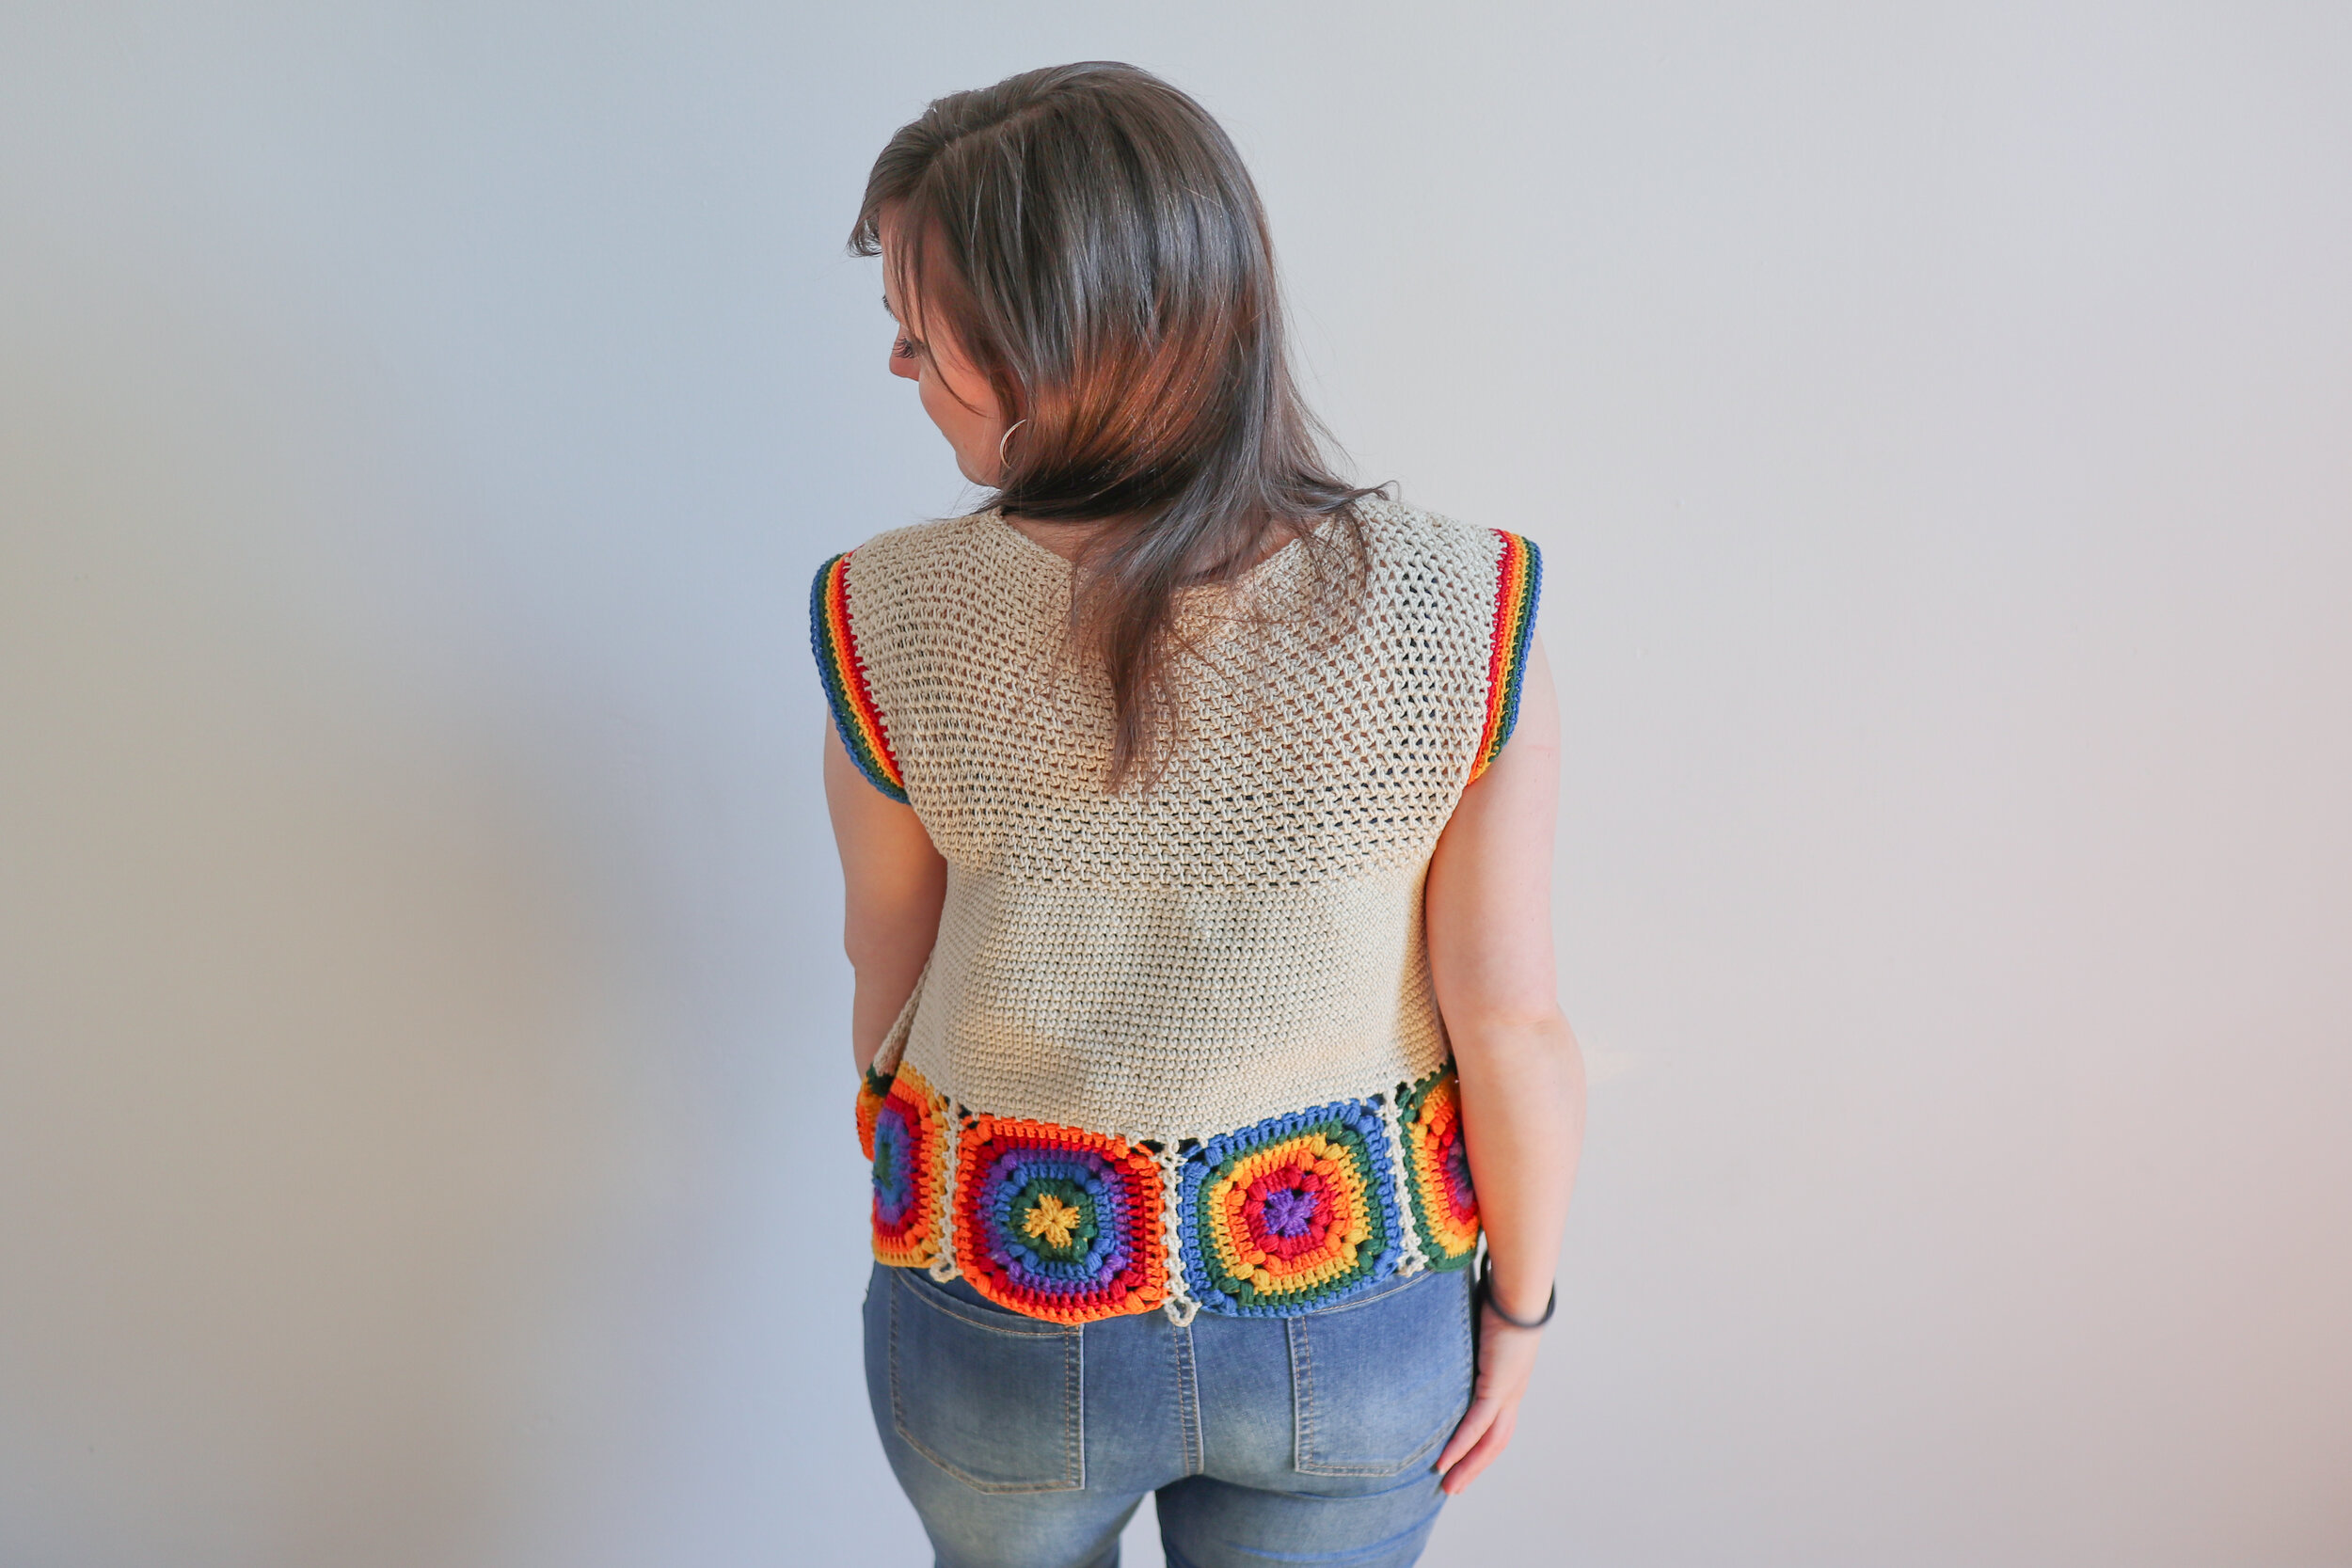
This top is created with a cute granny square border along the bottom, then tappers up towards the bust with an A-line shape. This construction means that the top comes to about the top of a highwaisted pair of jeans, while the sides drape down beautifully!
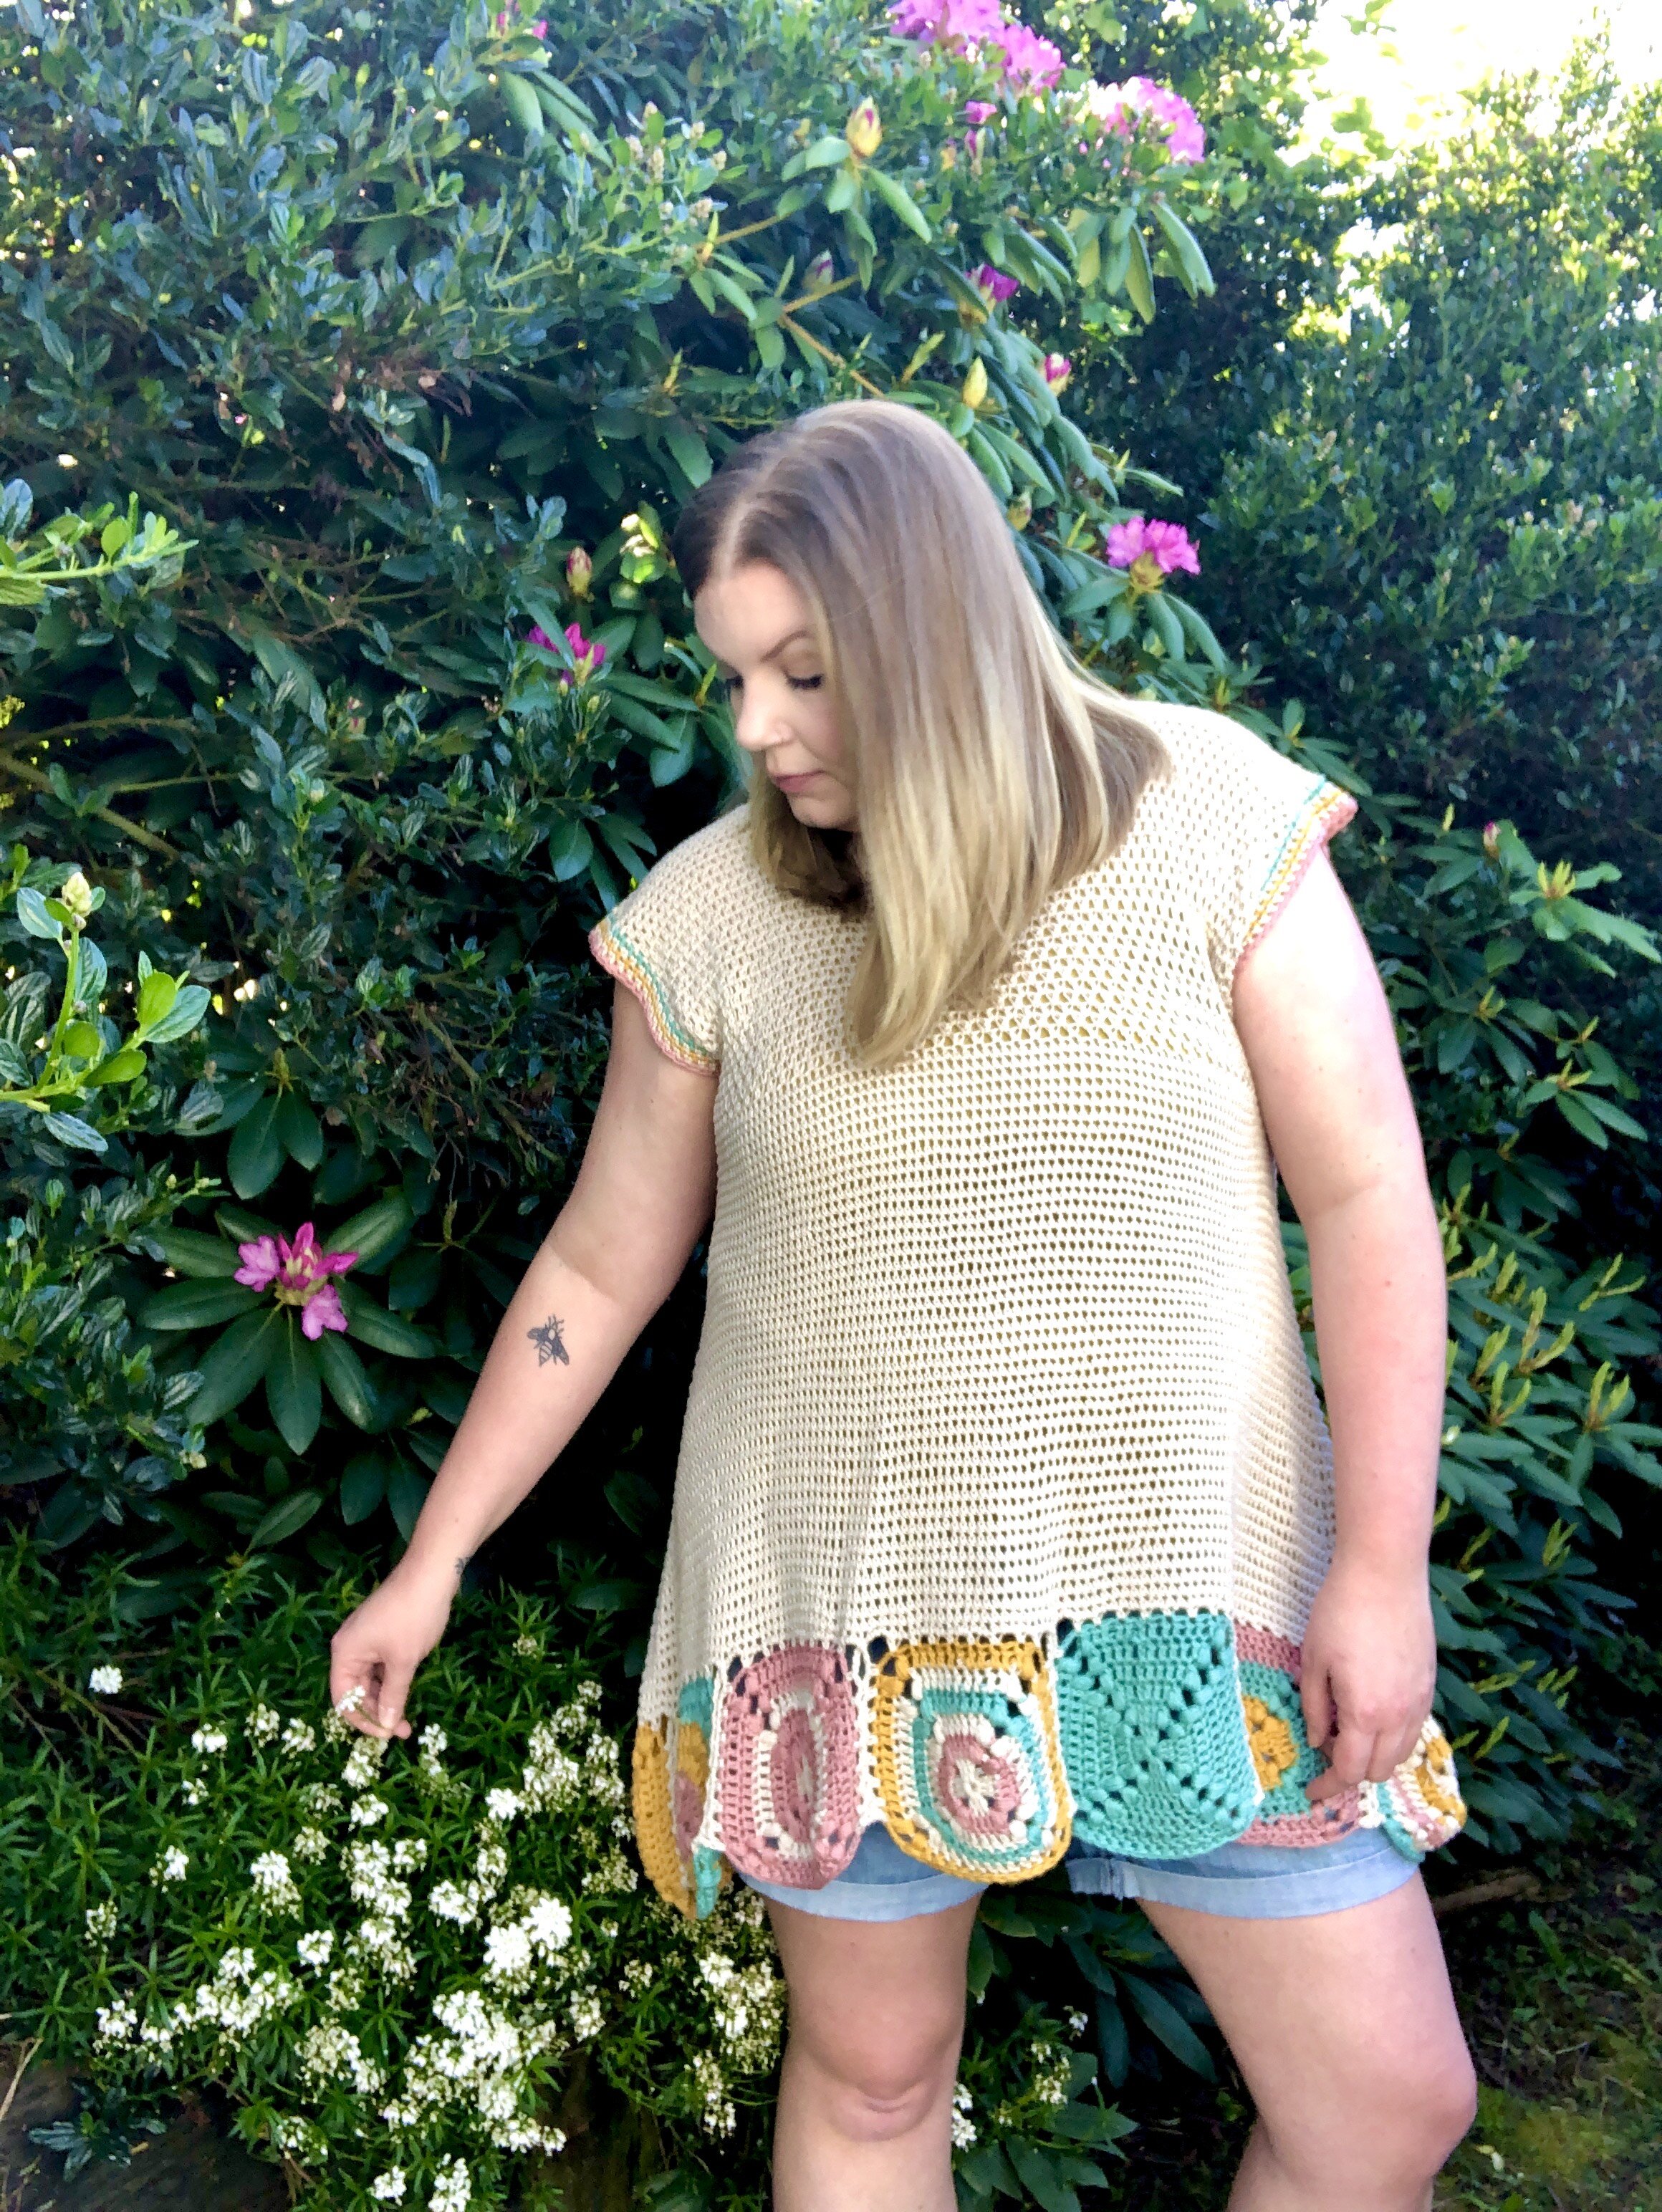
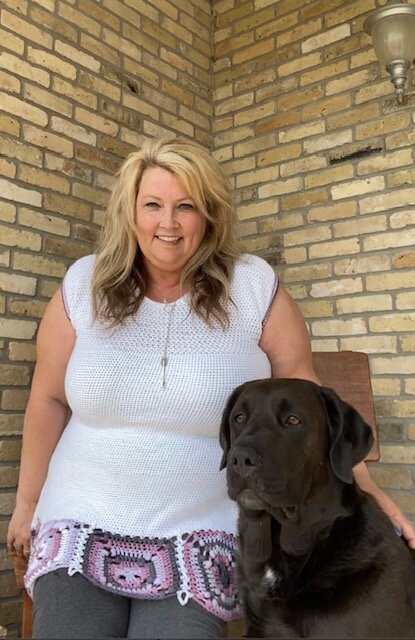
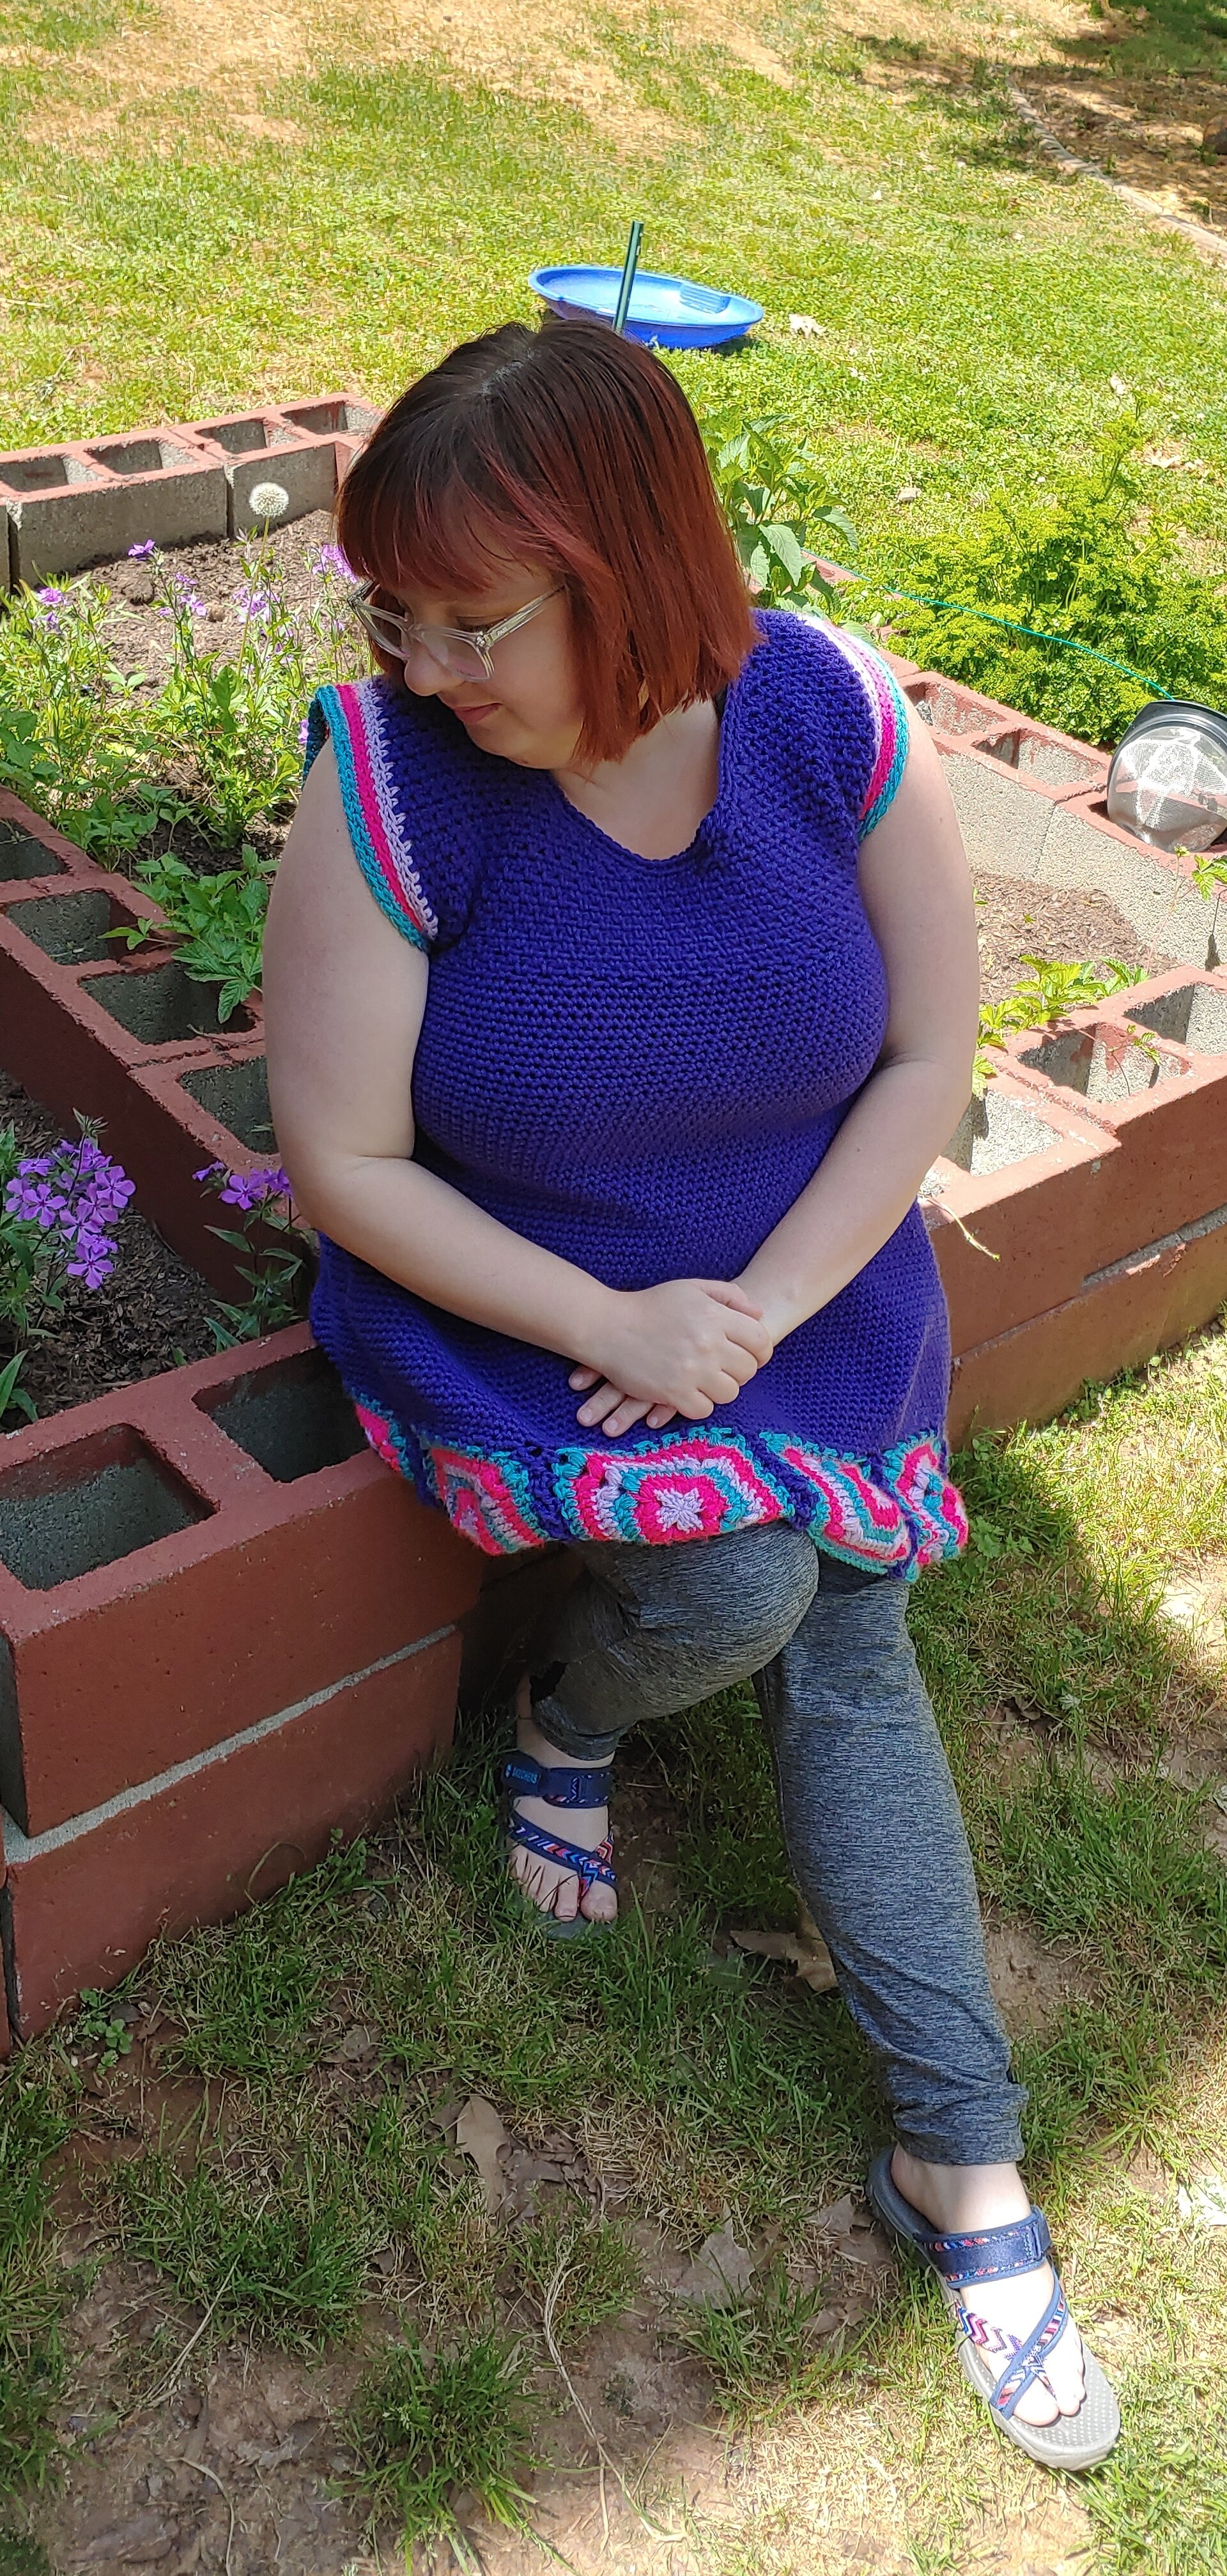
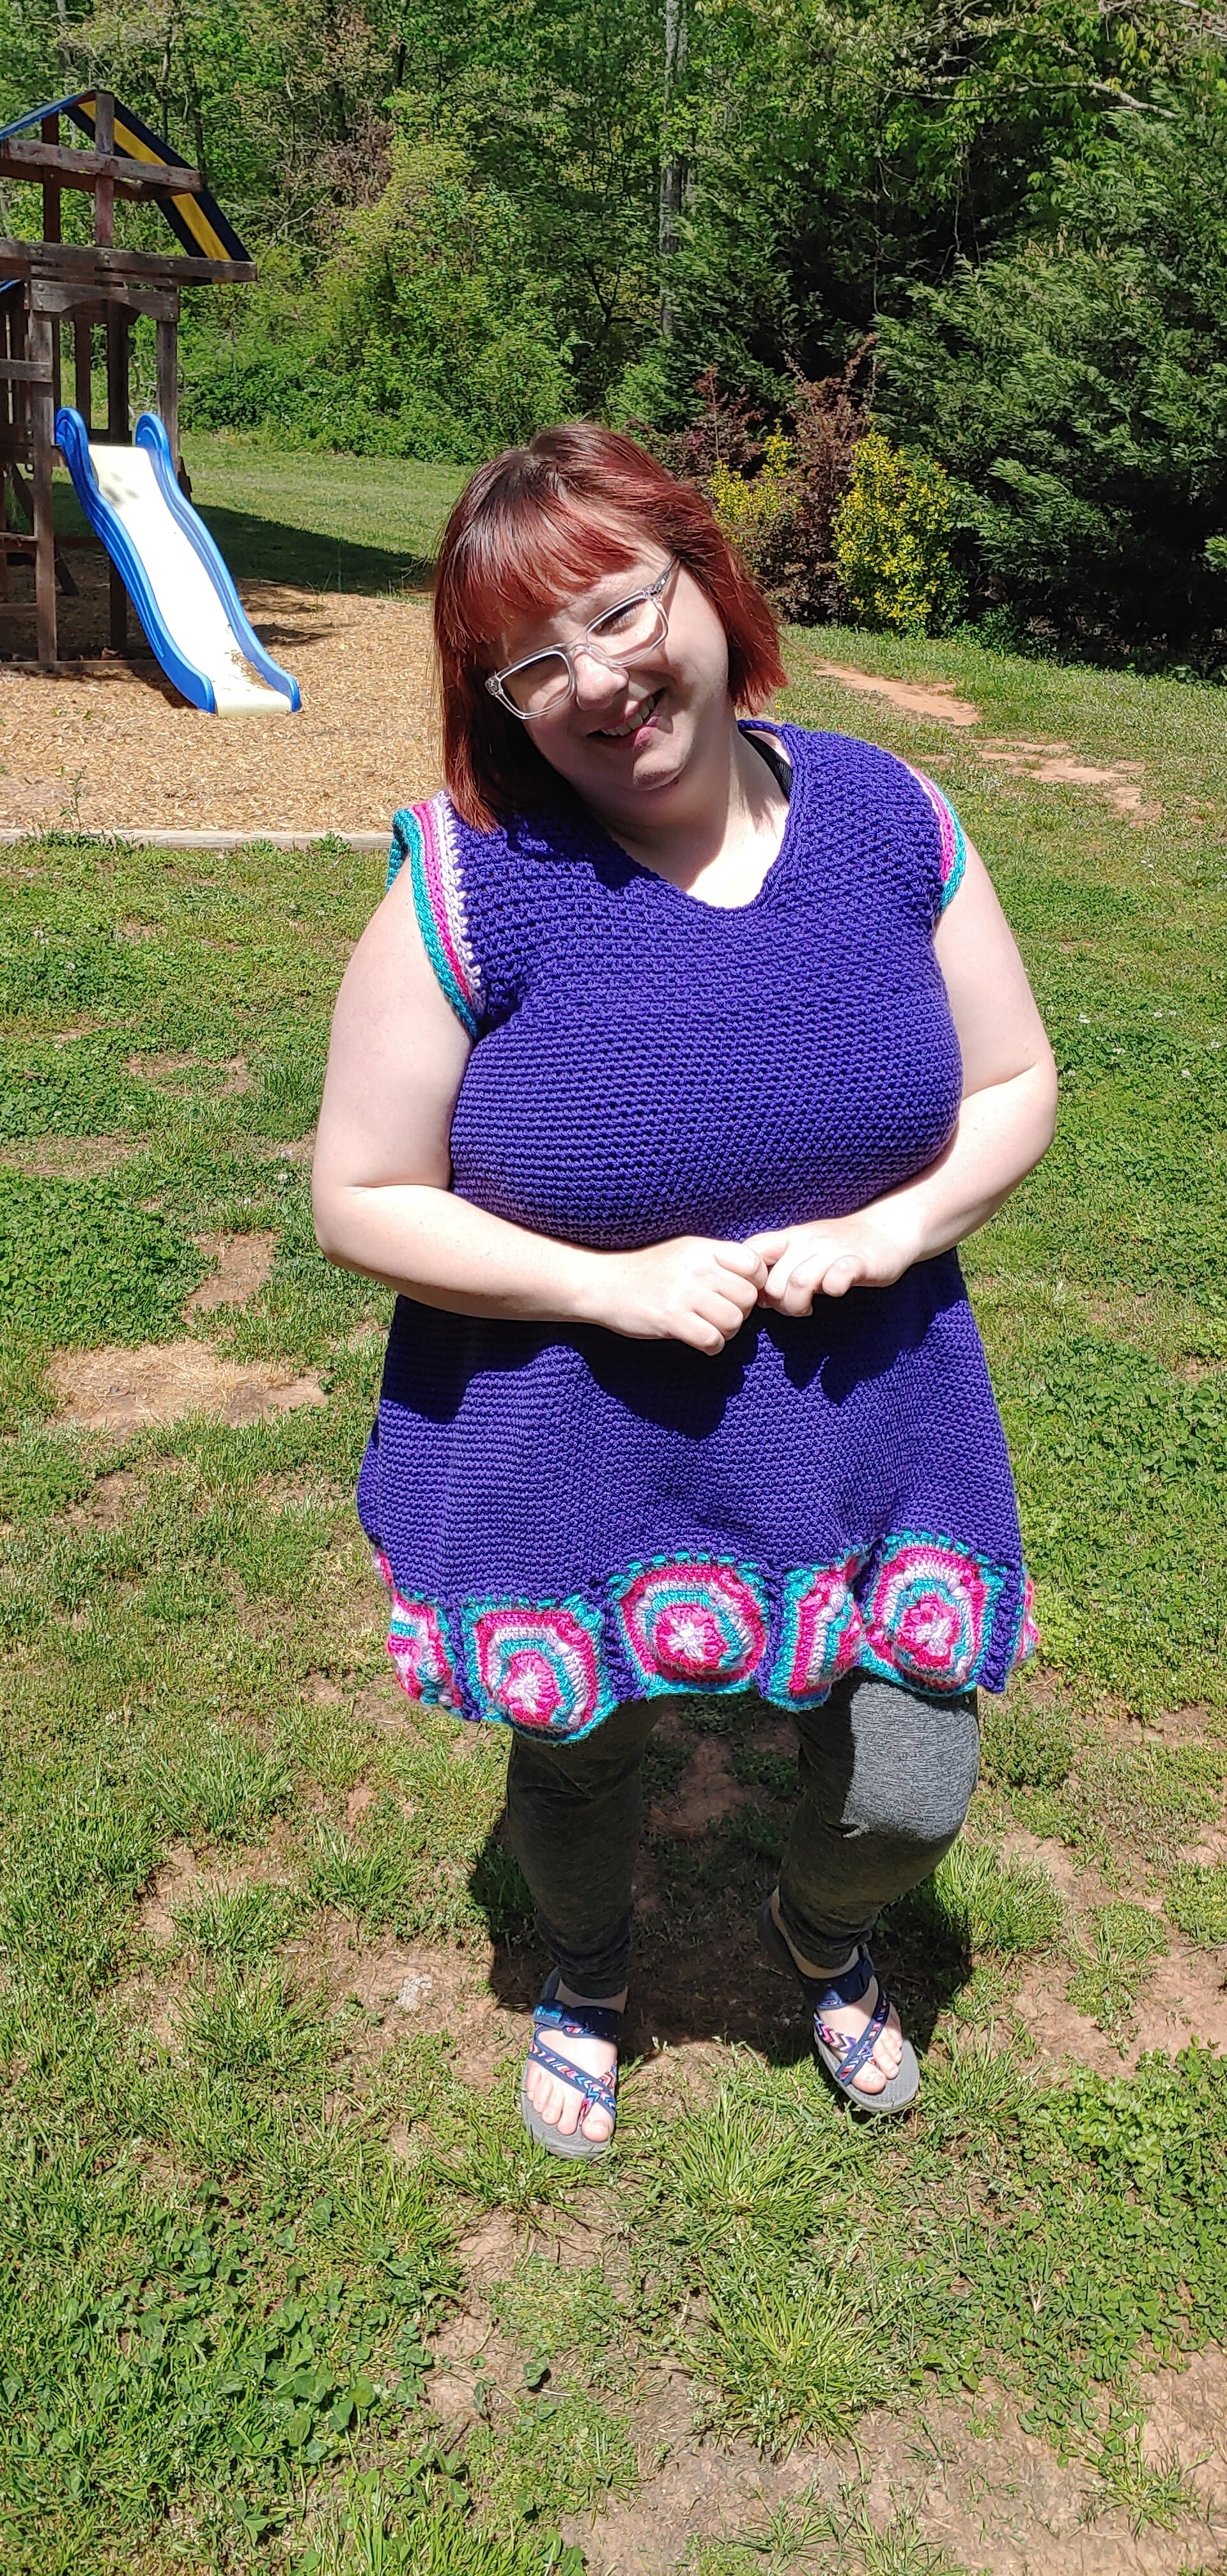
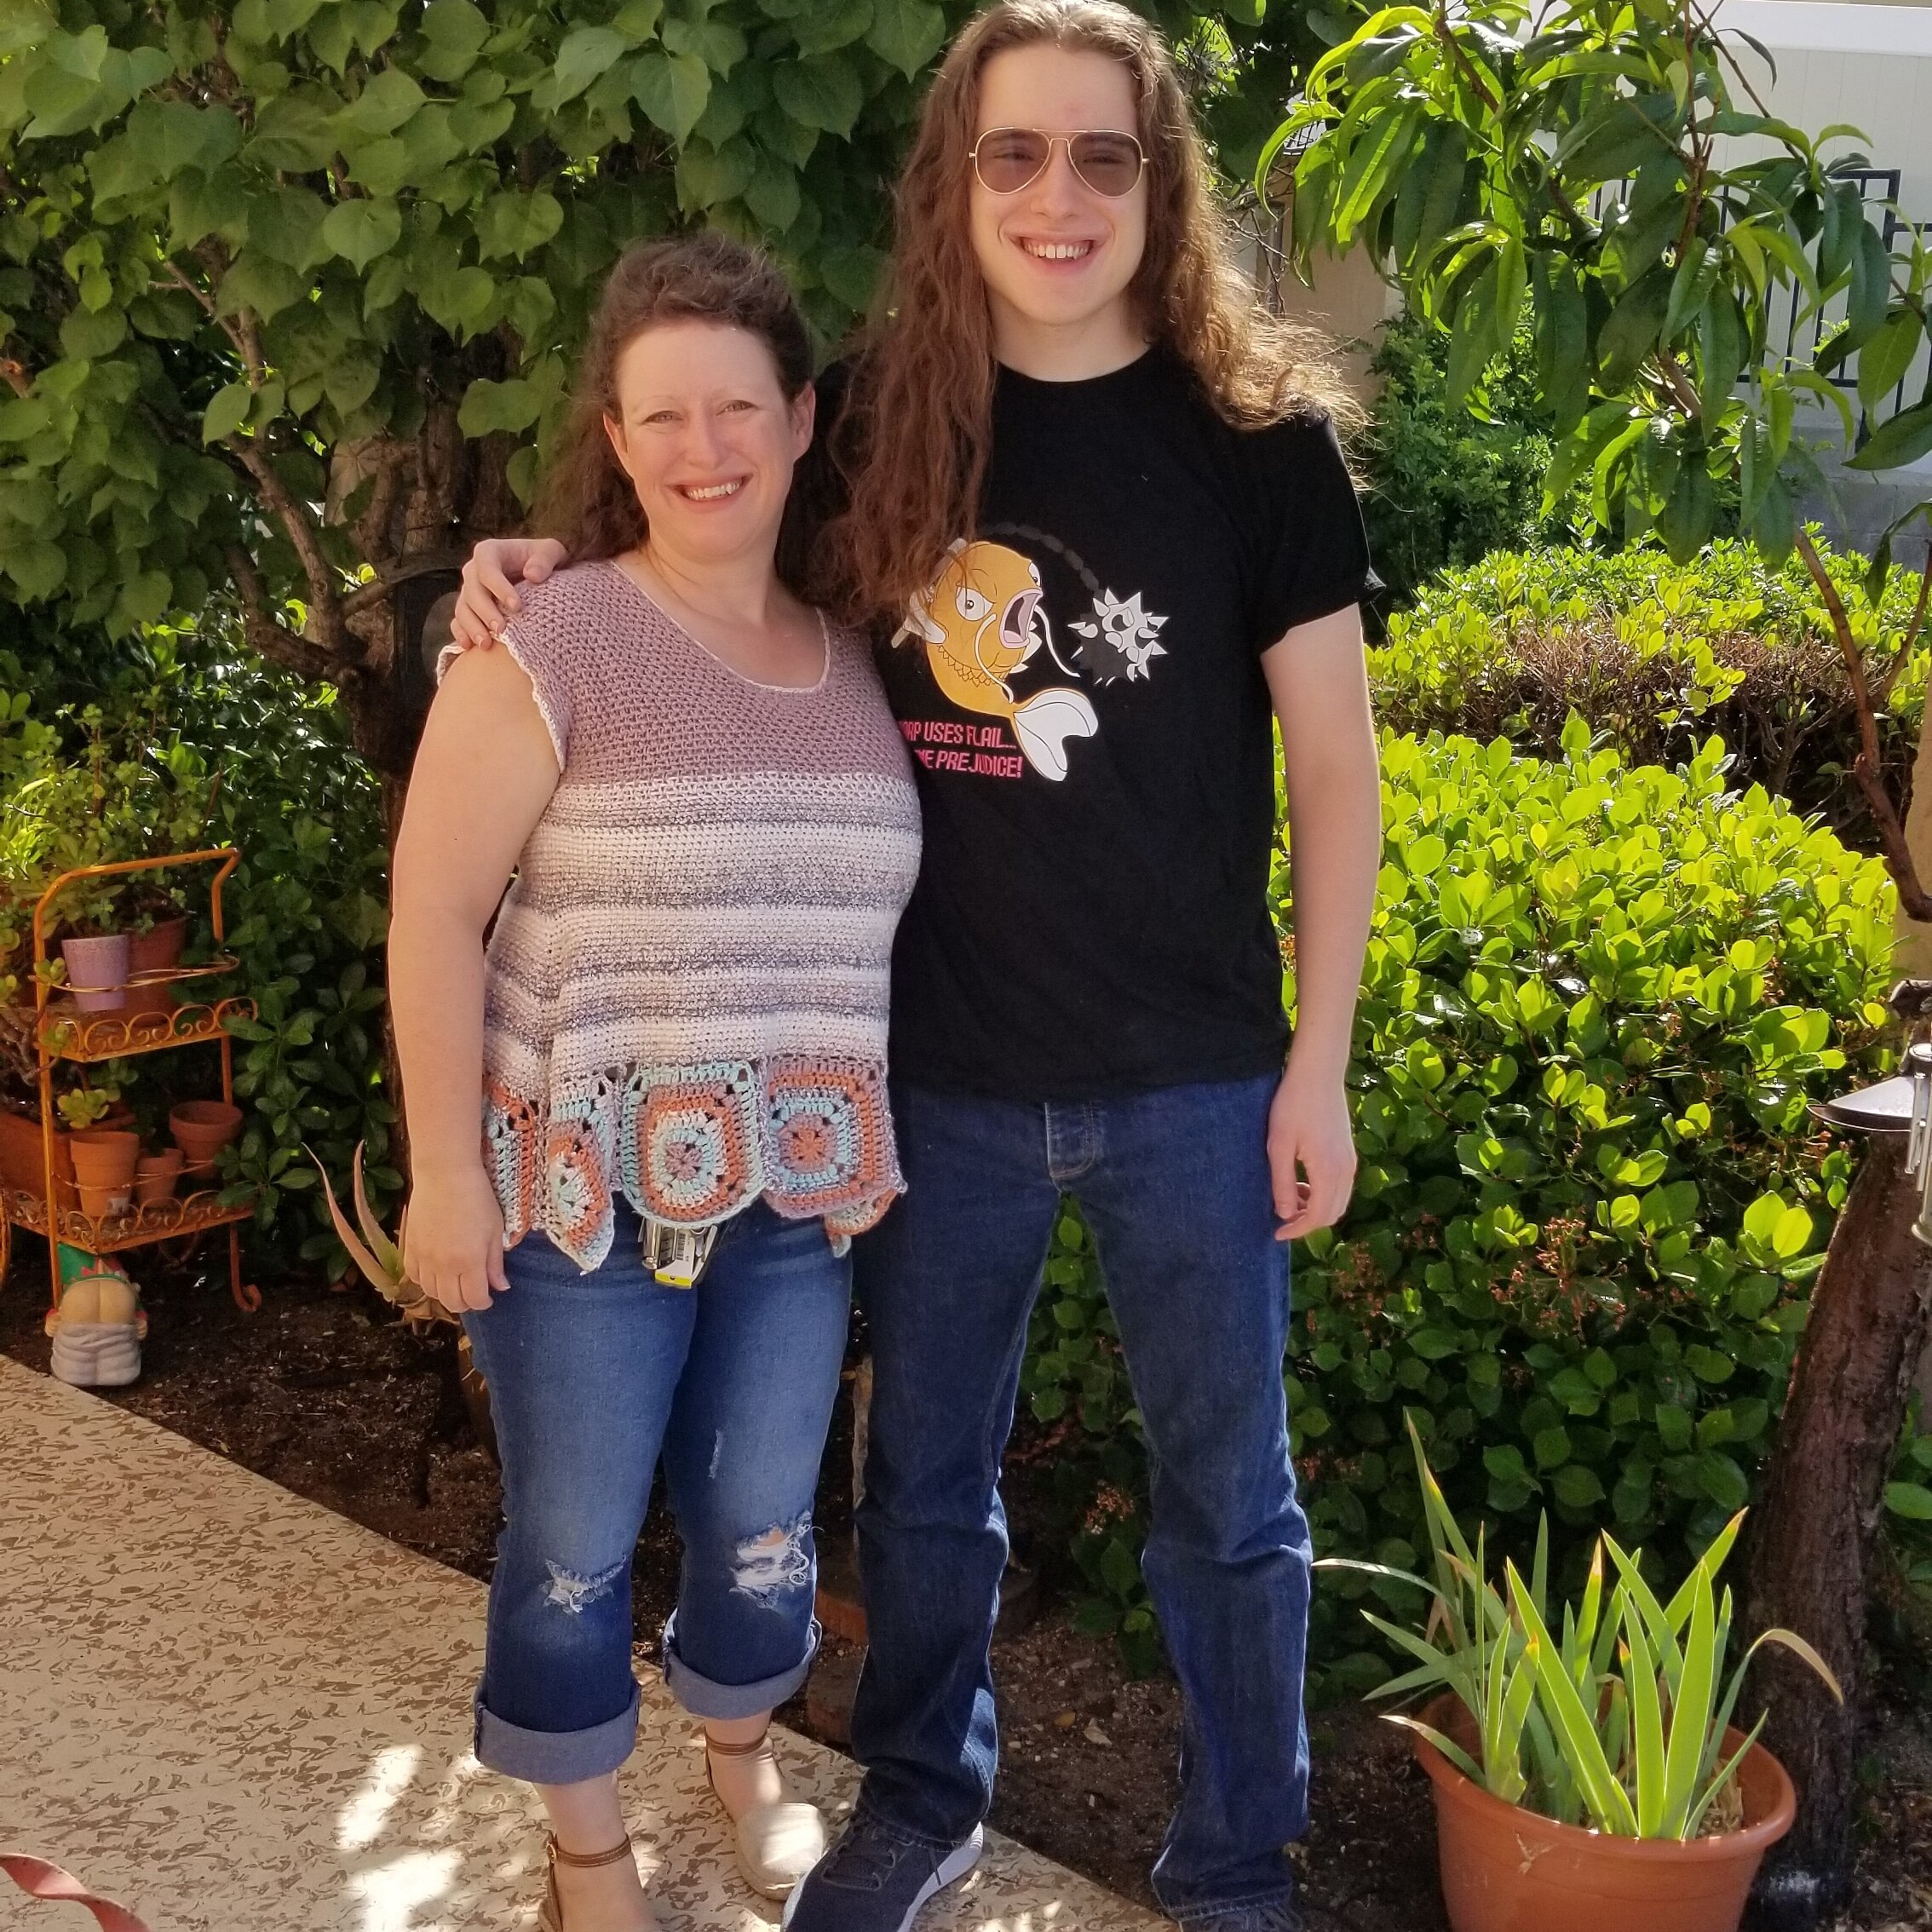
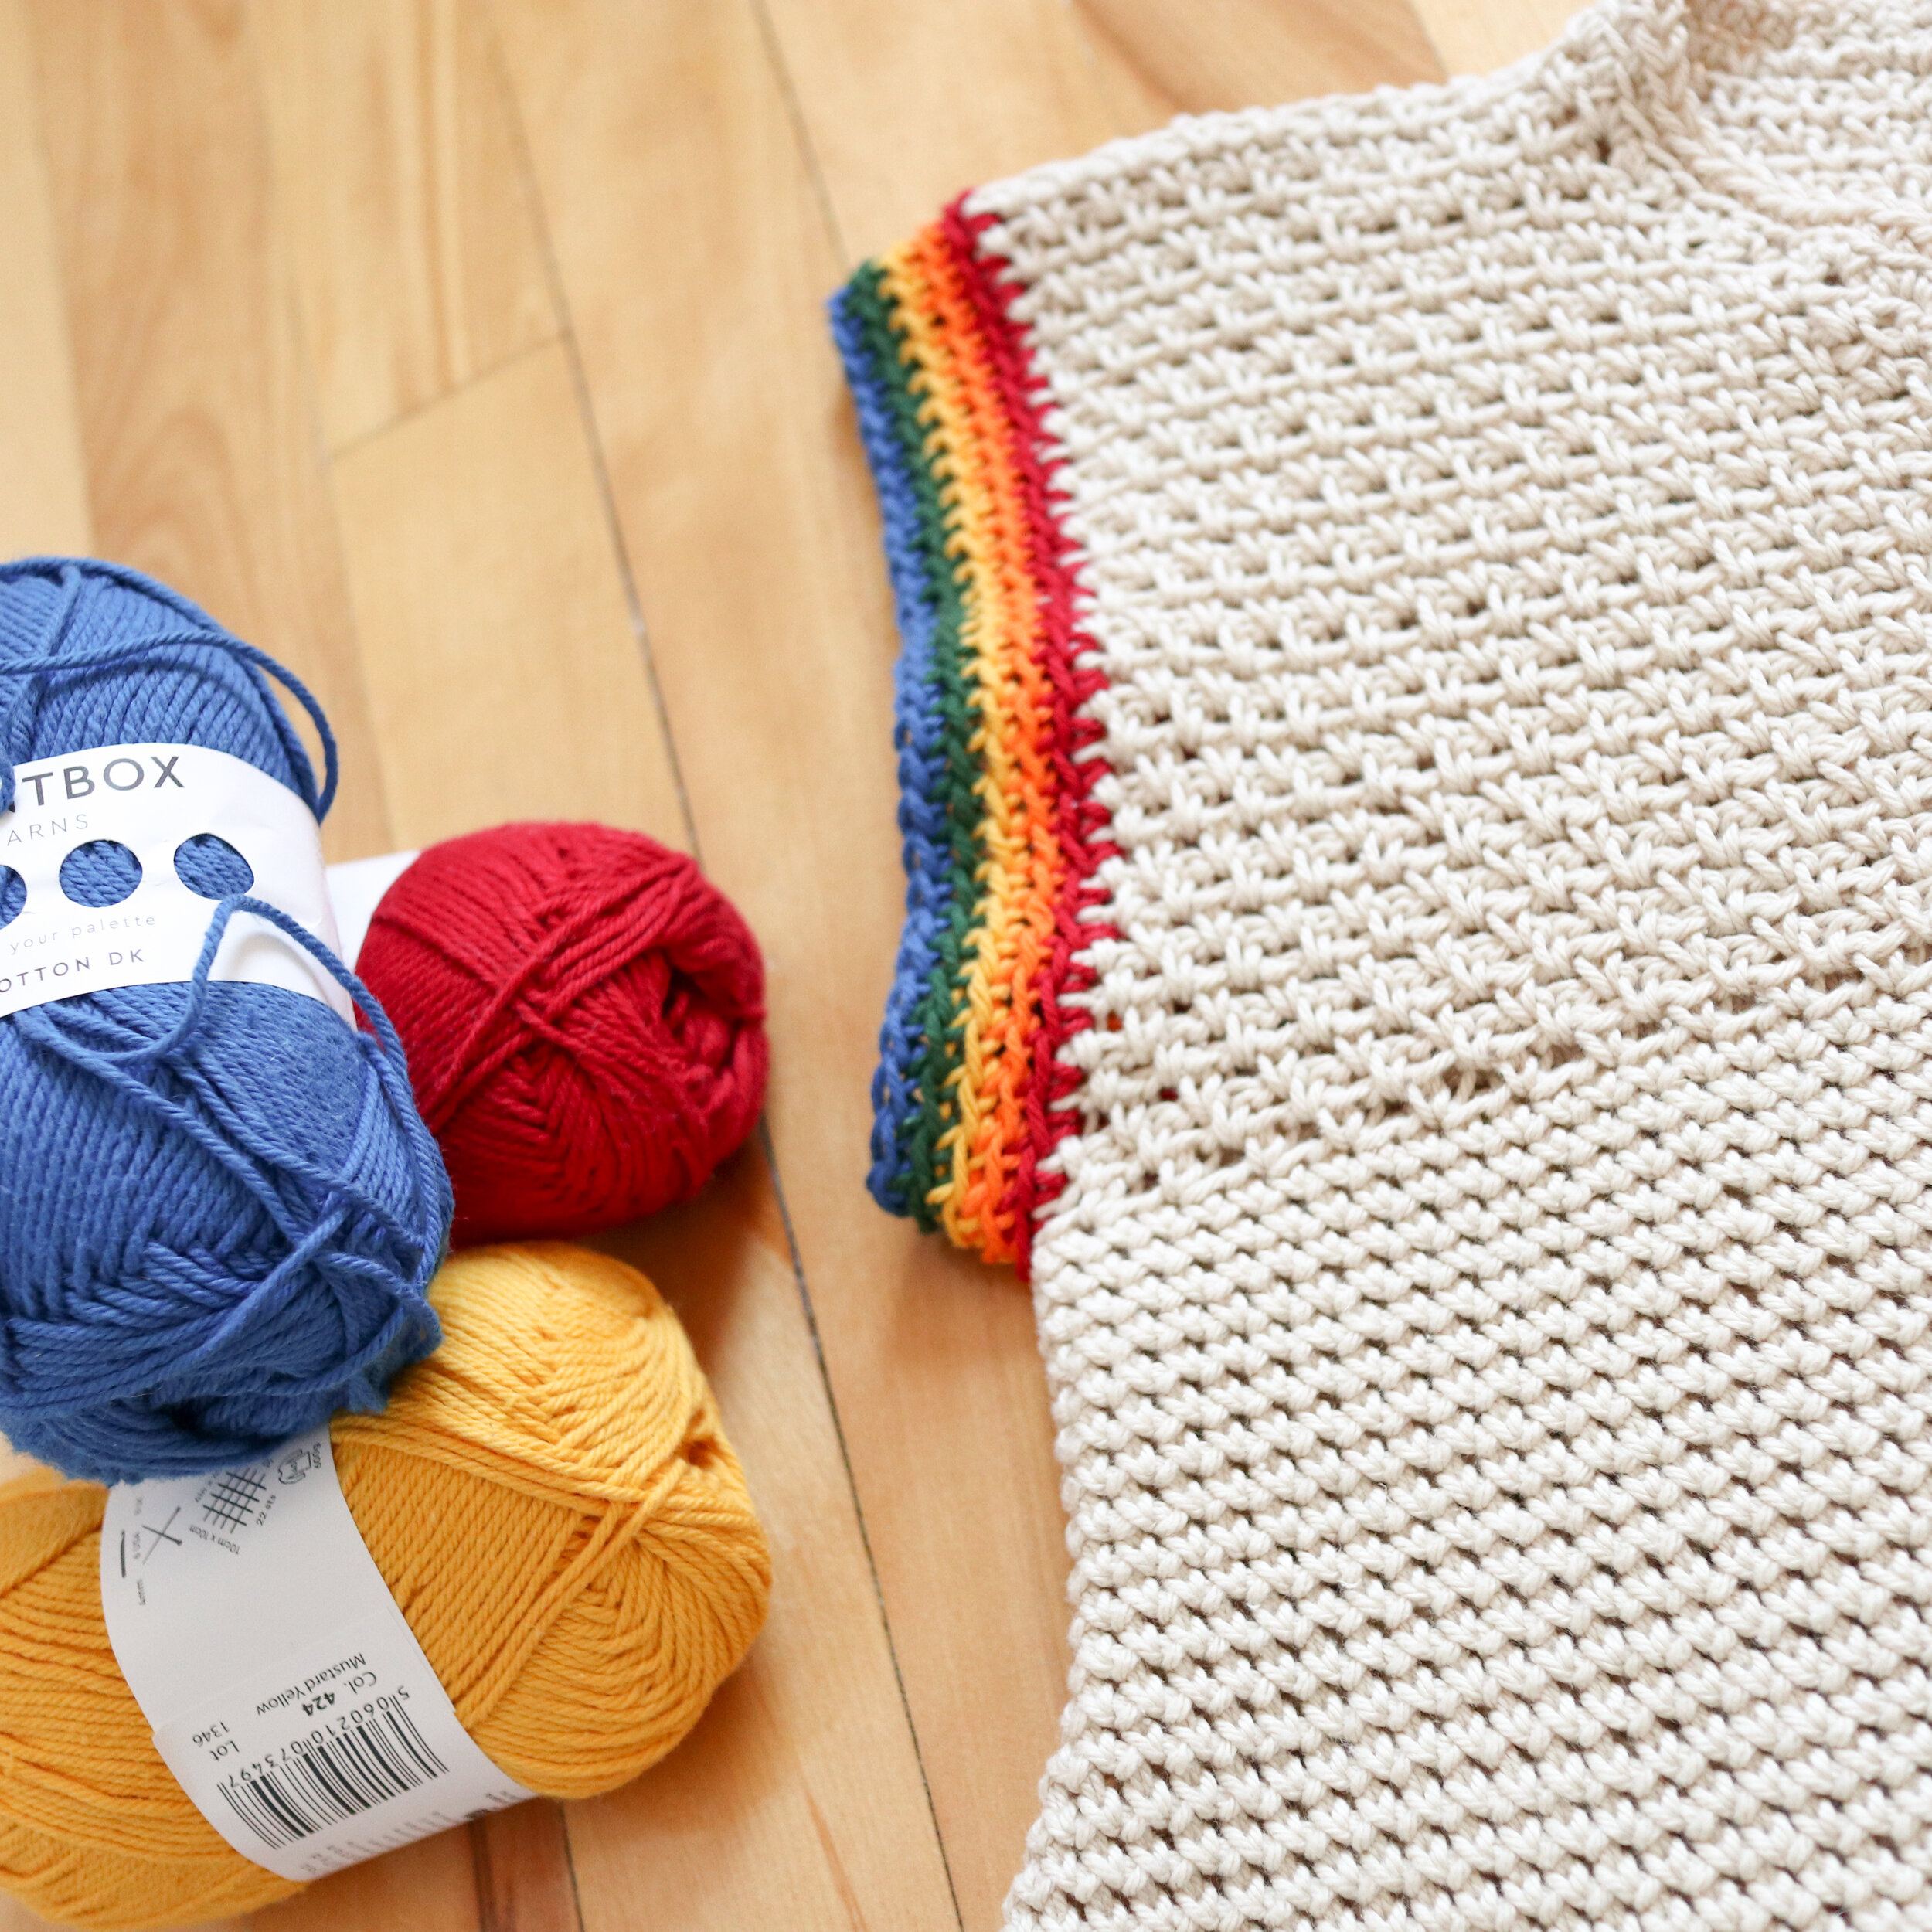
I chose a traditional ROYGBIV (minus the I) rainbow for my top. I both love rainbows and wanted something that would be adorable and representative for PRIDE. But, this top would be gorgeous in a variety of different colors! Even in all one color or black and white, this top would pop! Check out my awesome testers’ pictures below.
For the sample top, Paintbox Yarns Cotton DK was used. This is a weight 3, 100% cotton, DK yarn. Cotton is a great transitional fibre for either Spring or Fall and it’s great for summer heat. However, you can make this tee with any weight 3 yarn that you would like. Make sure you check your gauge, though.
THANK YOU! to all my wonderful testers!


I LOVE TO SEE WHAT YOU CREATE!
Please share your creations with the community on social media tagging @ravinsekaidesigns and hashtag #serendipitee
I can’t wait to see the beautiful things you come up with!
FOLLOW ME ON SOCIAL MEDIA
Facebook: Ravin Sekai Designs
Ravelry: RavinSekai
Etsy: Ravin Sekai Designs
Instagram: @ravinsekaidesigns
Pinterest: Ravin Sekai Designs
Patreon: Ravin Sekai Designs
WHAT YOU NEED:
Hook Size: 4mm and 5.5mm hooks or sizes needed to obtain gauge
Yarn: Light/DK weight 3 yarn. Sample crocheted in Paintbox Yarns Cotton DK. 808(898, 1178, 1279, 1566, 1698) yards total. (see notes for specifics)
Gauge: Gauge is after blocking. Refer to notes. With 4mm hook: 13.5 sts/9.5 rows = 4” in DC. Each Granny Square should be 5.5” x 5.5” With 5.5mm hook: 16sts/17.3 rows = 4” in Cross stitch/yarn under crochet. With 5.5mm hook: 17sts/17 rows = 4” in crochet moss st.
Ideal Bust Measurements: S: 32”-35”, M: 36”-39”, L: 40”-43”, XL: 44”-47”, 2XL: 48”-51”, 3XL: 52”-55”
Finished Garment Sizing: Top has approx 3” - 7” positive ease. Measurements are for garment laid flat after blocking. width at bottom: 27(30, 30, 33, 36, 39)” width at bust: 19.5(21.5, 23.5, 25, 27, 29)” Length: 18.5”(18.5, 22.5, 22.5, 25, 25)”. (see notes for fit and modifications)
Model Size: model is 4’11”, 35” bust, 27.5” waist, 40” hips wearing a small with 4” positive ease in bust, 14” positive ease at hips.

Save for Later
Pin to Pinterest
ABBREVIATIONS:
Abbreviations in US terms
Ch: chain
MC: main color. I used Cream.
Pm: place marker
Sm: stitch marker
RSM: replace stitch marker
Sl st: slip stitch
CSSC: Cross Stitch/yarn under crochet. Insert your hook as you would for a normal sc, yarn under your hook and bring through, finish your stitch like you would a normal sc.
Sc: single crochet
Scblo: single crochet in the back loop only
Hdc: half double crochet
Dc: double crochet
Yo: yarn over
Pf st: puff stitch, YO, insert hook into st, YO, pull through just the st, YO, insert hook into same st, YO, pull through just the st, YO, insert hook into same st, YO, pull through just the st, YO, insert hook into same st, YO, pull through just the st, YO, pull through 8 loops, YO, pull through last 2 loops. This makes a 9 loop puff.

Notes:
To make a top that is similar to the sample image (1 MC, and 6 colors for the rainbow parts) you will need approx 537(592, 871, 943, 1200, 1302) yards MC and approx 45(51, 51, 56, 61, 66) yards each color (based on 6 colors used).
Try not to block your swatches too aggressively. Both the CSSC and the Moss stitch create a very stretchy fabric. As such, after blocking your swatches, within a few hours of unpinning, your swatch may shrink in size a bit. Don’t worry too much about this unless it shrinks drastically. If it shrinks drastically, you may have blocked your swatch too aggressively. Be mindful of this while you measure your gauge. But, also be aware that because the stitches are so stretchy, they can accommodate a larger bust. So, how you want your tops to fit (ie. tighter/looser in the bust) should be how you determine which size to make.
If you would like a longer or shorter top, add/subtract rounds to the body AFTER decreasing and BEFORE separating the front and back for sleeves. If you would like a tighter or looser top, choose either a size up or down from your bust measurements. Be conscious of how much ease is already written into the pattern and also how stretchy the CSSC and Moss stitches are.
Ch3 on granny squares count as 1dc.
To avoid a travelling seam with CSSC, use the alternating sl st method of joining your rounds. A good tutorial on this method is here https://www.youtube.com/watch?v=xJphtnlHKmA

THE PATTERN:
For the free pattern of this garment please continue on this page. Please consider supporting me by purchasing the 100% ad-free PDF with full charts for this pattern on my Ravelry or ETSY pages. Or consider joining my Patreon for member perks.
The Granny Square [make 9(10, 10, 11, 12, 13)]
I made my granny squares rainbow colored with one color each row and alternating the color I started with to create the look you see in the sample.
With 4mm hook, Ch4, sl st in 1st chain (makes a circle)
Row 1: ch 7, *3dc in center of circle, ch4* rep * * twice more, 2dc in circle, sl st in ch3 of starting ch7.
Row 2: ch3, *[pf st, ch4, pf st] all in ch4 below, 3dc*, rep * * twice more, [pf st, ch4, pf st] in final ch4, 2dc, sl st in top of starting ch3.
Row 3: ch3, 1dc, *[pf st, ch4, pf st] all in ch4, 5dc* rep * * twice more, [pf st, ch4, pf st] in final ch4, 3dc, sl st in top of starting ch3.
Row 4: ch3, 2dc, *[pf st, ch4, pf st] all in ch4, 7dc* rep * * twice more, [pf st, ch4, pf st] in final ch4, 4dc, sl st in top of starting ch3.
Row 5: ch3, 3dc, *[pf st, ch4, pf st] all in ch4, 9dc* rep * * twice more, [pf st, ch4, pf st] in final ch4, 5dc, sl st in top of starting ch3.
Row 6: ch3, 4dc, *[pf st, ch4, pf st] all in ch4, 11dc* rep * * twice more, [pf st, ch4, pf st] in final ch4, 6dc, sl st in top of starting ch3.
FO
Block Squares to 5.5”x5.5”
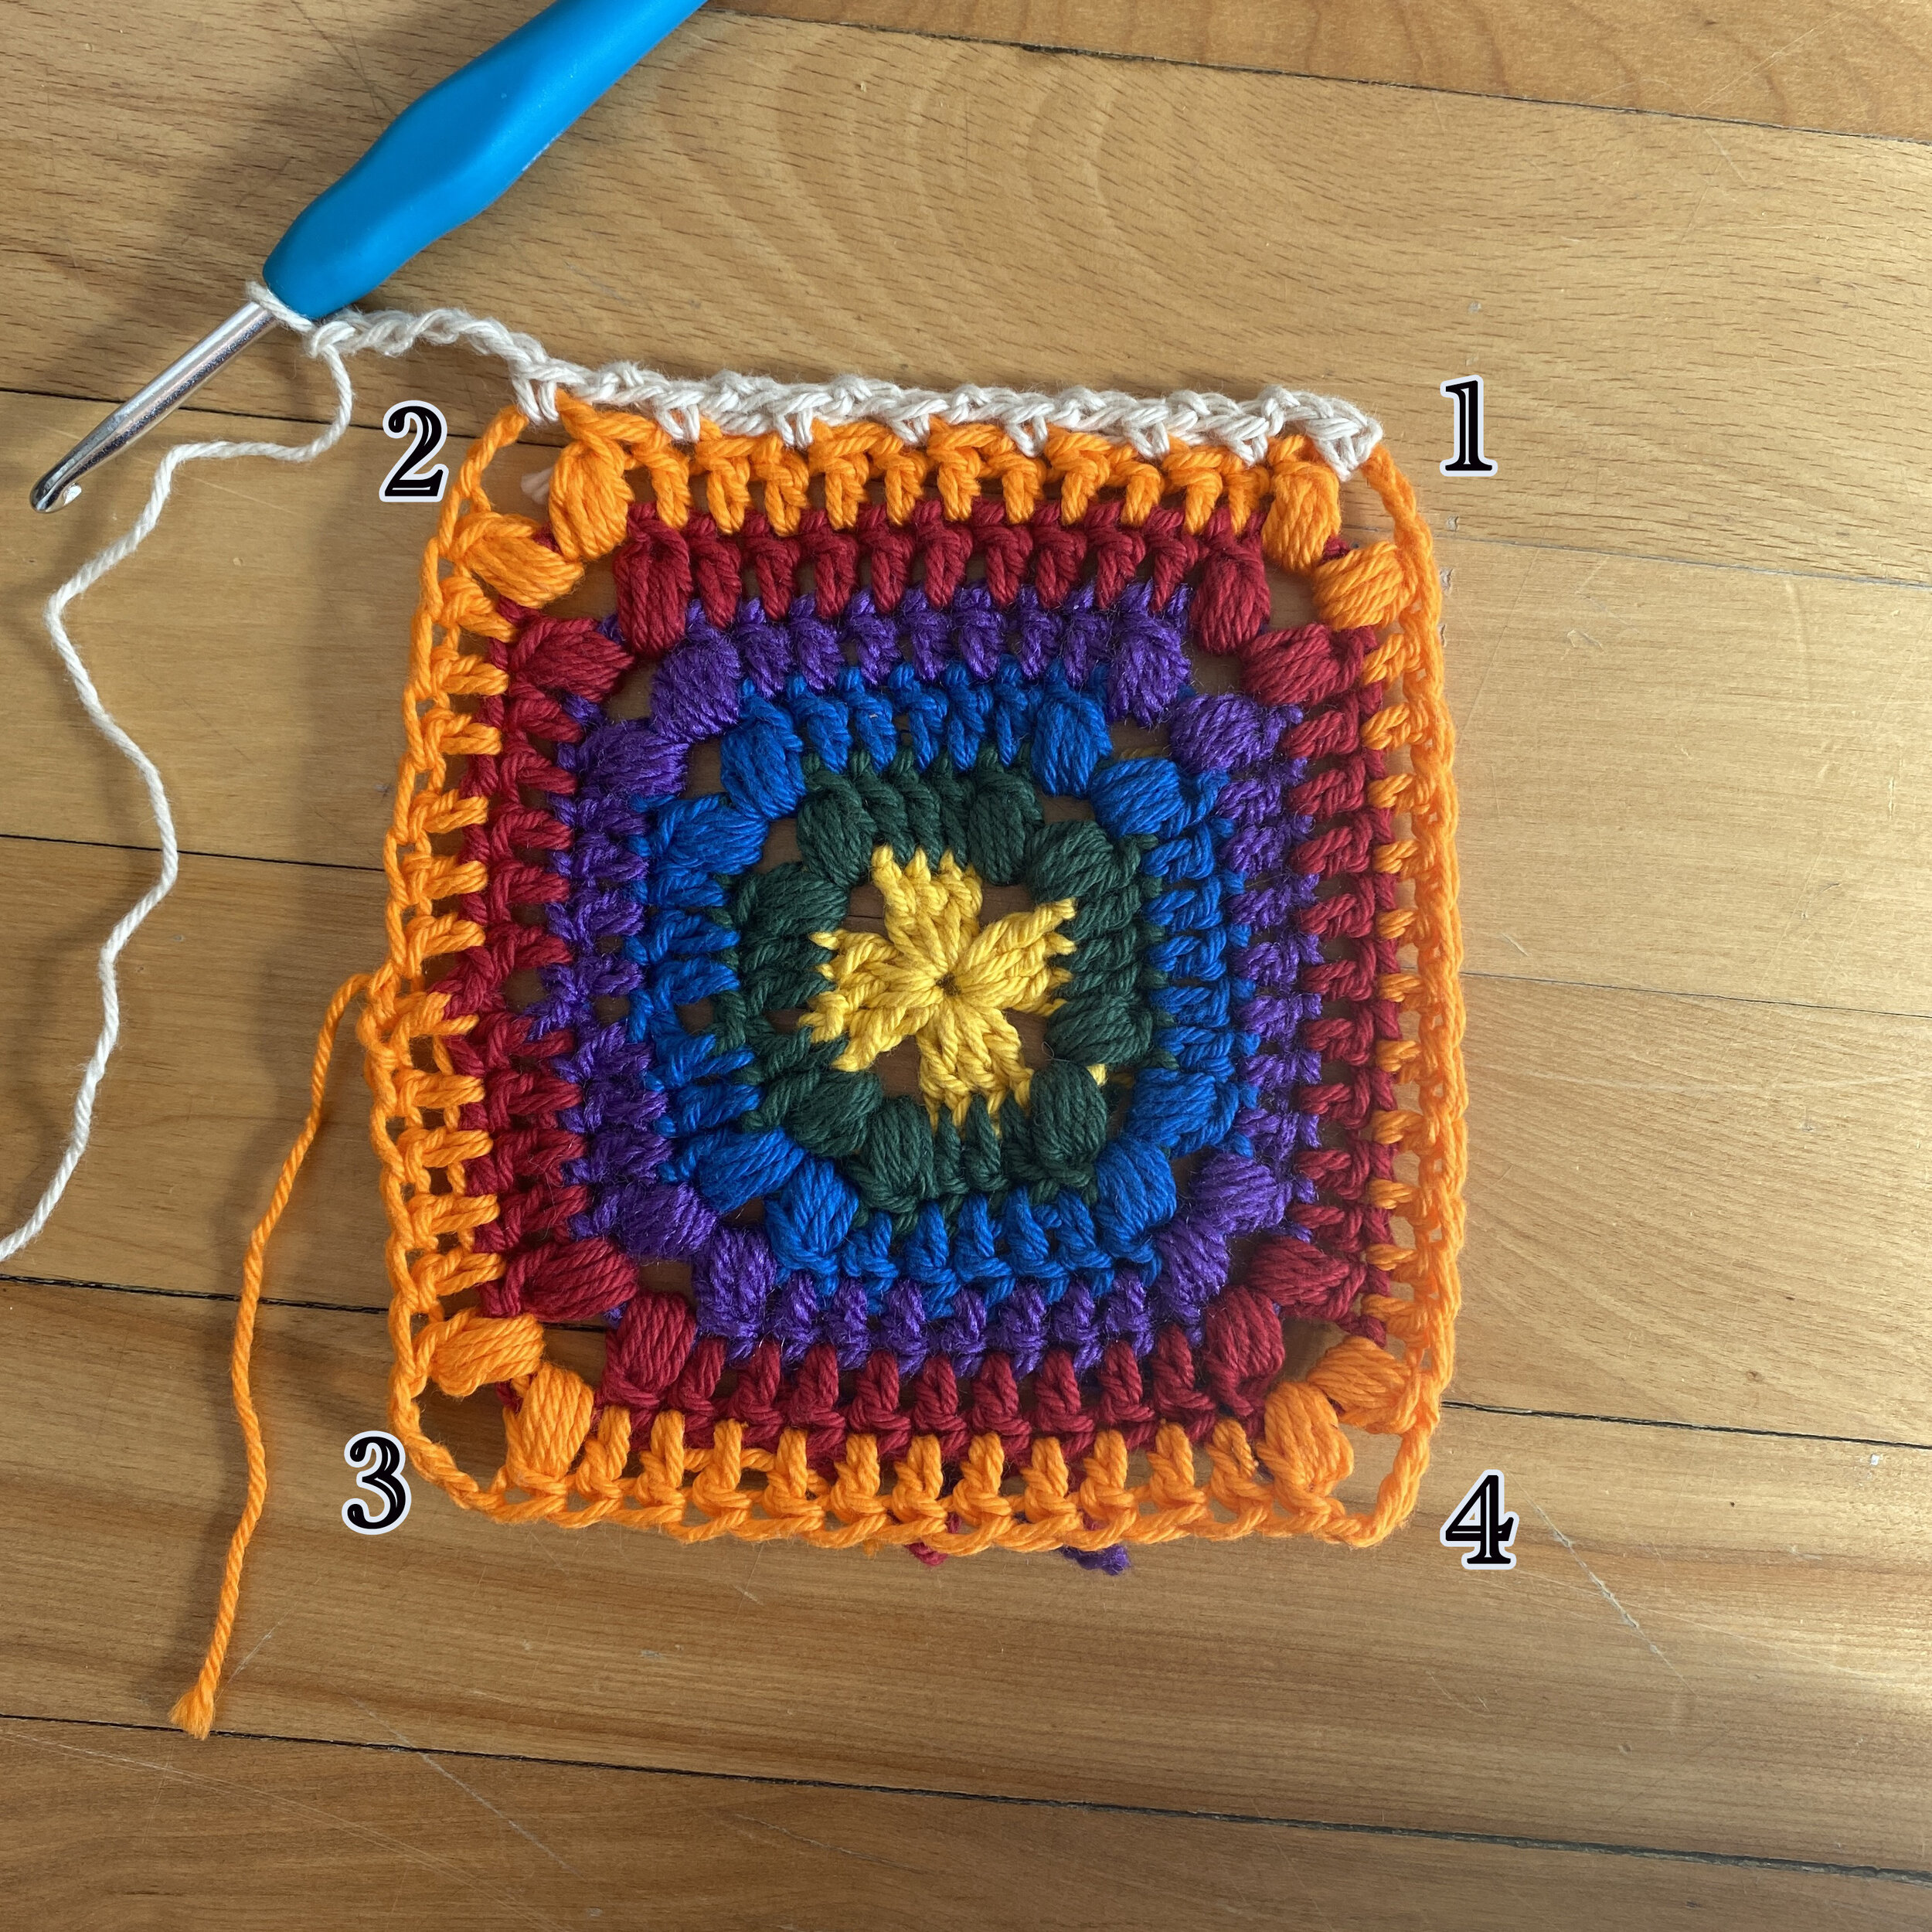
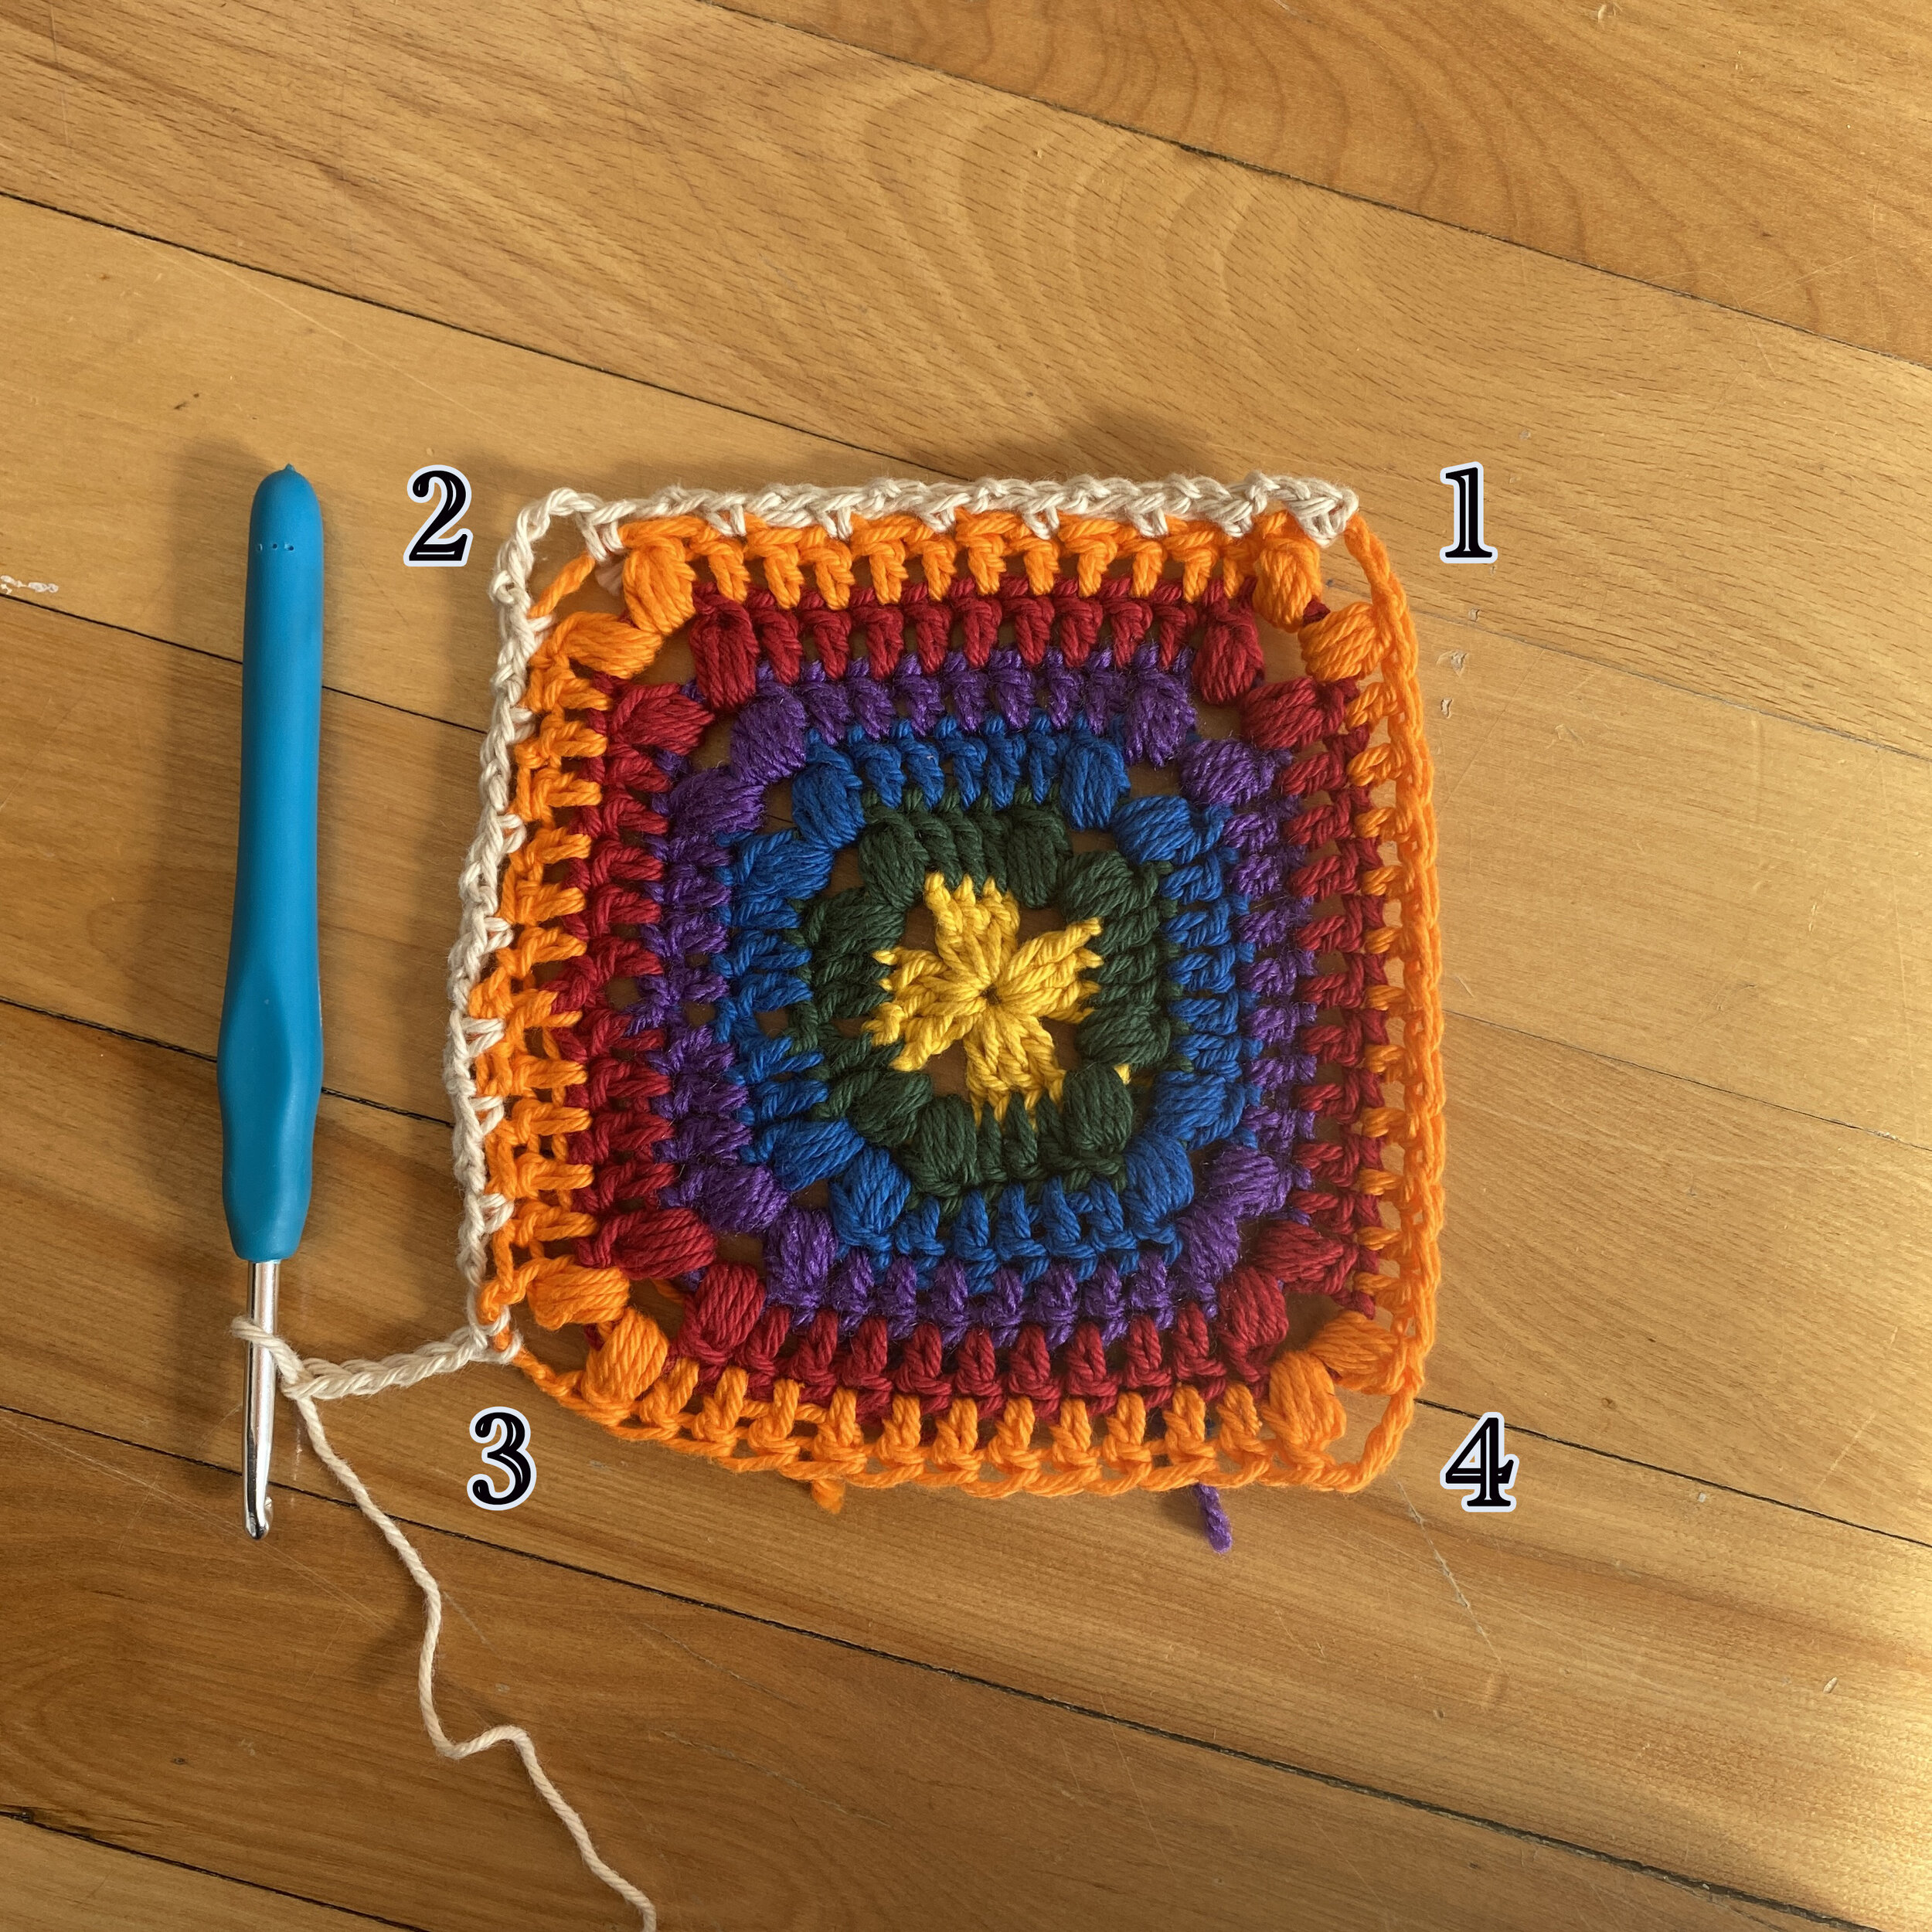
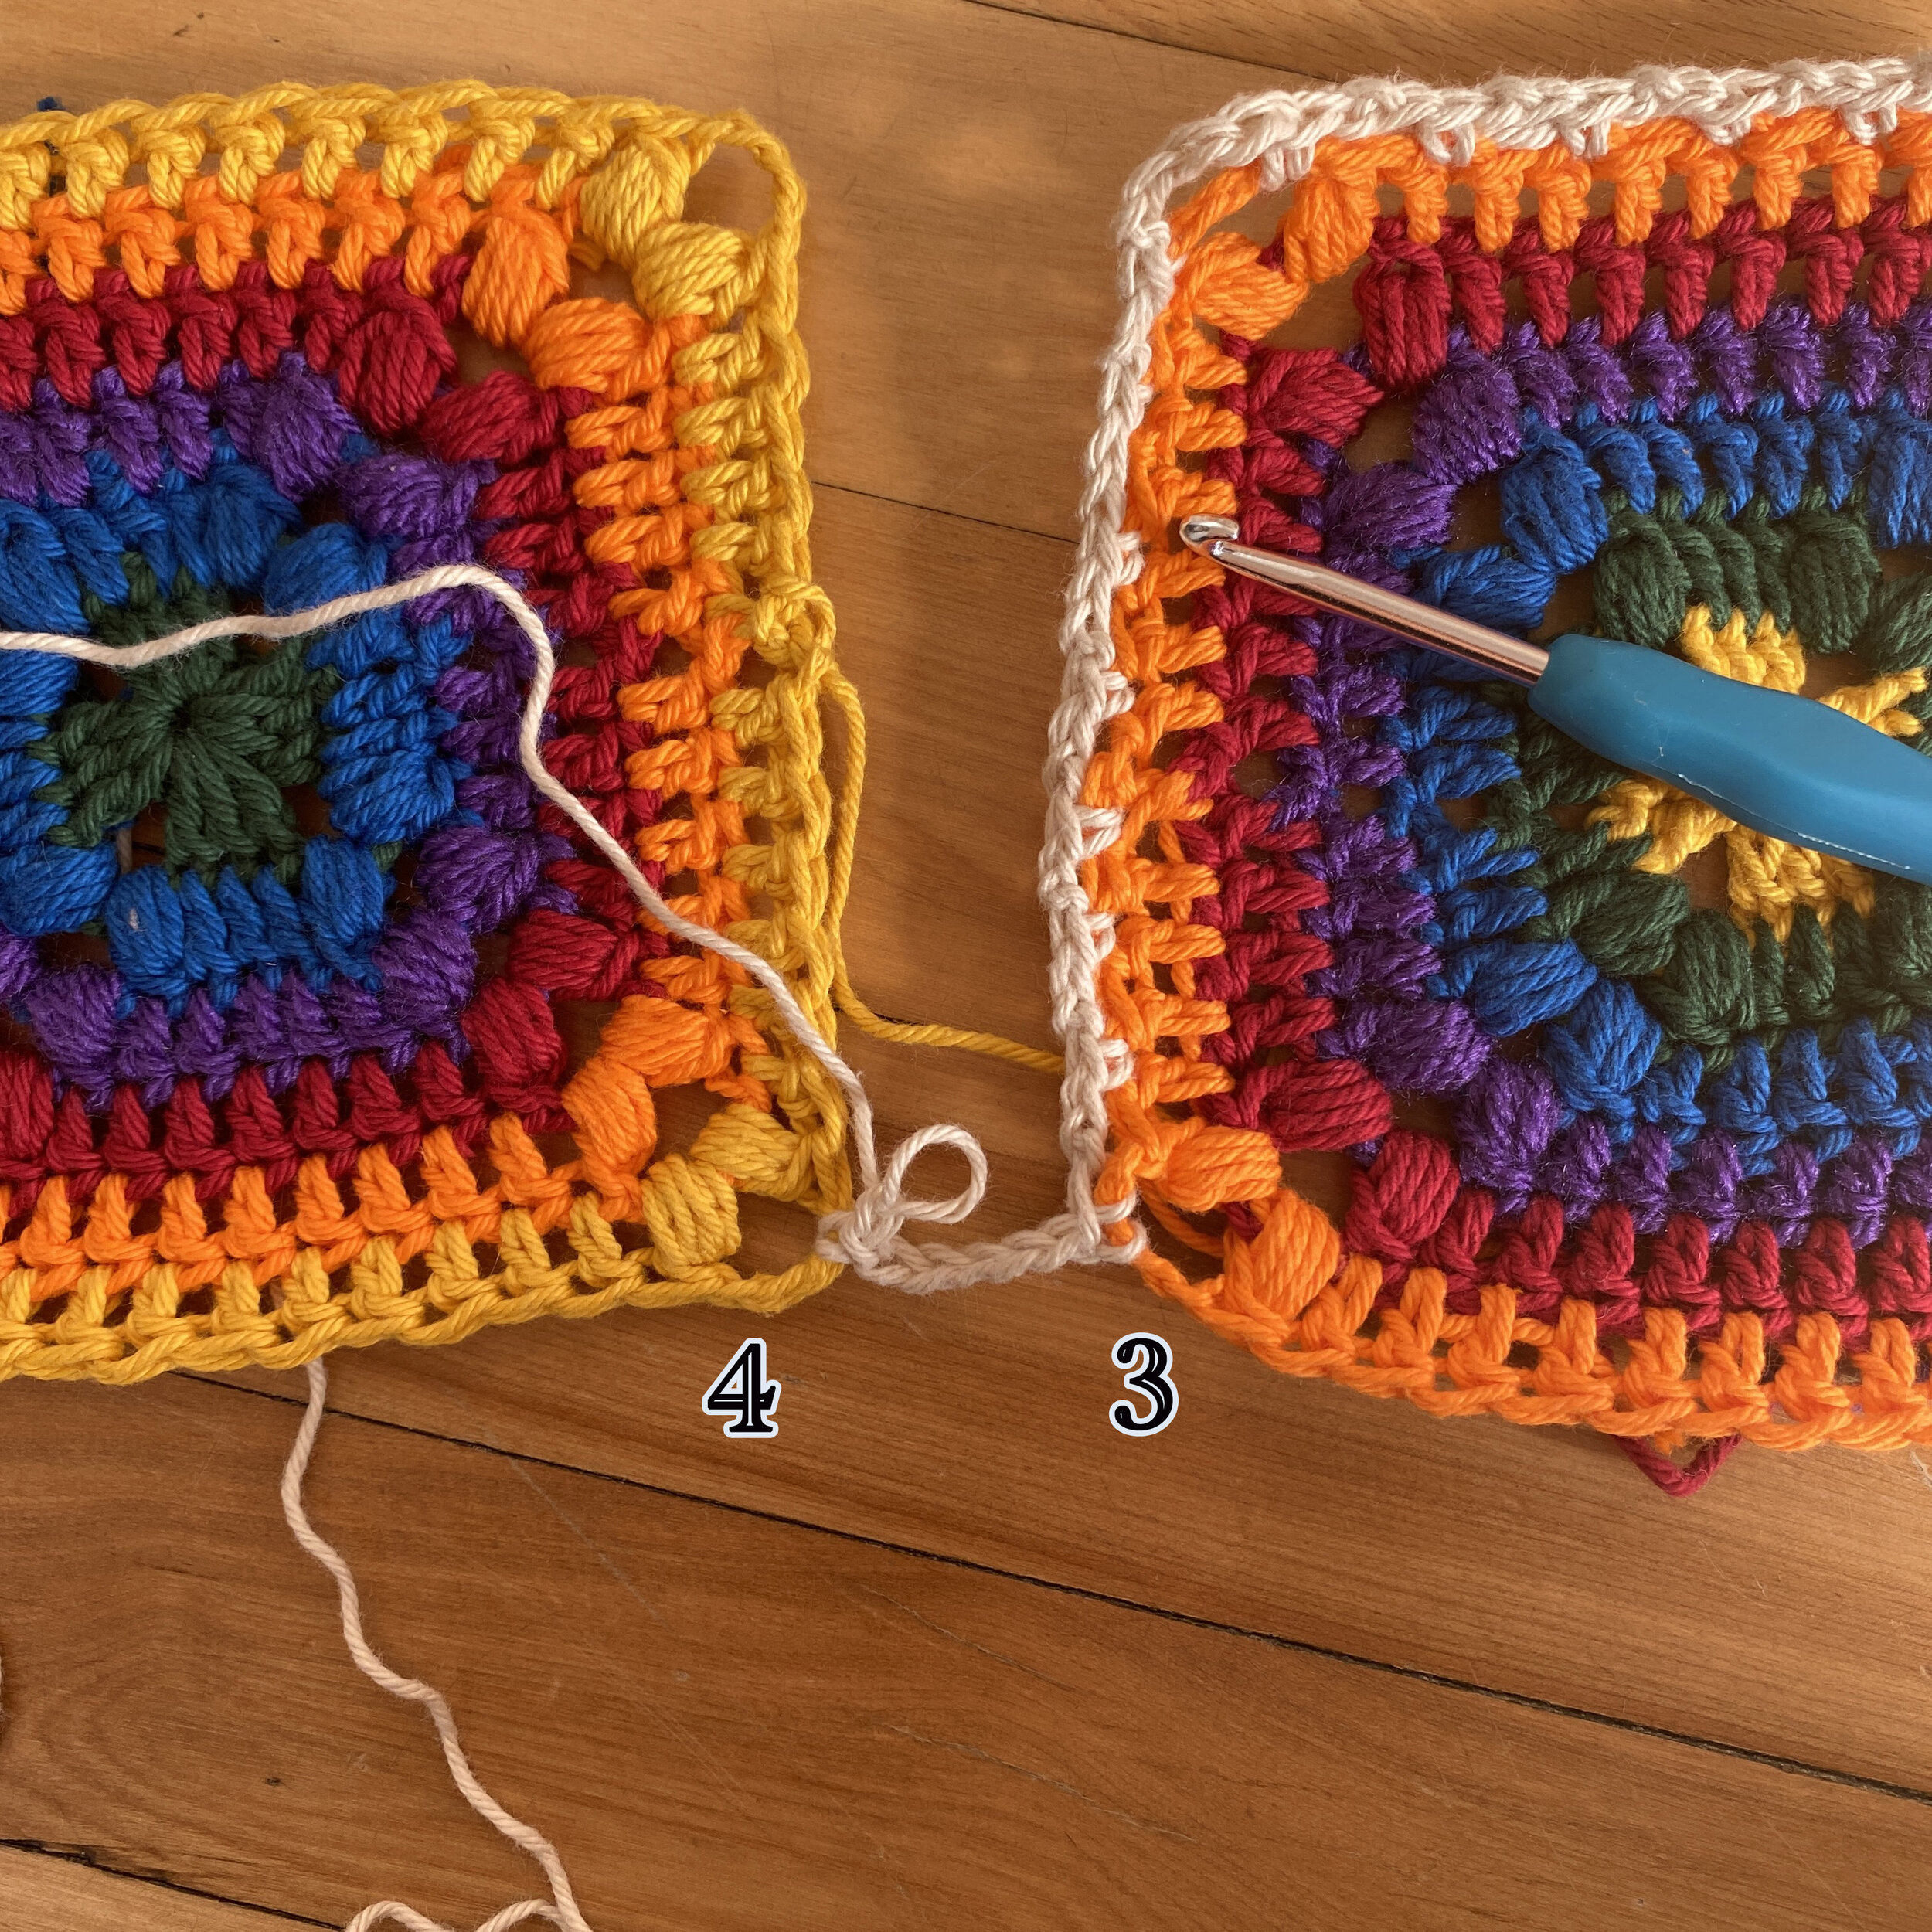
1. With Square 1 and starting in corner 1, attach the yarn in the 4th ch of the corner with a sc, *ch2, sk1, sc* across the top placing the last sc in the 1st ch of the ch4 of corner 2, ch7
2. sc in the 4th ch and rep * * down the side, ch 7
3. Attach to Square 2 in the 4th ch of the ch 4 of corner 4 with sc , *ch1, remove hook from loop
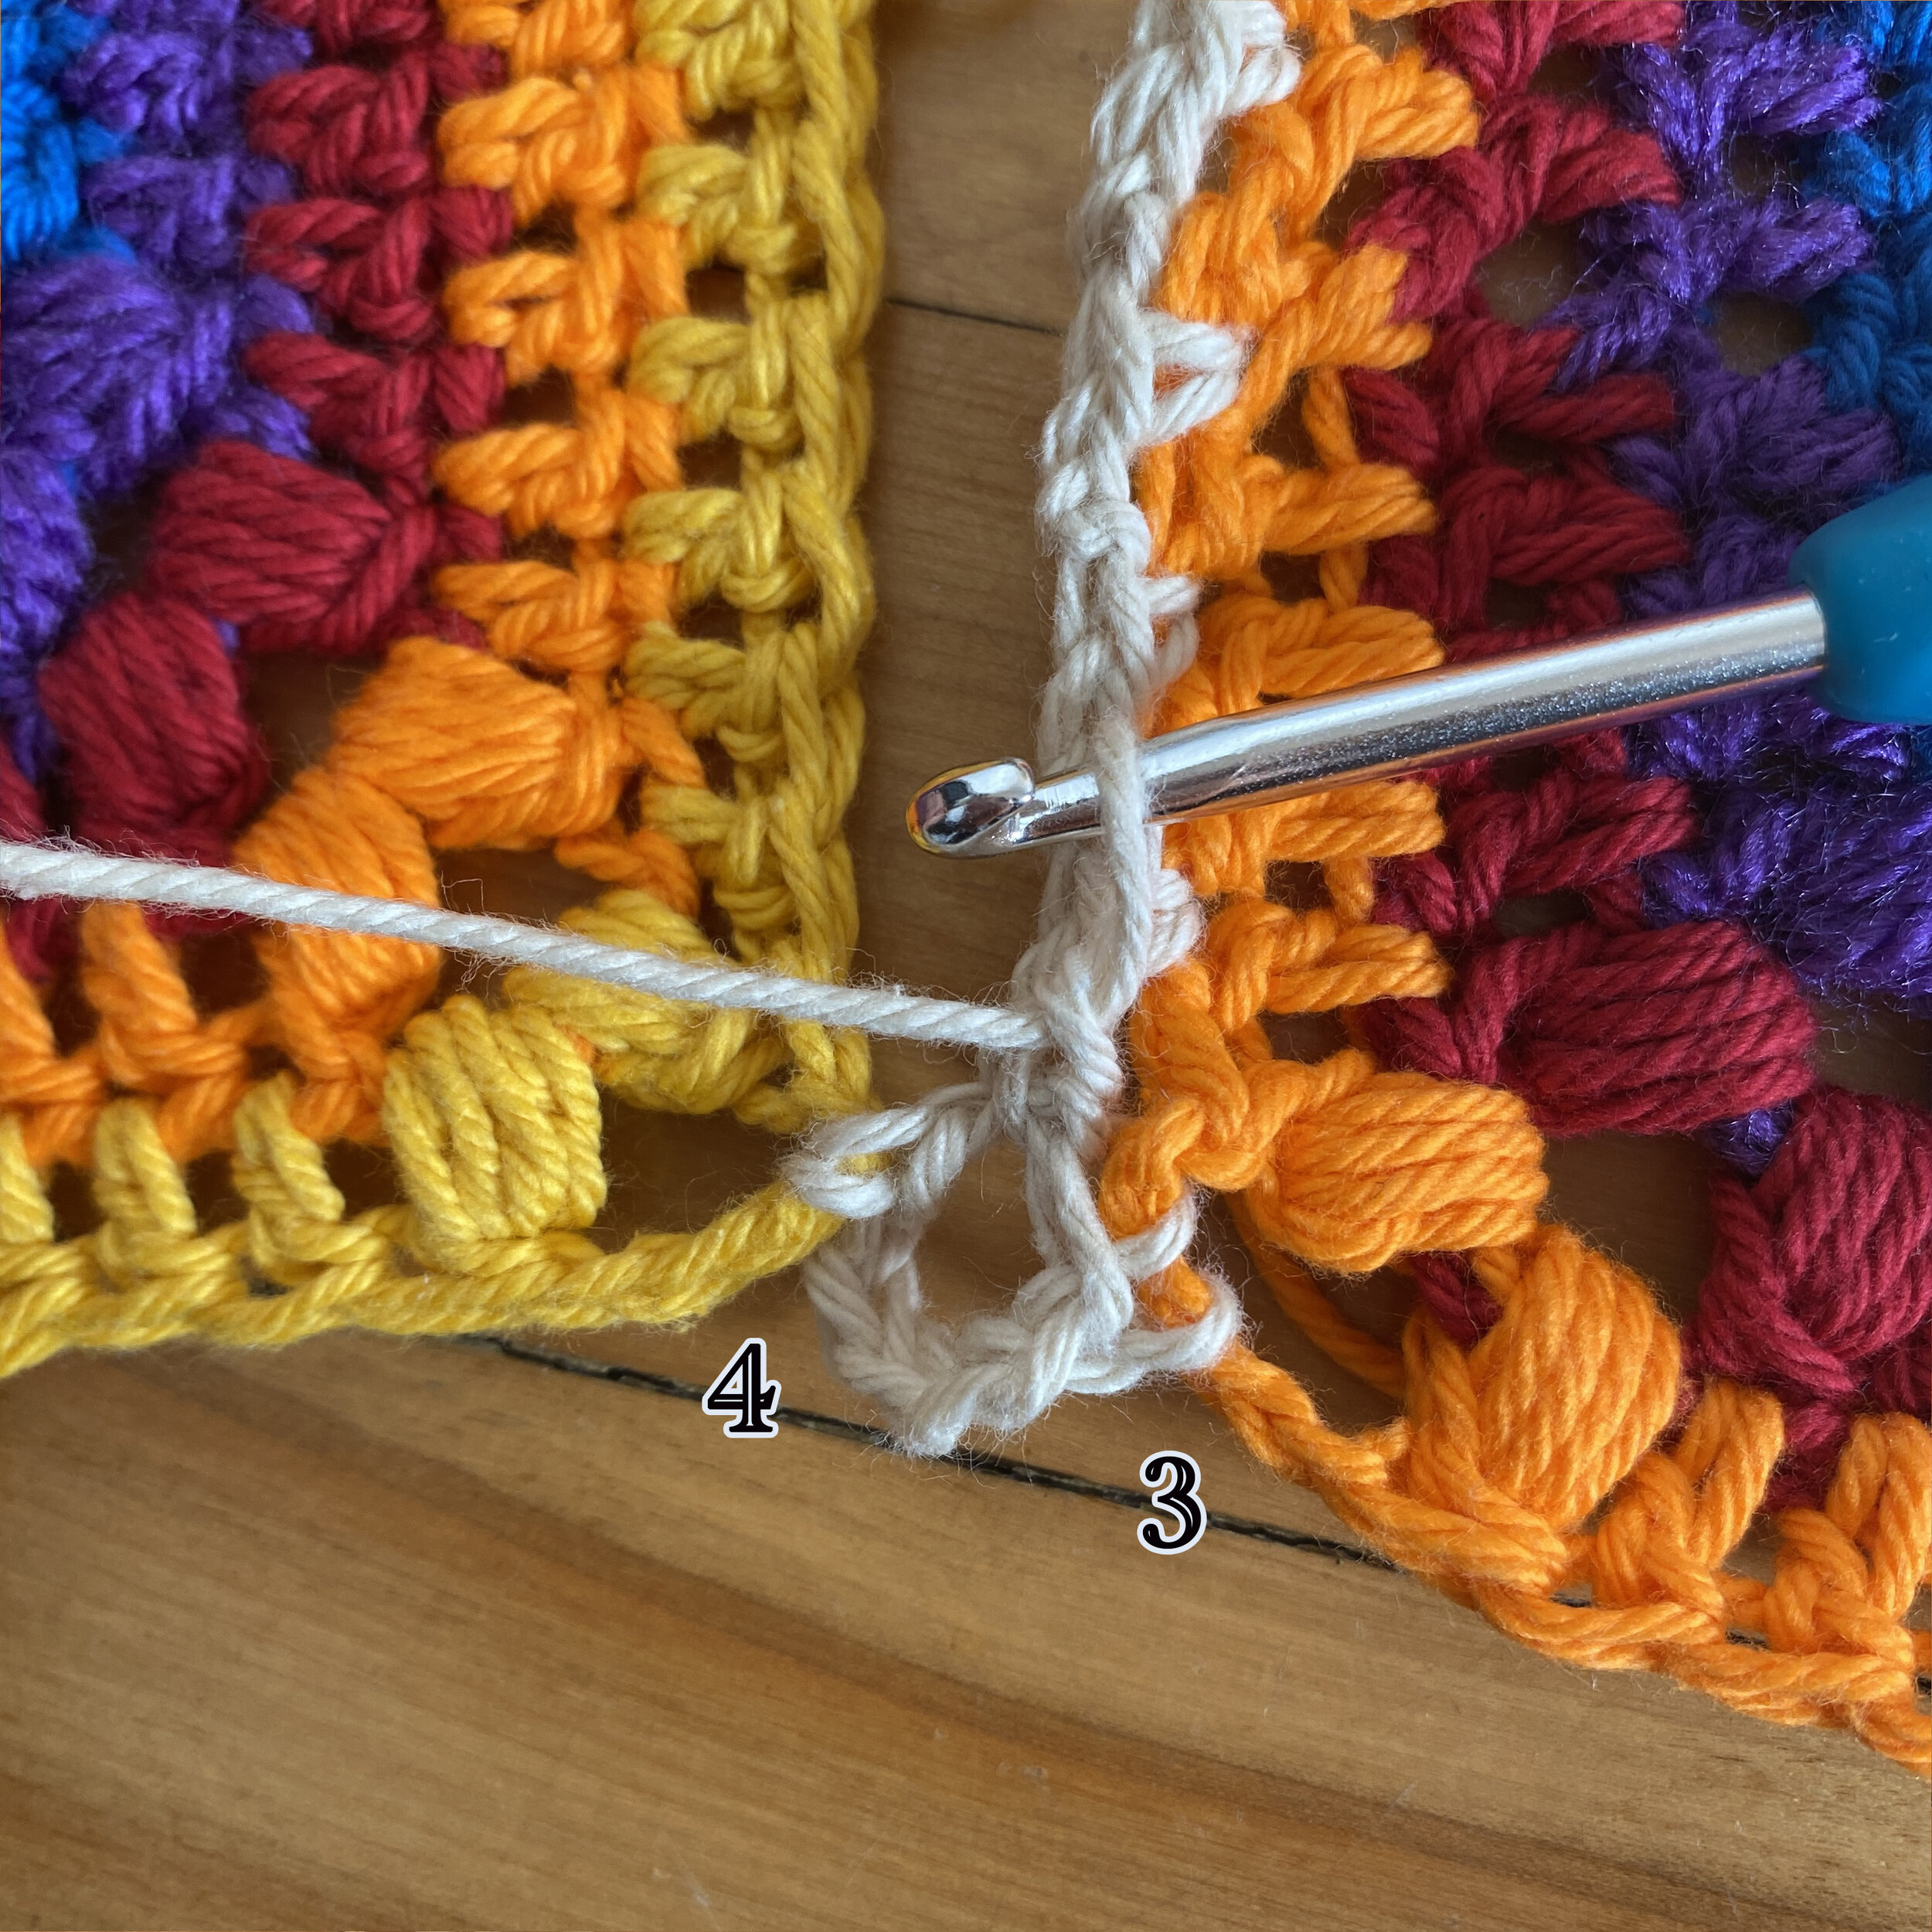
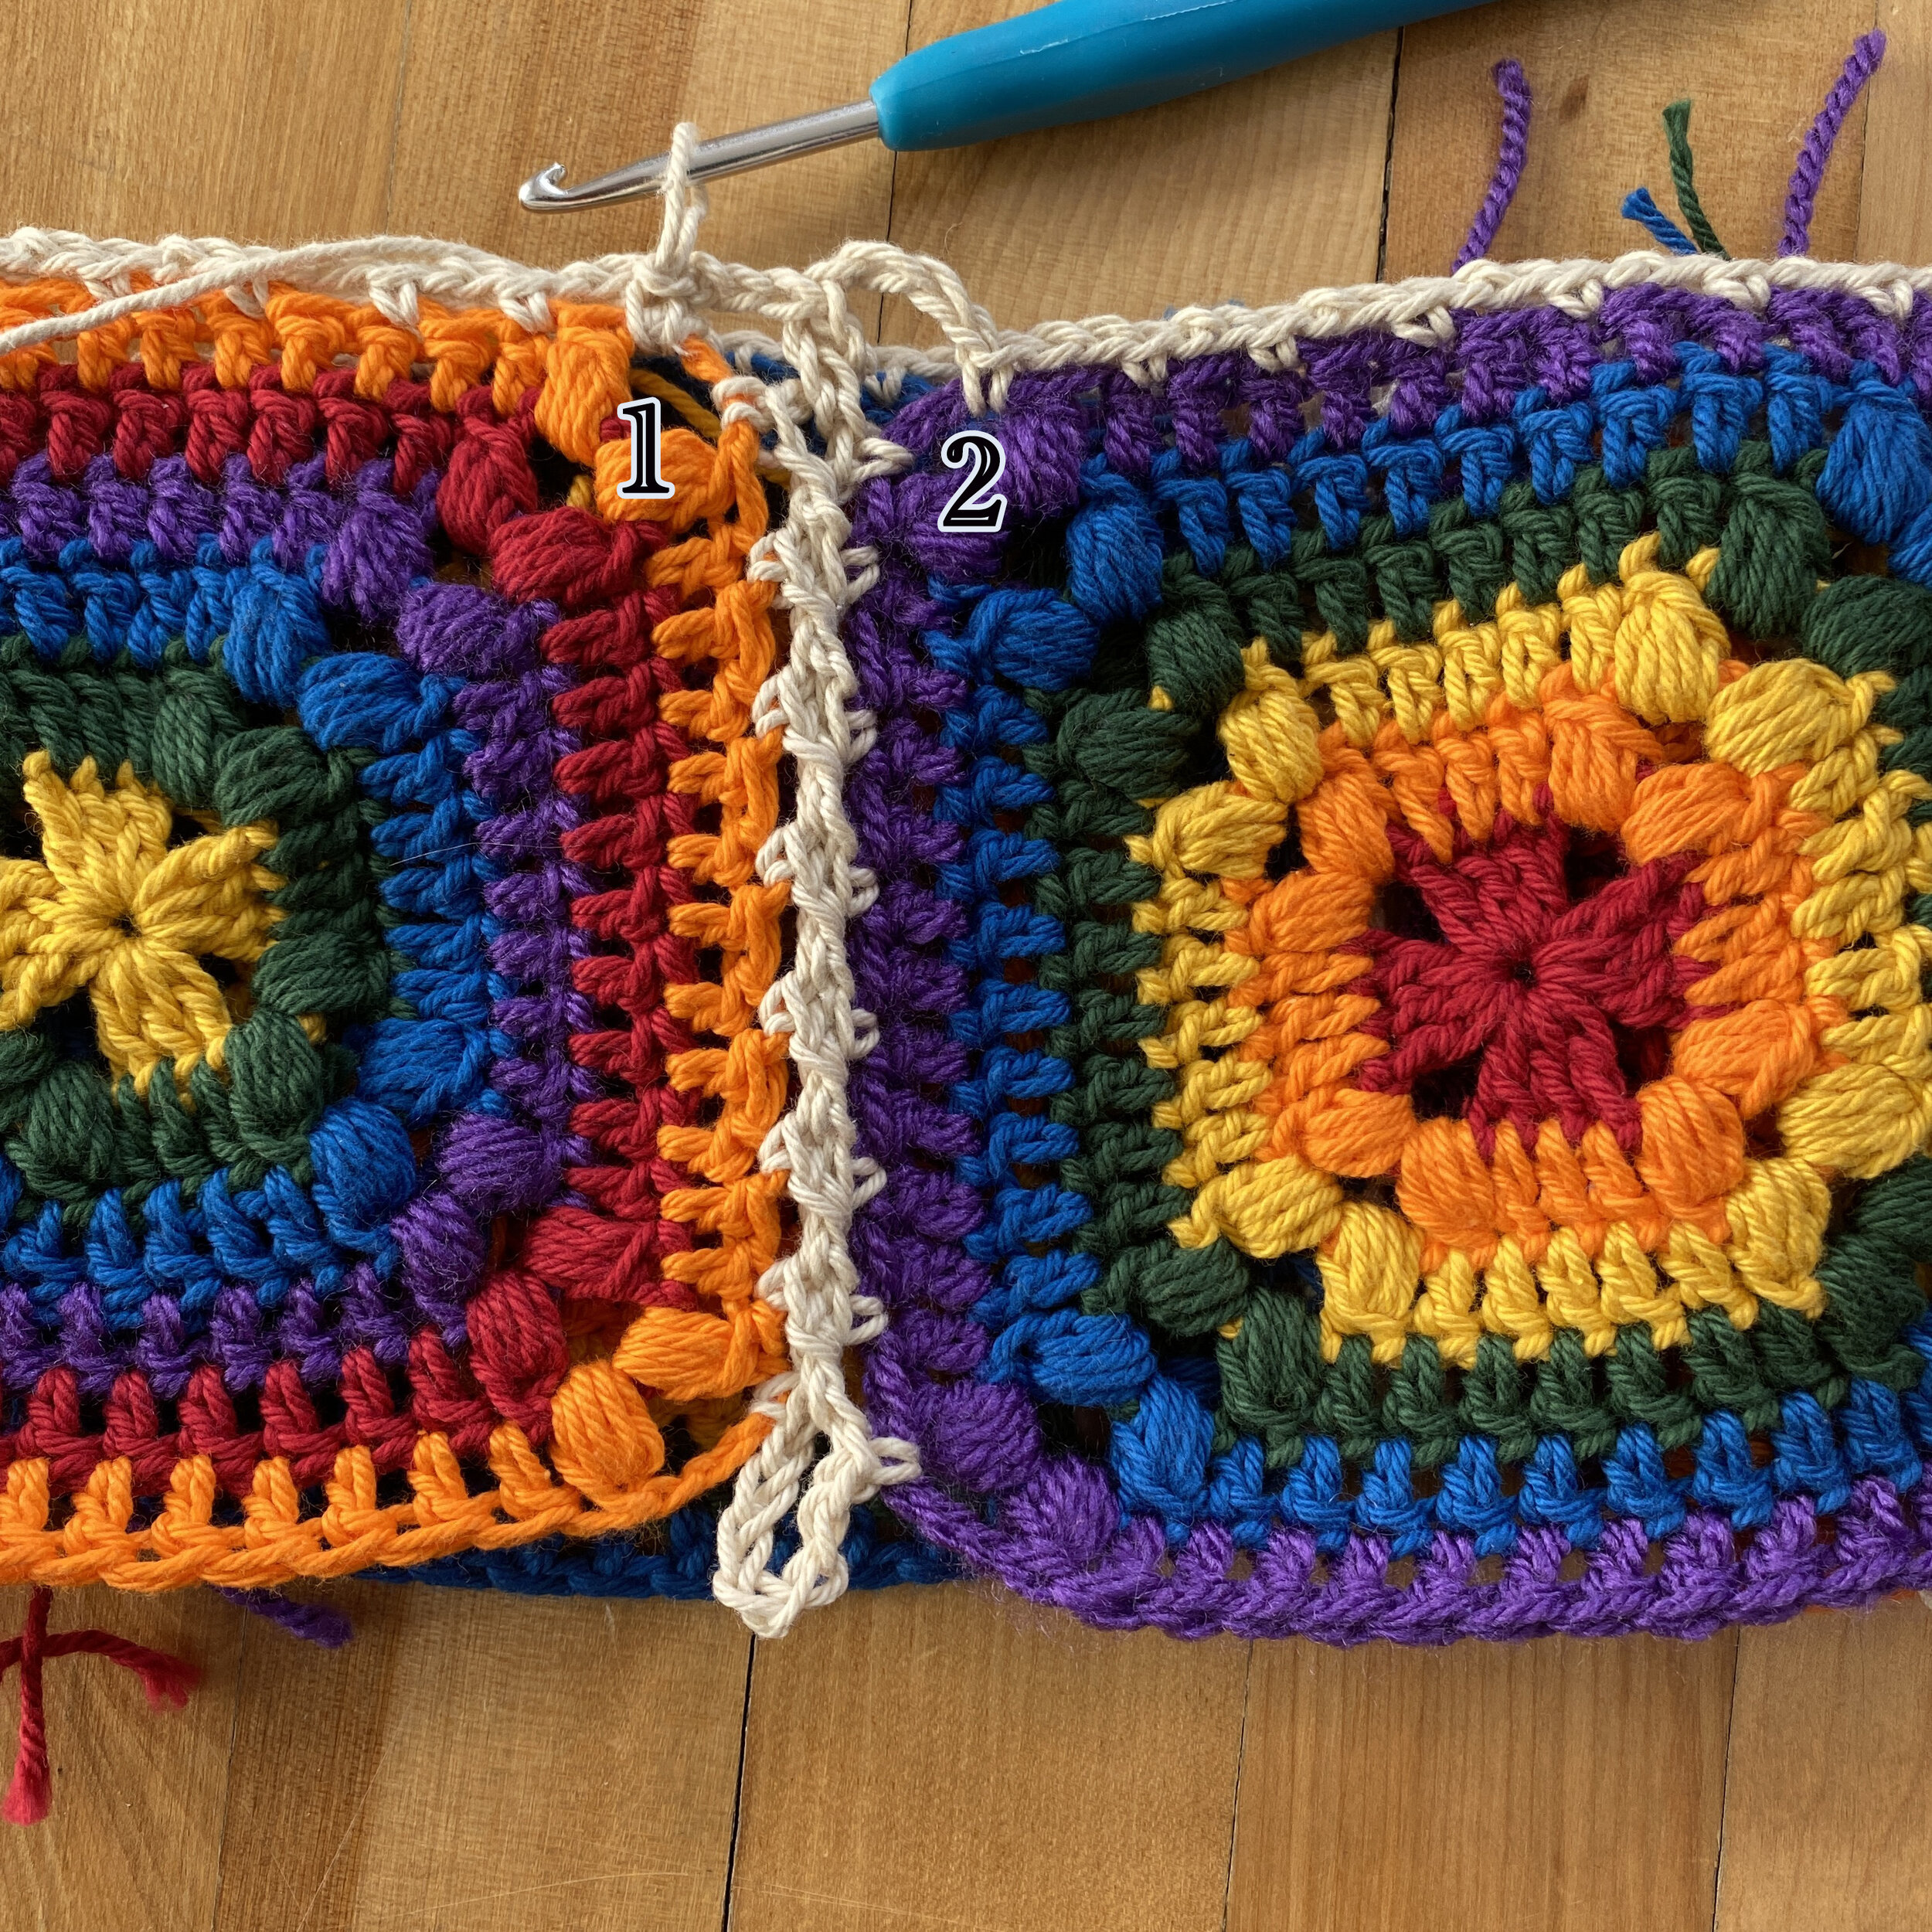
4. place hook through 1st ch2 space on Square 1 and pull through
5. ch1, sk1 on Square 2 and sc in next st*, rep * * up the side placing the last sc in the 1st ch of the ch 4 of corner 1 of Square 2, ch4, remove hook from loop
6. pull loop through ch7 of corner 2 of Square 1, ch3, sc in 4th ch of corner 1 on Square 2. Rep until all squares are joined. Fold squares and attach Square 1 to the last Square and sl st into the first sc of the join on Square 1.
FO

Body:
With 5.5mm hook and MC.
S, XL, 3XL (odd number of granny squares)
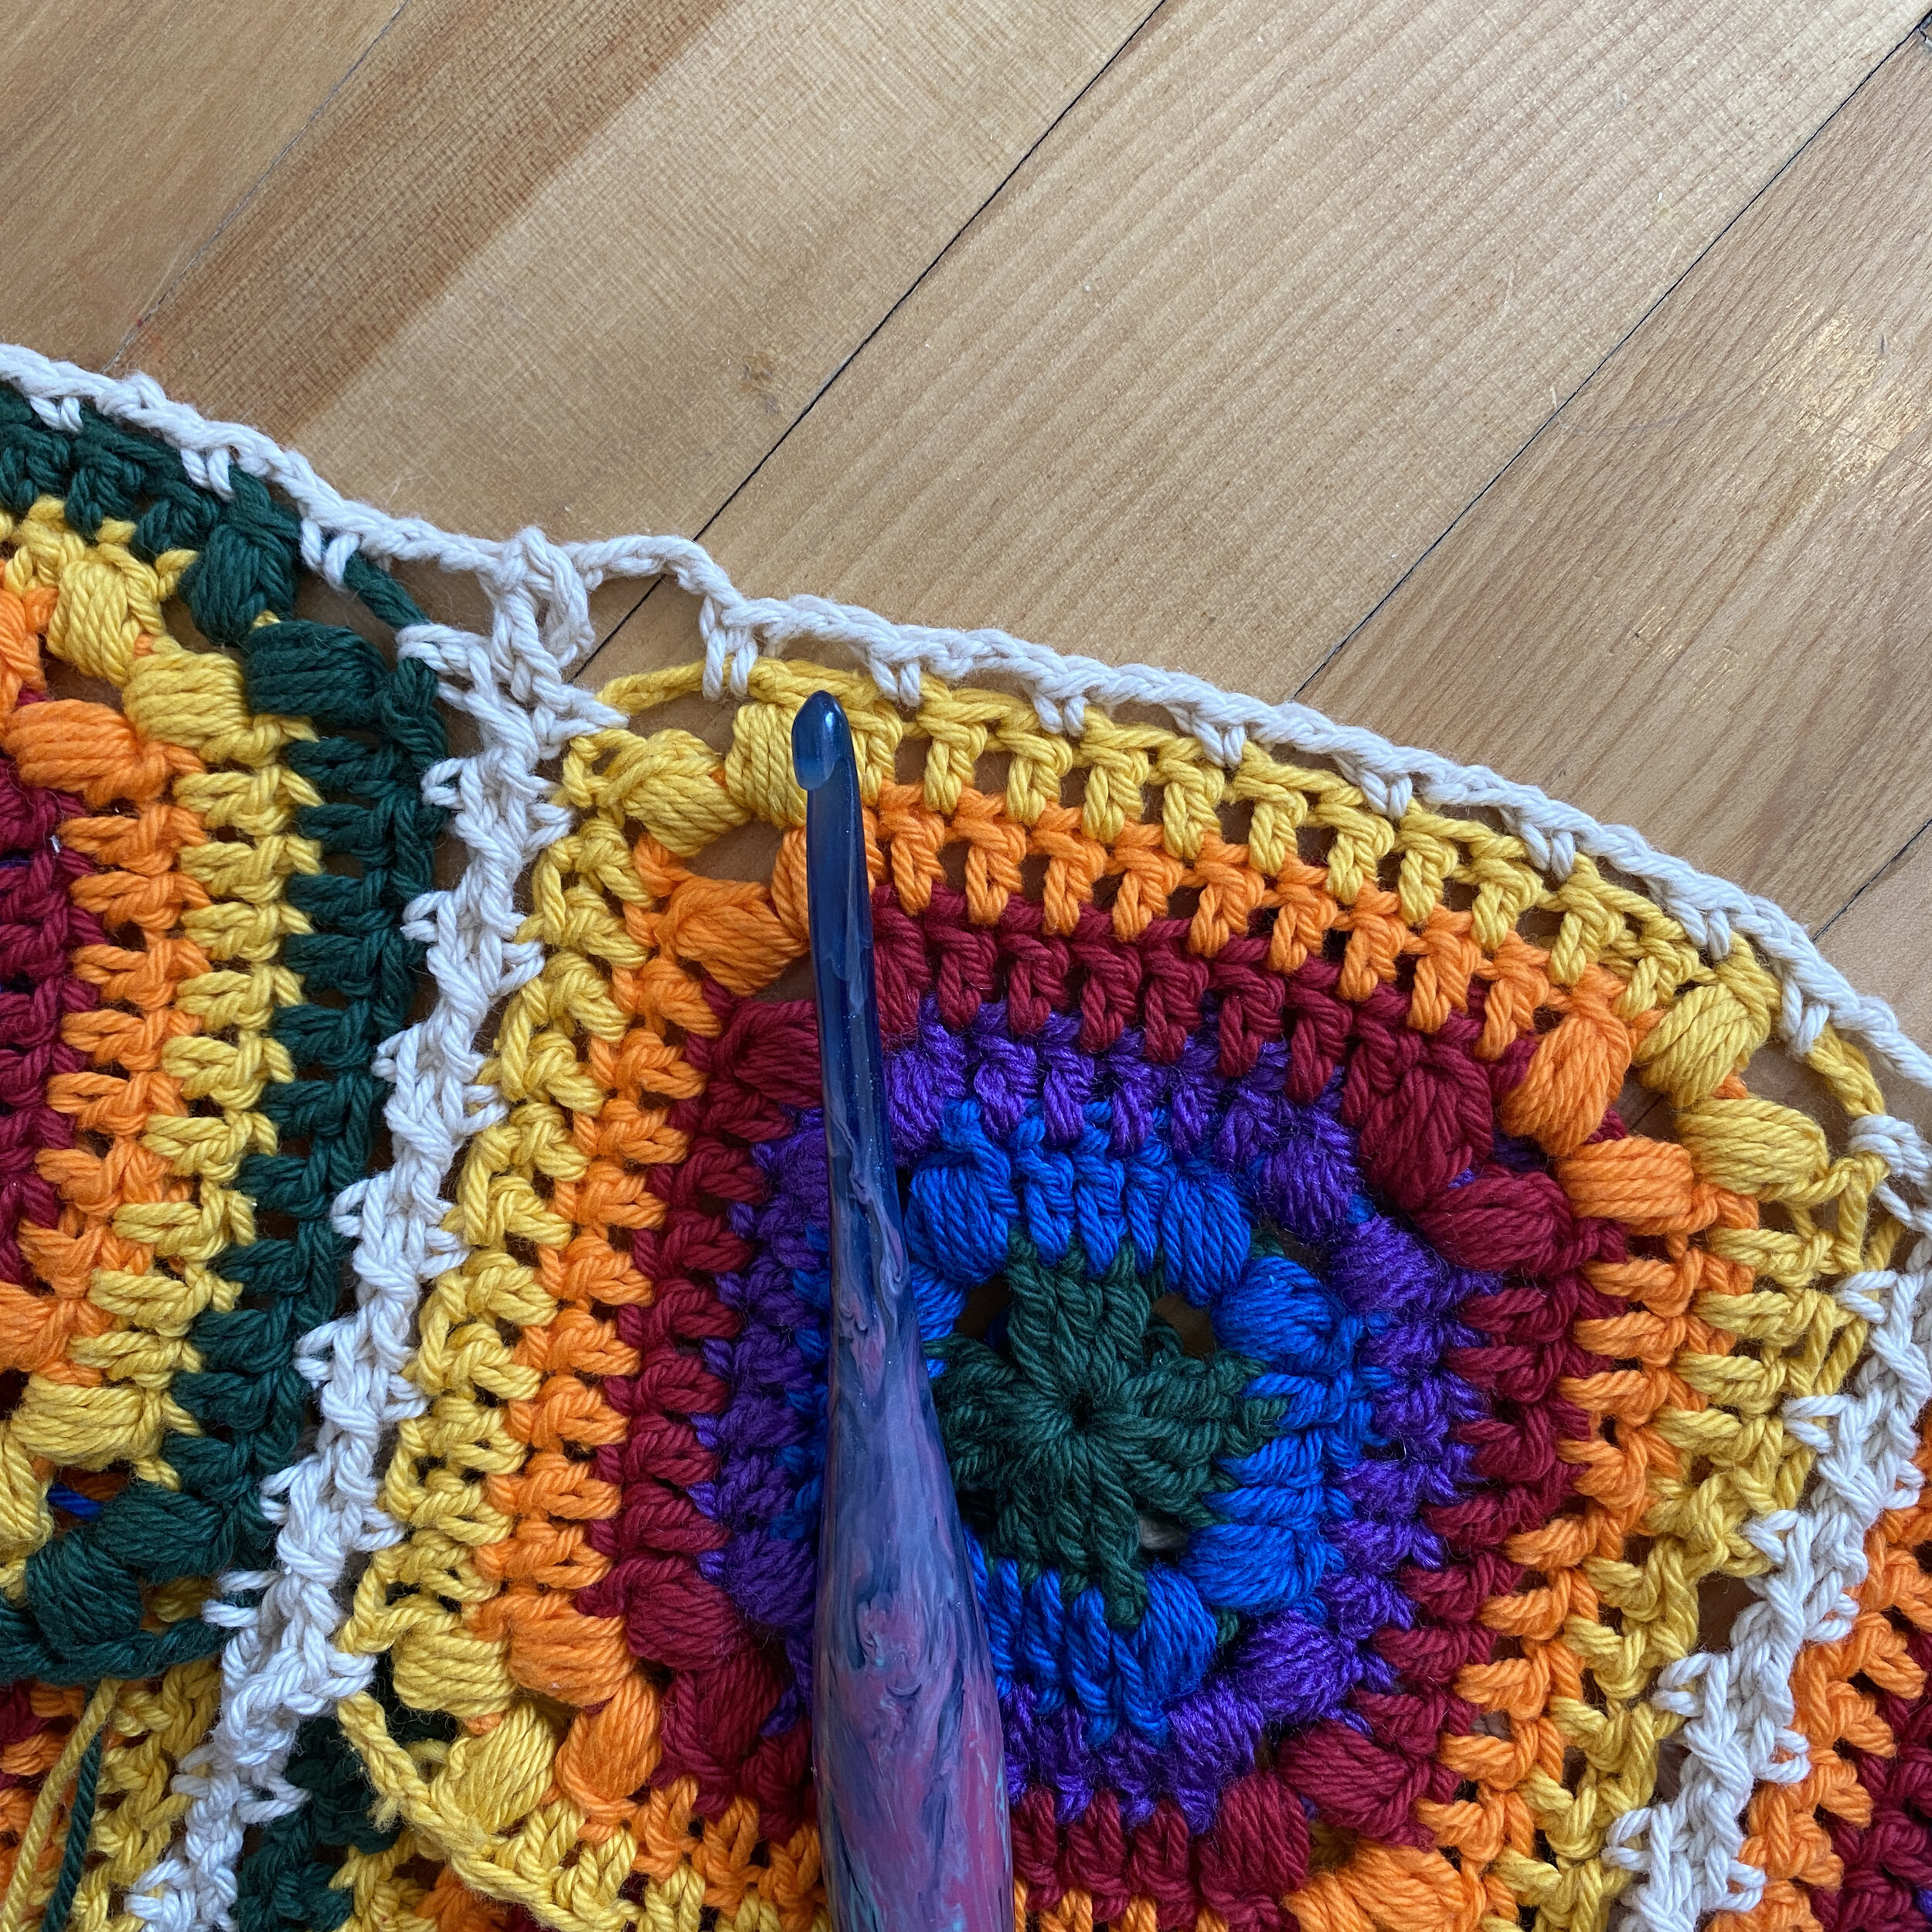
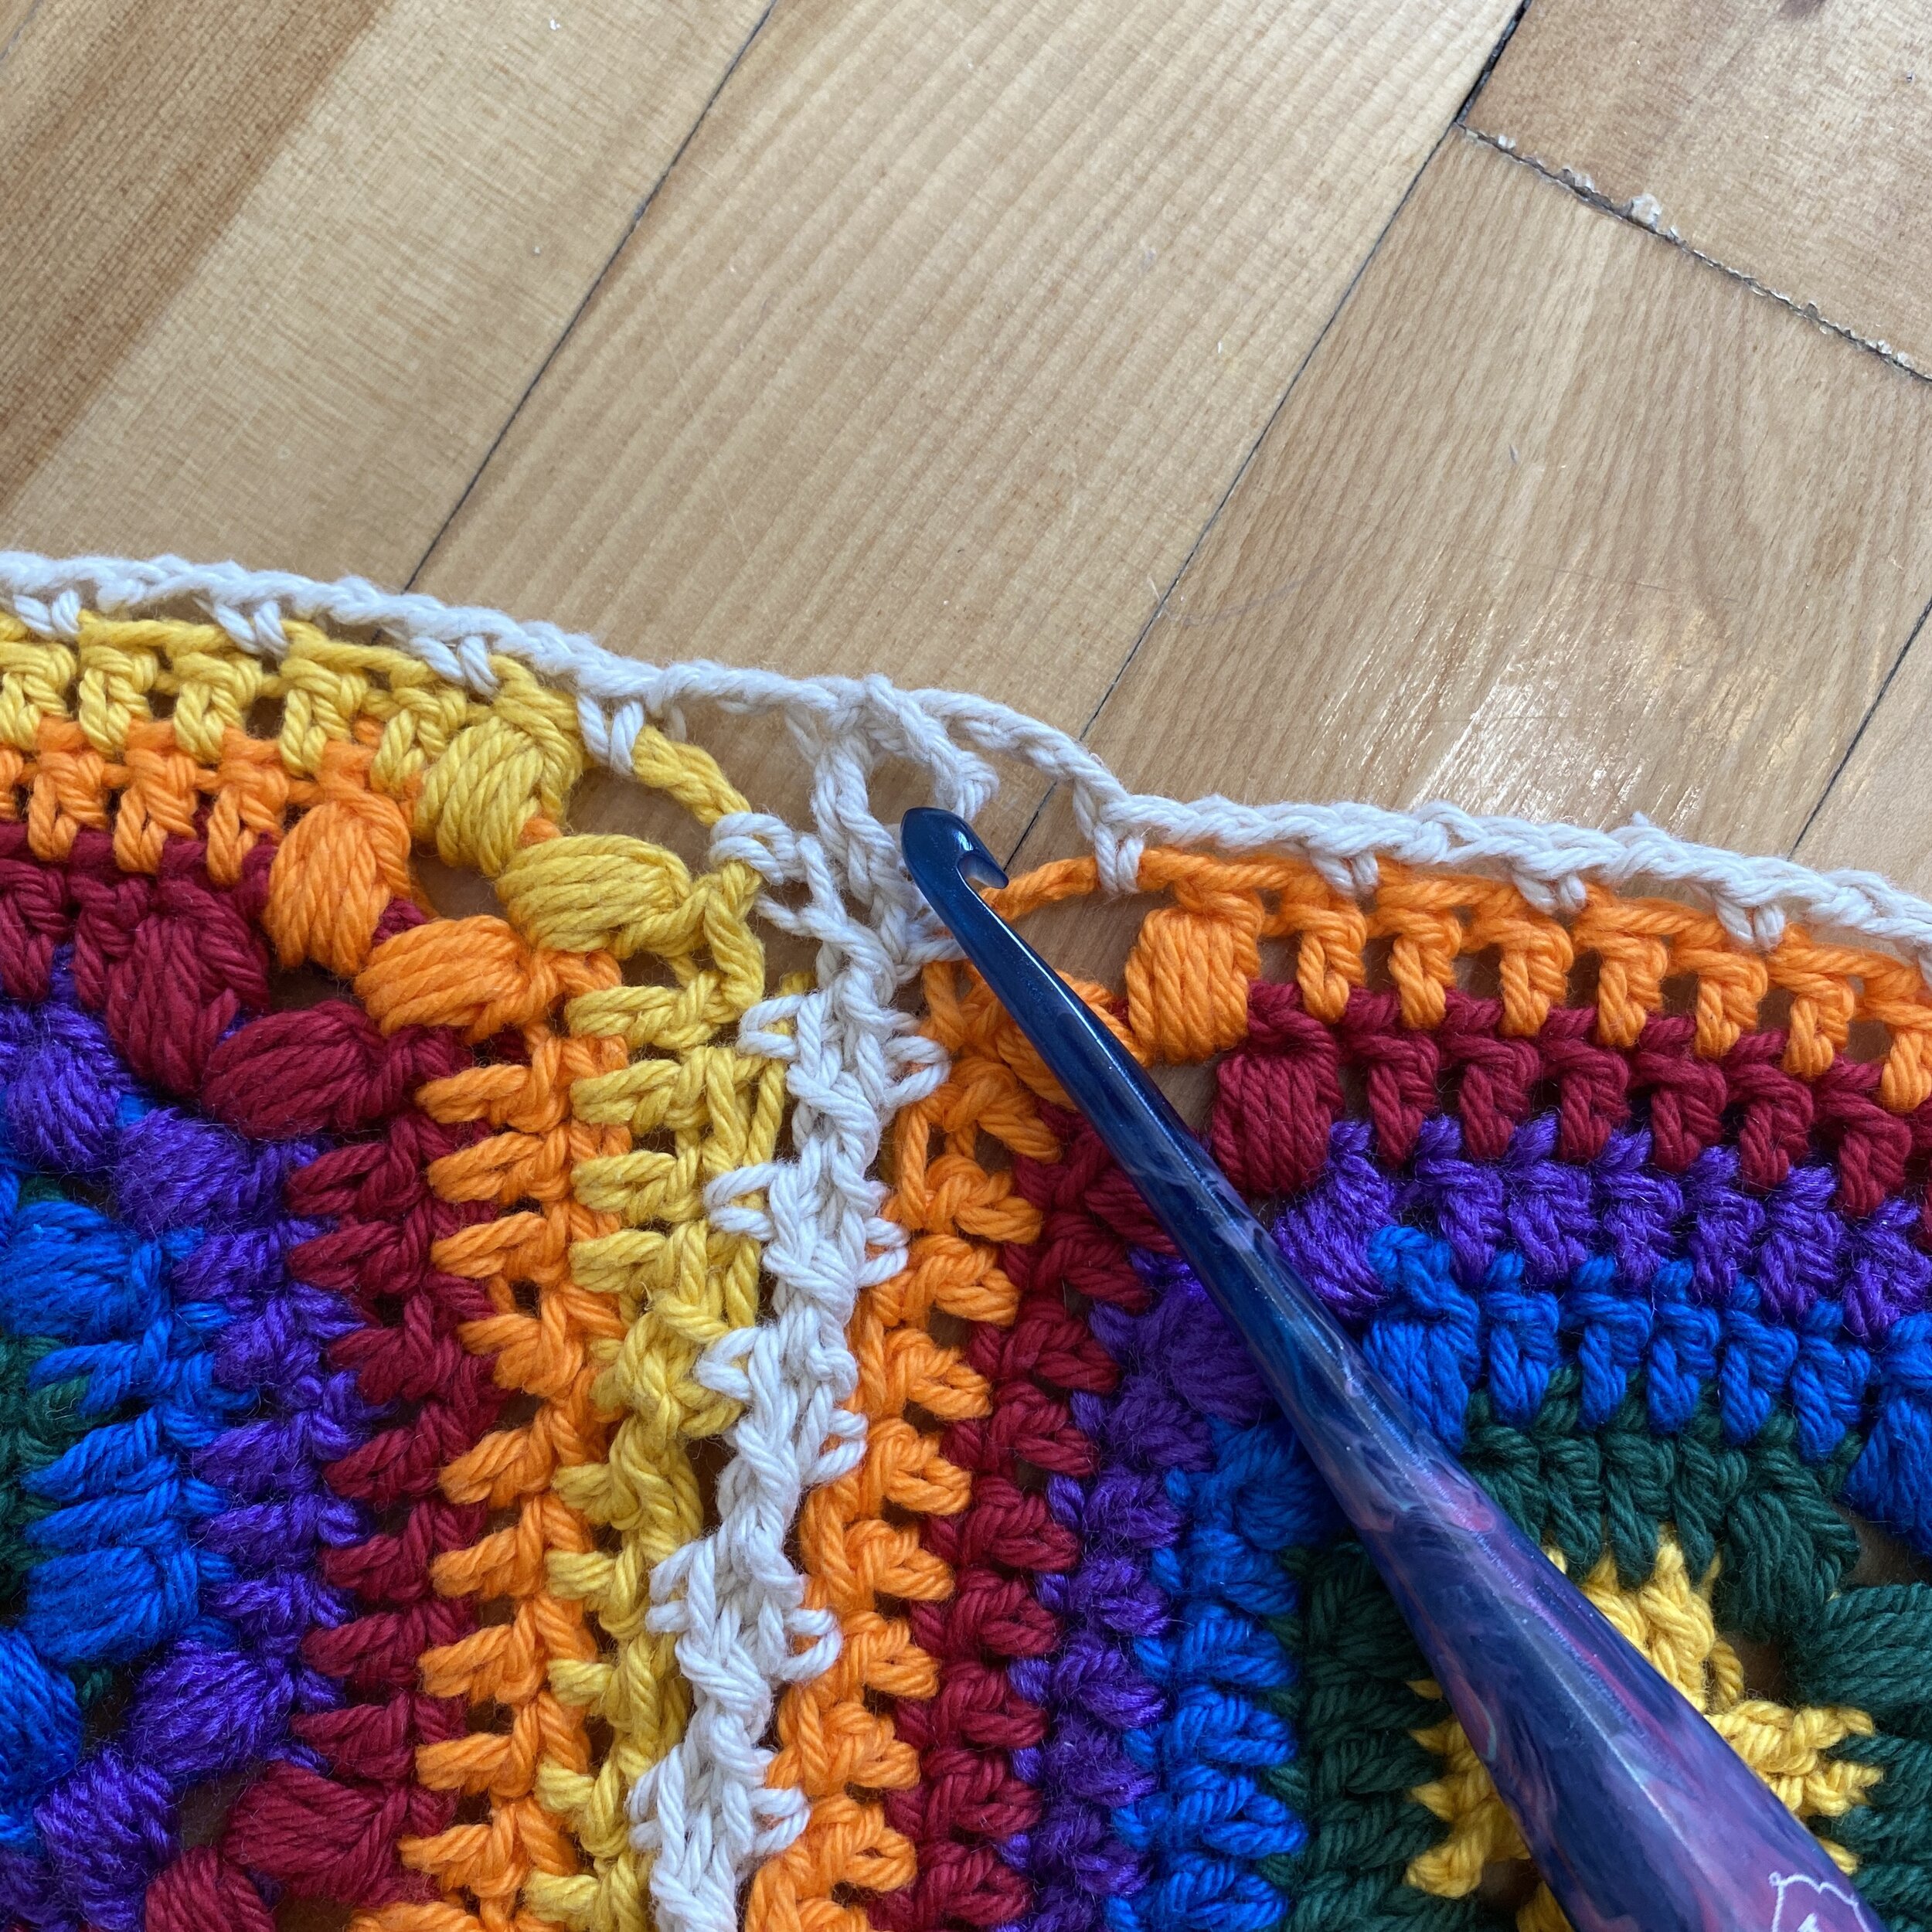
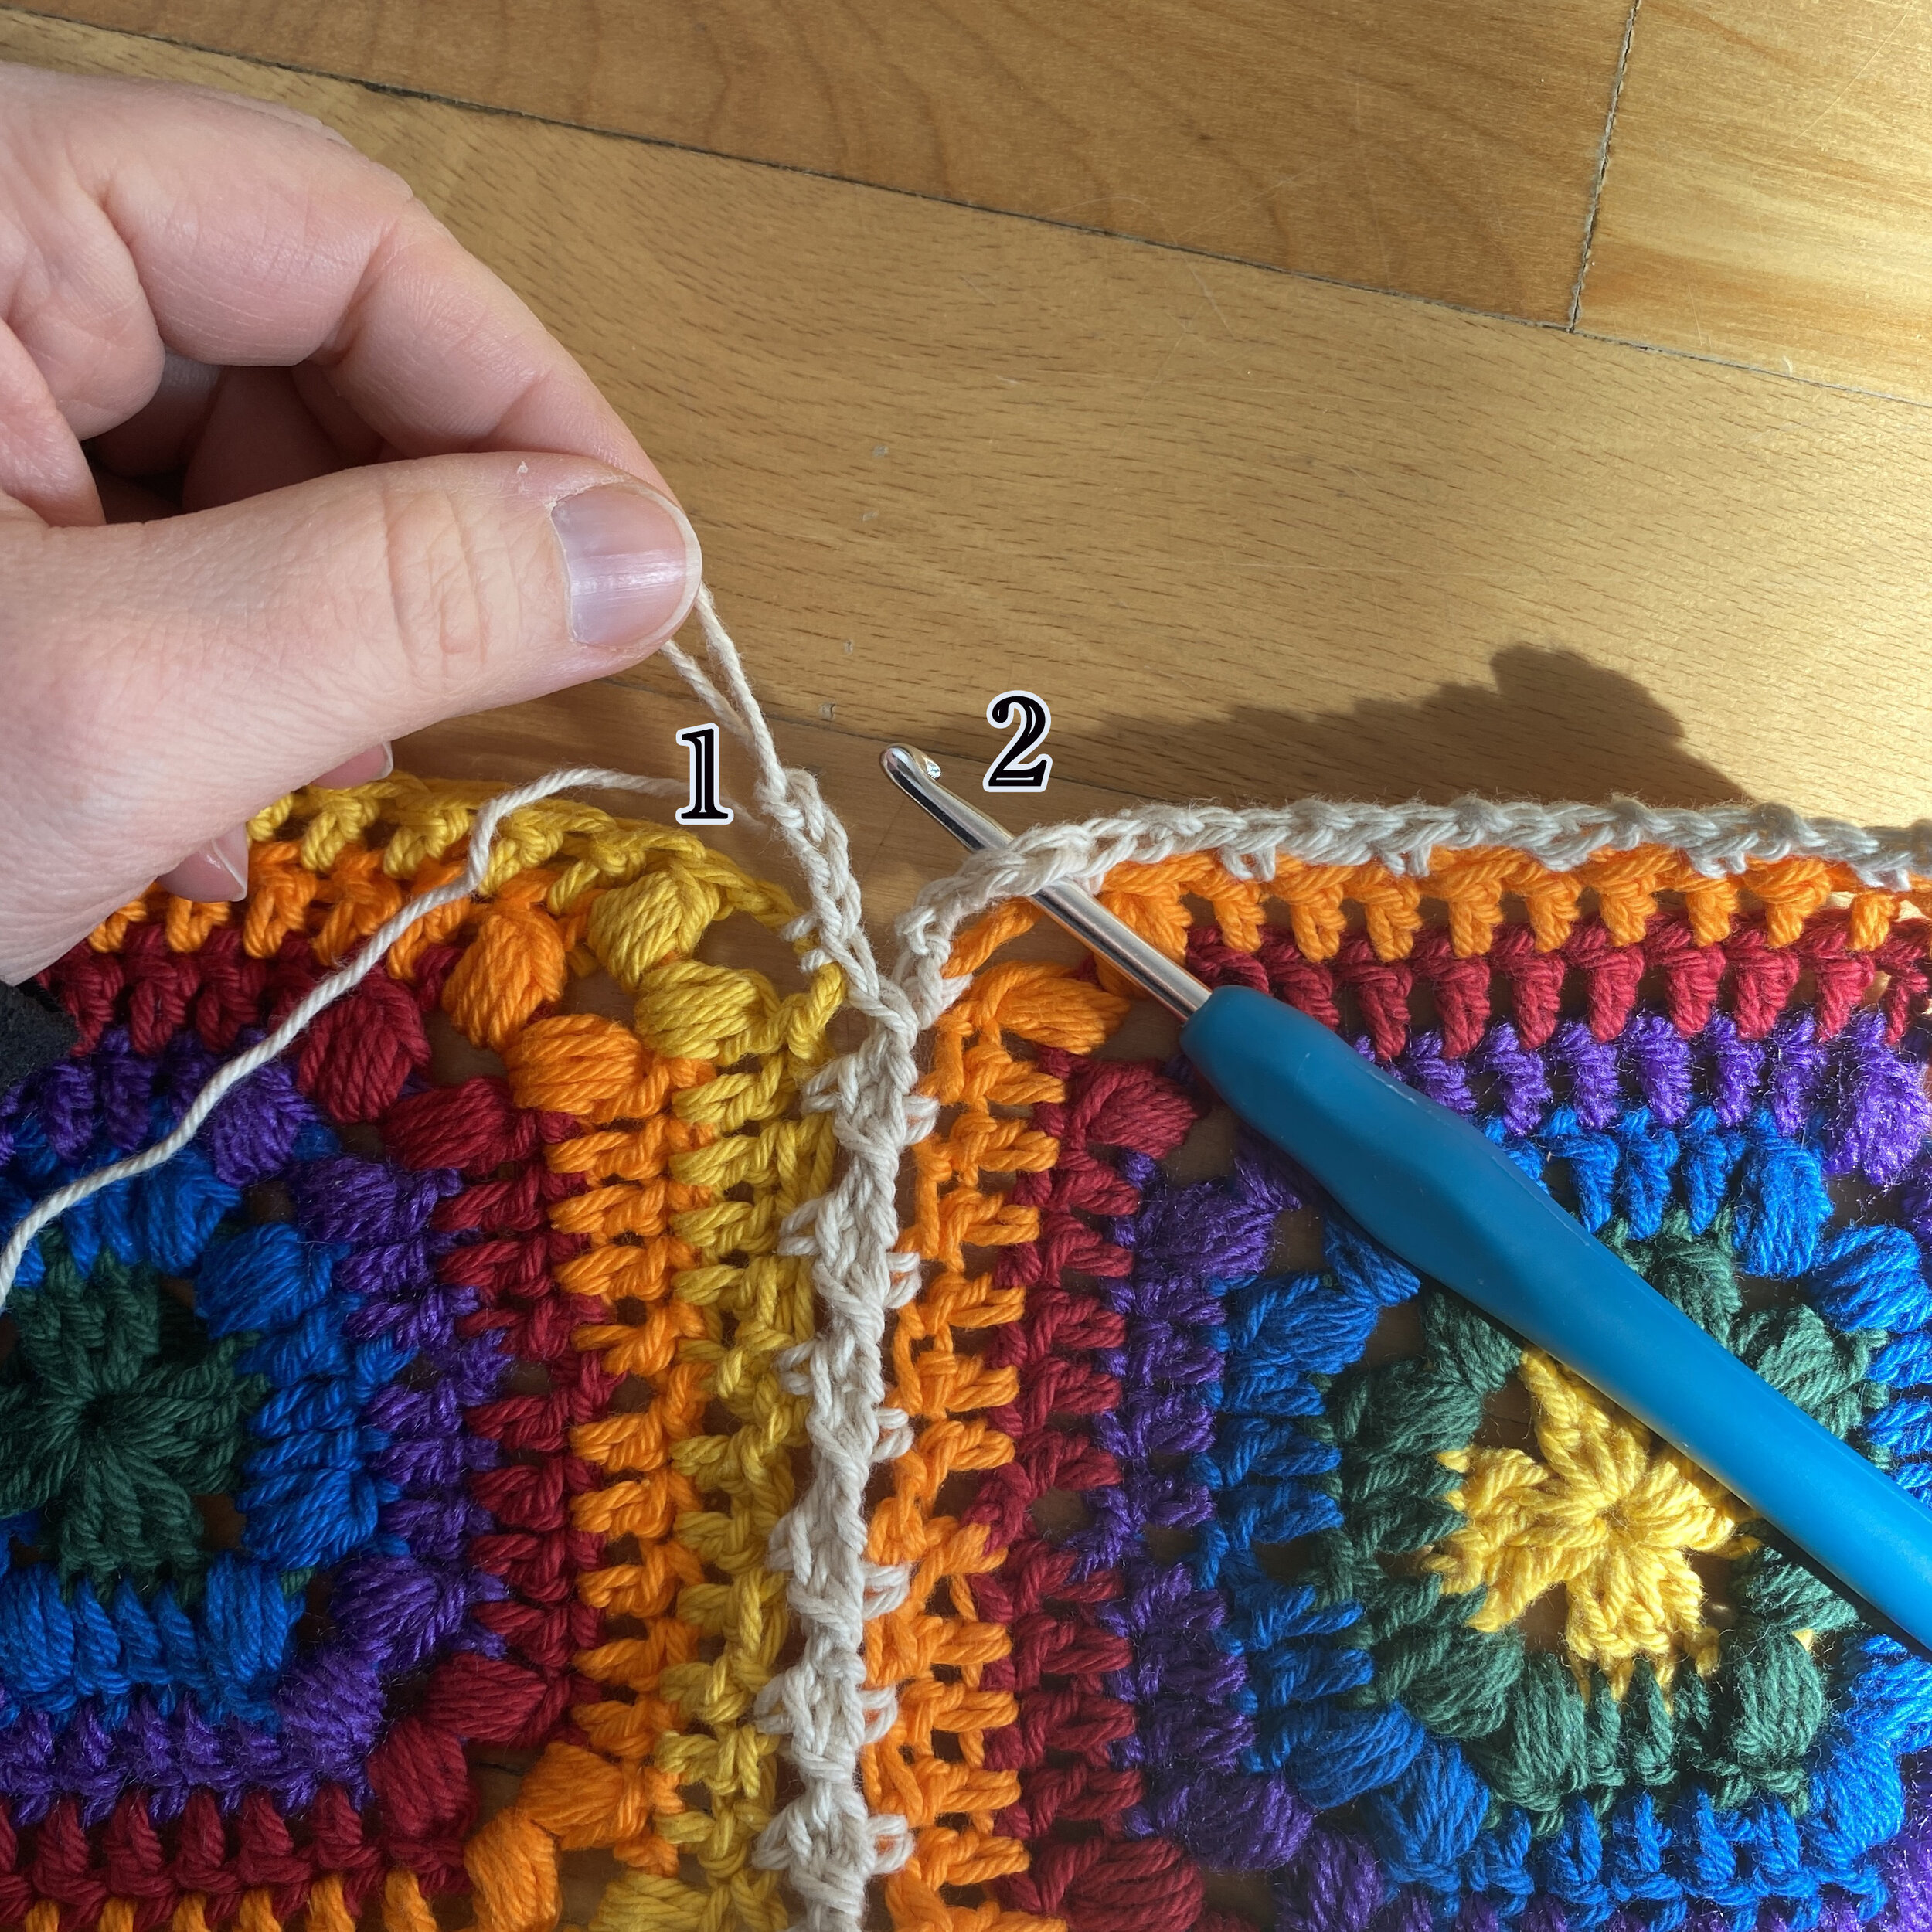
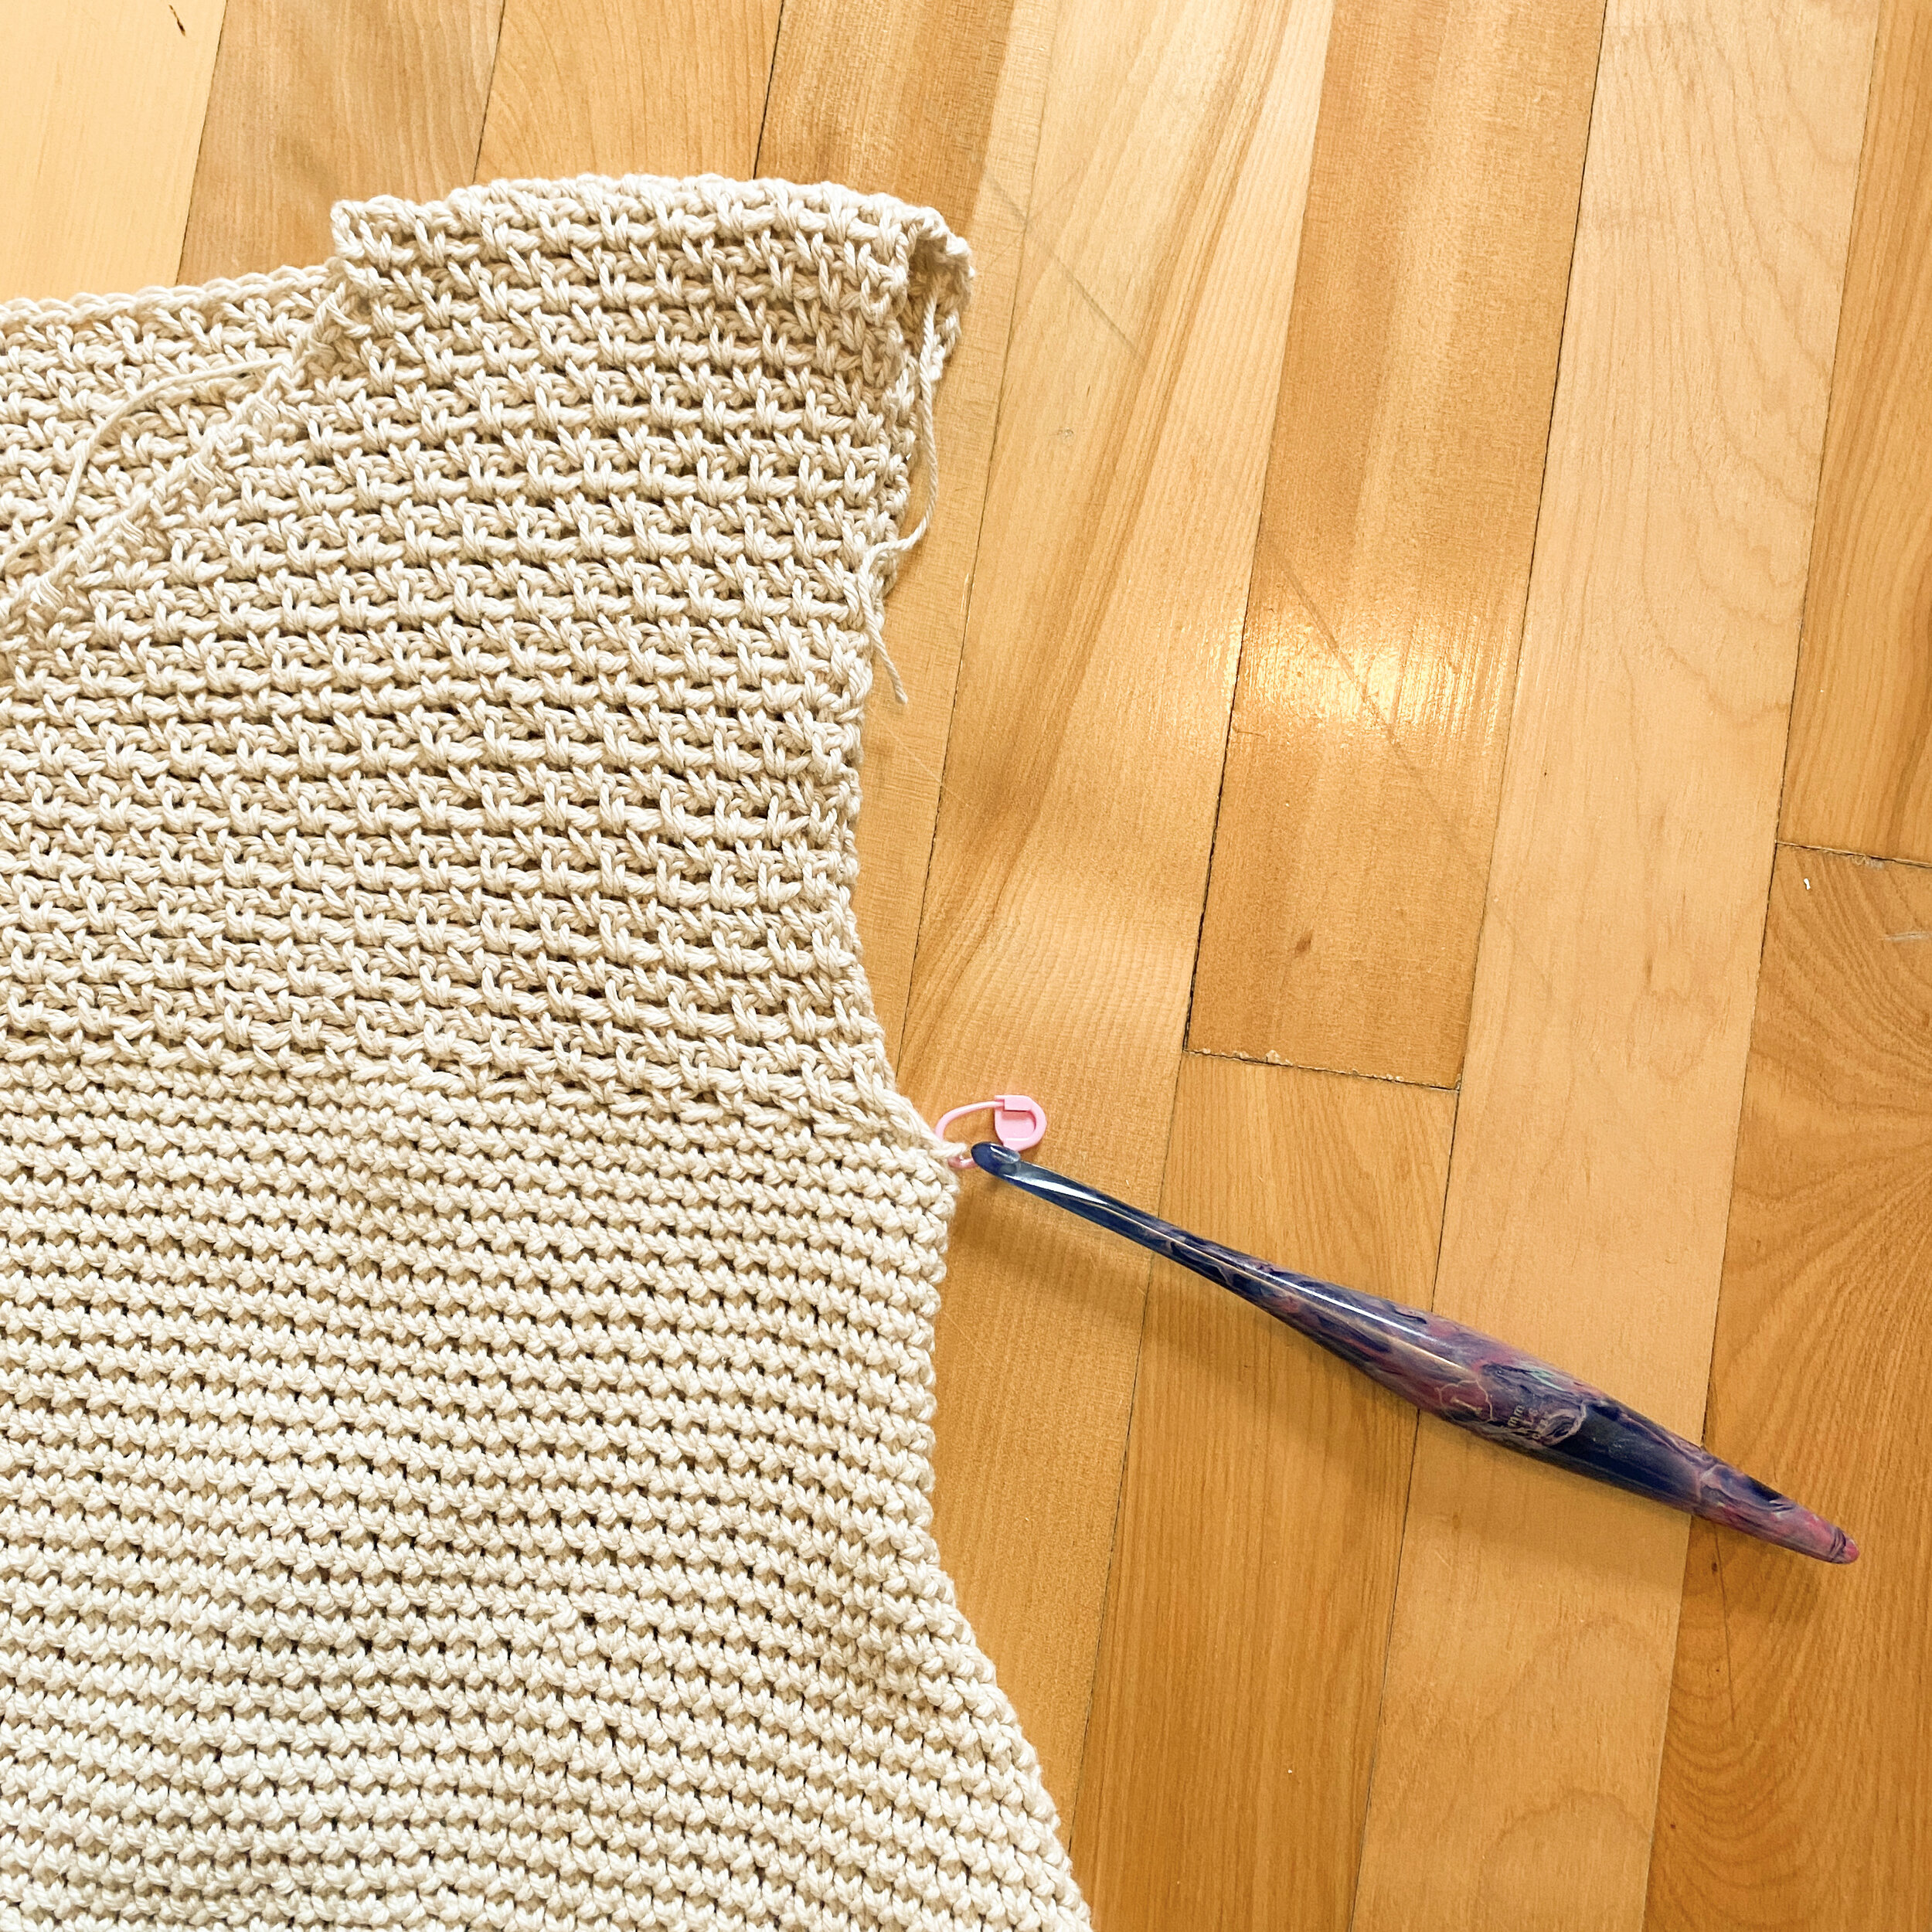
Round 1: Decide which square you would like to be at the side of your t-shirt. Reattach yarn with sl st to the last ch2 of that square (refer to picture 1 above), 2 sc in same space, 1sc in next sc, [2 sc in ch 7 space, 1 sc in center loop (refer to picture 2 above), 2 sc in next ch7 space, *1 sc in next sc, 2sc in ch2 space, 1 sc in next sc, 1sc in next ch 2 space* rep * * 2 more times, 1sc in next sc, 2sc in ch2 space, 1sc in the next sc] rep [ ] around until you reach the square you started with. 2 sc in ch 7 space, 1 sc in center loop, 2 sc in next ch7 space, *1 sc in next sc, 2sc in ch2 space, 1 sc in next sc, 1sc in next ch 2 space* rep * * twice, 1sc in the last sc, sl st into first sc of round. Pm in the 1st st, which is now your BOR, and at st #109(133, 157). This will indicate the sides of your t-shirt, which is where we will be making our decreases. [216(264, 312) total sts]
M, L, 2XL (even number of granny squares)
Round 1: Reattach yarn with sl st to the last center loop between squares (refer to picture 2 above), 1 sc in same space, 2 sc in ch7 space, [*1 sc in next sc, 2sc in ch2 space, 1 sc in next sc, 1sc in next ch 2 space* rep * * 2 more times, 1sc in next sc, 2sc in ch2 space, 1sc in the next sc*, 2 sc in ch 7 space, 1 sc in center loop, 2 sc in next ch7 space] rep [ ] around until the last square. 2 sc in ch 7 space, sl st into first sc of round. Pm in the 1st st, which is now your BOR, and at st #121(121, 145). This will indicate the sides of your t-shirt, which is where we will be making our decreases. [240(240, 288) total sts]
Decreases:
Next, we are going to be making decreases towards the bust by CSSC2tog on either side of each st marker (4sts each decrease round) starting with Round 2.
For S size, you will decrease 4 st (one on either side of each sm) every row 15 times. (216 st to 156 st)
For M size, you will decrease 4 st (one on either side of each sm) every row 17 times. (240 st to 172 st)
For L size, you will decrease 4 st (one on either side of each sm) every 2 rows 13 times. (240 st to 188 st)
For XL size, you will decrease 4 st (one on either side of each sm) every 2 rows 16 times. (264 st to 200 st)
For 2XL size, you will decrease 4 st (one on either side of each sm) every 2 rows 18 times. (288 st to 216 st)
For 3XL size, you will decrease 4 st (one on either side of each sm) every 2 rows 20 times. (312 st to 232 st)
S and M Only:
In this section, you will need to be aware that your side seam may travel. The alternating sl st is built into the pattern, and there is a video to help you out in the notes section. It is ok if your seam still drifts a bit as we will reset it in the next section.
Round 2: ch1, 1CSSC in first sc (the same st as sl st from previous round), rsm, CSSC2tog, CSSC until 2 sts before next sm, CSSC2tog, 1CSSC, rsm, CSSC2tog, CSSC until 2 sts before next sm, CSSC2tog, sl st in 1st CSSC of round (do not tighten sl st, this sl st is now your last st).
Round 3: ch1, sk the 1st CSSC (the st that you sl st in from previous round) CSSC in 2nd CSSC (this is now your first st), rsm, CSSC2tog, CSSC until 2 sts before next st marker, CSSC2tog, 1CSSC, rsm, CSSC2tog, CSSC until last 2 sts before next st marker, CSSC2tog, (the last CSSC and the sl st from Round 2) sl st into the 1st CSSC of the round. (pull sl st tight).
Round 4 - Round 16(18): Rep Round 2 - Round 3
Round 17(19): ch1, sk the 1st CSSC (the st that you sl st in from previous round) CSSC around, place your last CSSC in the sl st from previous round, sl st into the 1st CSSC of the round. (pull sl st tight).
Round 18(20): ch1, 1CSSC in first CSSC and every CSSC around, sl st into 1st CSSC of round. (do not tighten sl st, this sl st is now your last st).
Round 19(21) - Round 26(26): rep Round 17(19) - Round 18(20).
FO
L, XL, 2XL, 3XL:
In this section, you will need to be aware that your side seam may travel. The alternating sl st is built into the pattern, and there is a video to help you out in the notes section. It is ok if your seam still drifts a bit as we will reset it in the next section.
Round 2: ch1, 1CSSC in first sc (the same st as sl st from previous round), rsm, CSSC2tog, CSSC until 2 sts before next sm, CSSC2tog, 1CSSC, rsm, CSSC2tog, CSSC until 2 sts before next sm, CSSC2tog, sl st in 1st CSSC of round (do not tighten sl st).
Round 3: ch1, sk the 1st CSSC (the st that you sl st in from previous round) CSSC around, place your last CSSC in the sl st from Round 2, sl st into the 1st CSSC of the round. (pull sl st tight).
Round 4 - Round 27(33, 37, 41): rep Round 2 - Round 3
Round 28(34, 38, 42): ch1, 1CSSC in first CSSC and every CSSC around, sl st into 1st CSSC of round. (do not tighten sl st, this sl st is now your last st).
Round 29(35, 39, 43): ch1, sk the 1st CSSC (the st that you sl st in from previous round) CSSC around, place your last CSSC in the sl st from previous round, sl st into the 1st CSSC of the round. (pull sl st tight).
Round 30(36, 40, 44) - Round 42(42, 52, 52): rep Round 28(34, 38, 42) - Round 29(35, 39, 43)
FO
Separating Front and back:
This is what will determine how large your sleeve opening is. This section will be approx. 7(7, 8, 8, 9, 9)” long, resulting in a 14(14, 16, 16, 18, 18)” sleeve opening in circumference once the shoulders are joined. If you need a larger sleeve opening, continue the front and back sections until it reaches the length you need. (Keep your gauge in mind). Add rows to the section before sectioning off the neckline on the front.
Back All Sizes:
Remove your sm and lay your top flat. It will look something like the picture. Because your seams might have travelled a little, you might need to determine where the center of your top is located again. Take a ruler or something that is straight and place it in the center of your top (refer to picture 1). Place a sm on the sts on either side of where your center is located. Count 38(42, 46, 49, 53, 57) sts from both sm and place sm at each side (refer to picture 2). You should have 78(86, 94, 100, 108, 116) sts on each side of your top now and the new sm should be located at the sides of your top. You can remove the center sm now. Decide which side you want to be the front and which will be the back. With 5.5mm hook, reattach yarn at the sm on the right side of the back of your top to finish the back side.
Row 27(27, 43, 43, 53, 53): ch2, sk 1st st (the st you attached the yarn to), sc in next st, ch1, *sk next st, sc in next st after, ch 1* rep * * until your last sc goes into the st with your sm. Turn.
Row 28(28, 44, 44, 54, 54): ch 2, sc in 1st ch1 space of row below, ch1, *sc in ch1 space below, ch1* rep * * until end, sc in final ch2 of row below. Turn.
Row 29(29, 45, 45, 55, 55) - Row 56(56, 76, 76, 90, 90): rep Row 28(28, 44, 44, 54, 54).
The separated back section is 30(30, 34, 34, 38, 38) rows.
FO.
Front:
Turn top so that the front is facing you. With 5.5mm hook, reattach the yarn to the first unworked st on the front. (refer to picture)
Row 27(27, 43, 43, 53, 53): ch2, sk 1st st (the st you attached the yarn to), sc in next st, ch1, *sk next st, sc in next st after, ch 1* rep * * until your last sc goes into the st with your sm. Turn.
Row 28(28, 44, 44, 54, 54): ch2, sc in 1st ch1 space of row below, ch1, *sc in ch1 space below, ch1* rep * * until end, sc in final ch2 of row below. Turn.
Row 29(29, 45, 45, 55, 55) - Row 39(39, 59, 59, 73, 73): rep Row 28(28, 44, 44, 54, 54)
The section before the neckline splits is 13(13, 17, 17, 21, 21) rows long.
Neckline:
Place a sm at st #33(37, 41, 43, 47, 51) (refer to picture)
Row 40(40, 60, 60, 74, 74): ch2, sc in 1st ch1 space of row below, ch1, *sc in ch1 space below, ch1* rep * * until last 3 sts (2 before sm and st with the sm), sc in ch1 below, sc2tog. Turn. [32(36, 40, 42, 46, 50) sts]
Row 41(41, 61, 61, 75, 75): ch1, sc2tog, sc in 1st ch1 space, ch1, *sc in ch1 space below, ch1* rep * * until end, sc in final ch2 of row below. Turn. [31(35, 39, 41, 45, 49) sts]
Row 42(42, 62, 62, 76, 76) - Row 52(52, 72, 72, 86, 88): rep Row 40(40, 60, 60, 74, 74) - Row 41(41, 61, 61, 75, 75) [20(24, 28, 30, 34, 36) sts]
Row 53(53, 73, 73, 87, 89) - Row 56(56, 76, 76, 90, 90): ch2, sc in 1st ch1 space of row below, ch1, *sc in ch1 space below, ch1* rep * * until end, sc in final ch2 of row below. Turn.
FO
Reattach yarn to the opposite side with RS facing in the ch2 space, place a sm at st #33(37, 41, 43, 47, 51) and rep Row 40(40, 60, 60, 74, 74) - Row 56(56, 76, 76, 90, 90).
FO
Seam shoulders with your preferred method of seaming.
Sleeves:
Round 1: With 5.5mm hook. Reattach the yarn at the bottom of one of the sleeves’ opening with the color of your choice (refer to picture). Sc evenly around sleeve. (I placed 1 sc for each row and one in the seam for 61 sts on the small), sl st into 1st sc of round.
For the Rainbow, I started with red and then just followed ROYGB of the rainbow.
Round 2: ch1, scblo around, sl st into first st of round.
Round 3 - Round 5: rep Round 2.
FO
If you would like a longer sleeve, cont. repeating Round 2 until your desired length.
Collar:
Round 1: With 5.5mm hook and MC, reattach the yarn at the side seam of one side of the neckline. Sc evenly around the neckline. (I placed approx 1 sc for each row or 1 for each st depending), sl st into the 1st sc of the round.
Round 2: ch1, scblo around, sl st into first st of round.
Block top to measurements.
Granny squares are 5.5” tall.
After blocking, increases at the sides may be stiff and stick out. A good way to fix this is stretch and steam the sides or to lay the side seams flat between 2 damp towels and leave them over night. This will flatten out the creases created from blocking. If you used an iron-able yarn, you can also iron the sides flatter to create a better drape.

Happy Crocheting!
IF YOU LIKED THIS PATTERN, PLEASE SUPPORT ME ON PATREON OR BUY ME A COFFEE!

BUY ME A COFFEE
SUPPORT ME ON PATREON
I LOVE TO SEE WHAT YOU CREATE!
Please share your creations with the community on social media tagging @ravinsekaidesigns and hashtag #serendipitee
I can’t wait to see the beautiful things you come up with!
FOLLOW ME ON SOCIAL MEDIA
Facebook: Ravin Sekai Designs
Ravelry: RavinSekai
Instagram: @ravinsekaidesigns
Pinterest: Ravin Sekai Designs
Patreon: Ravin Sekai Designs

Hi! I’m Rachel.
I’m a quirky world traveller, avid knitter, crochet lover, pattern maker, and all around nerd! I spend a lot of time clowning around, and I often have the goofiest smile on my face. This website is the landing place for my new patterns, random thoughts, and general craziness. I hope you enjoy my randomness and my yarnie goodness!
Archive
- LGBTQ+
- PRIDE
- accessories
- accessory
- asymmetrical
- autumn
- backpack
- bag
- beach
- beanie
- bias shawl
- blanket
- blog hop
- blue
- bobble
- bookbag
- boyfriend
- cardigan
- case
- celtic weave stitch
- clutch
- clutch bag
- collaboration
- color block
- color work
- cover
- cover-up
- cowl
- crochet
- crochet pattern
- crochetpattern
- crop top
- croptop
- decor
- diy
- dress
- ds case
- duster
- earwarmer
- easy
- fall
- festivaltop
- free pattern
- gauge
- ghost
- granny squares
- halloween
- handbag
- hat
- headband


