
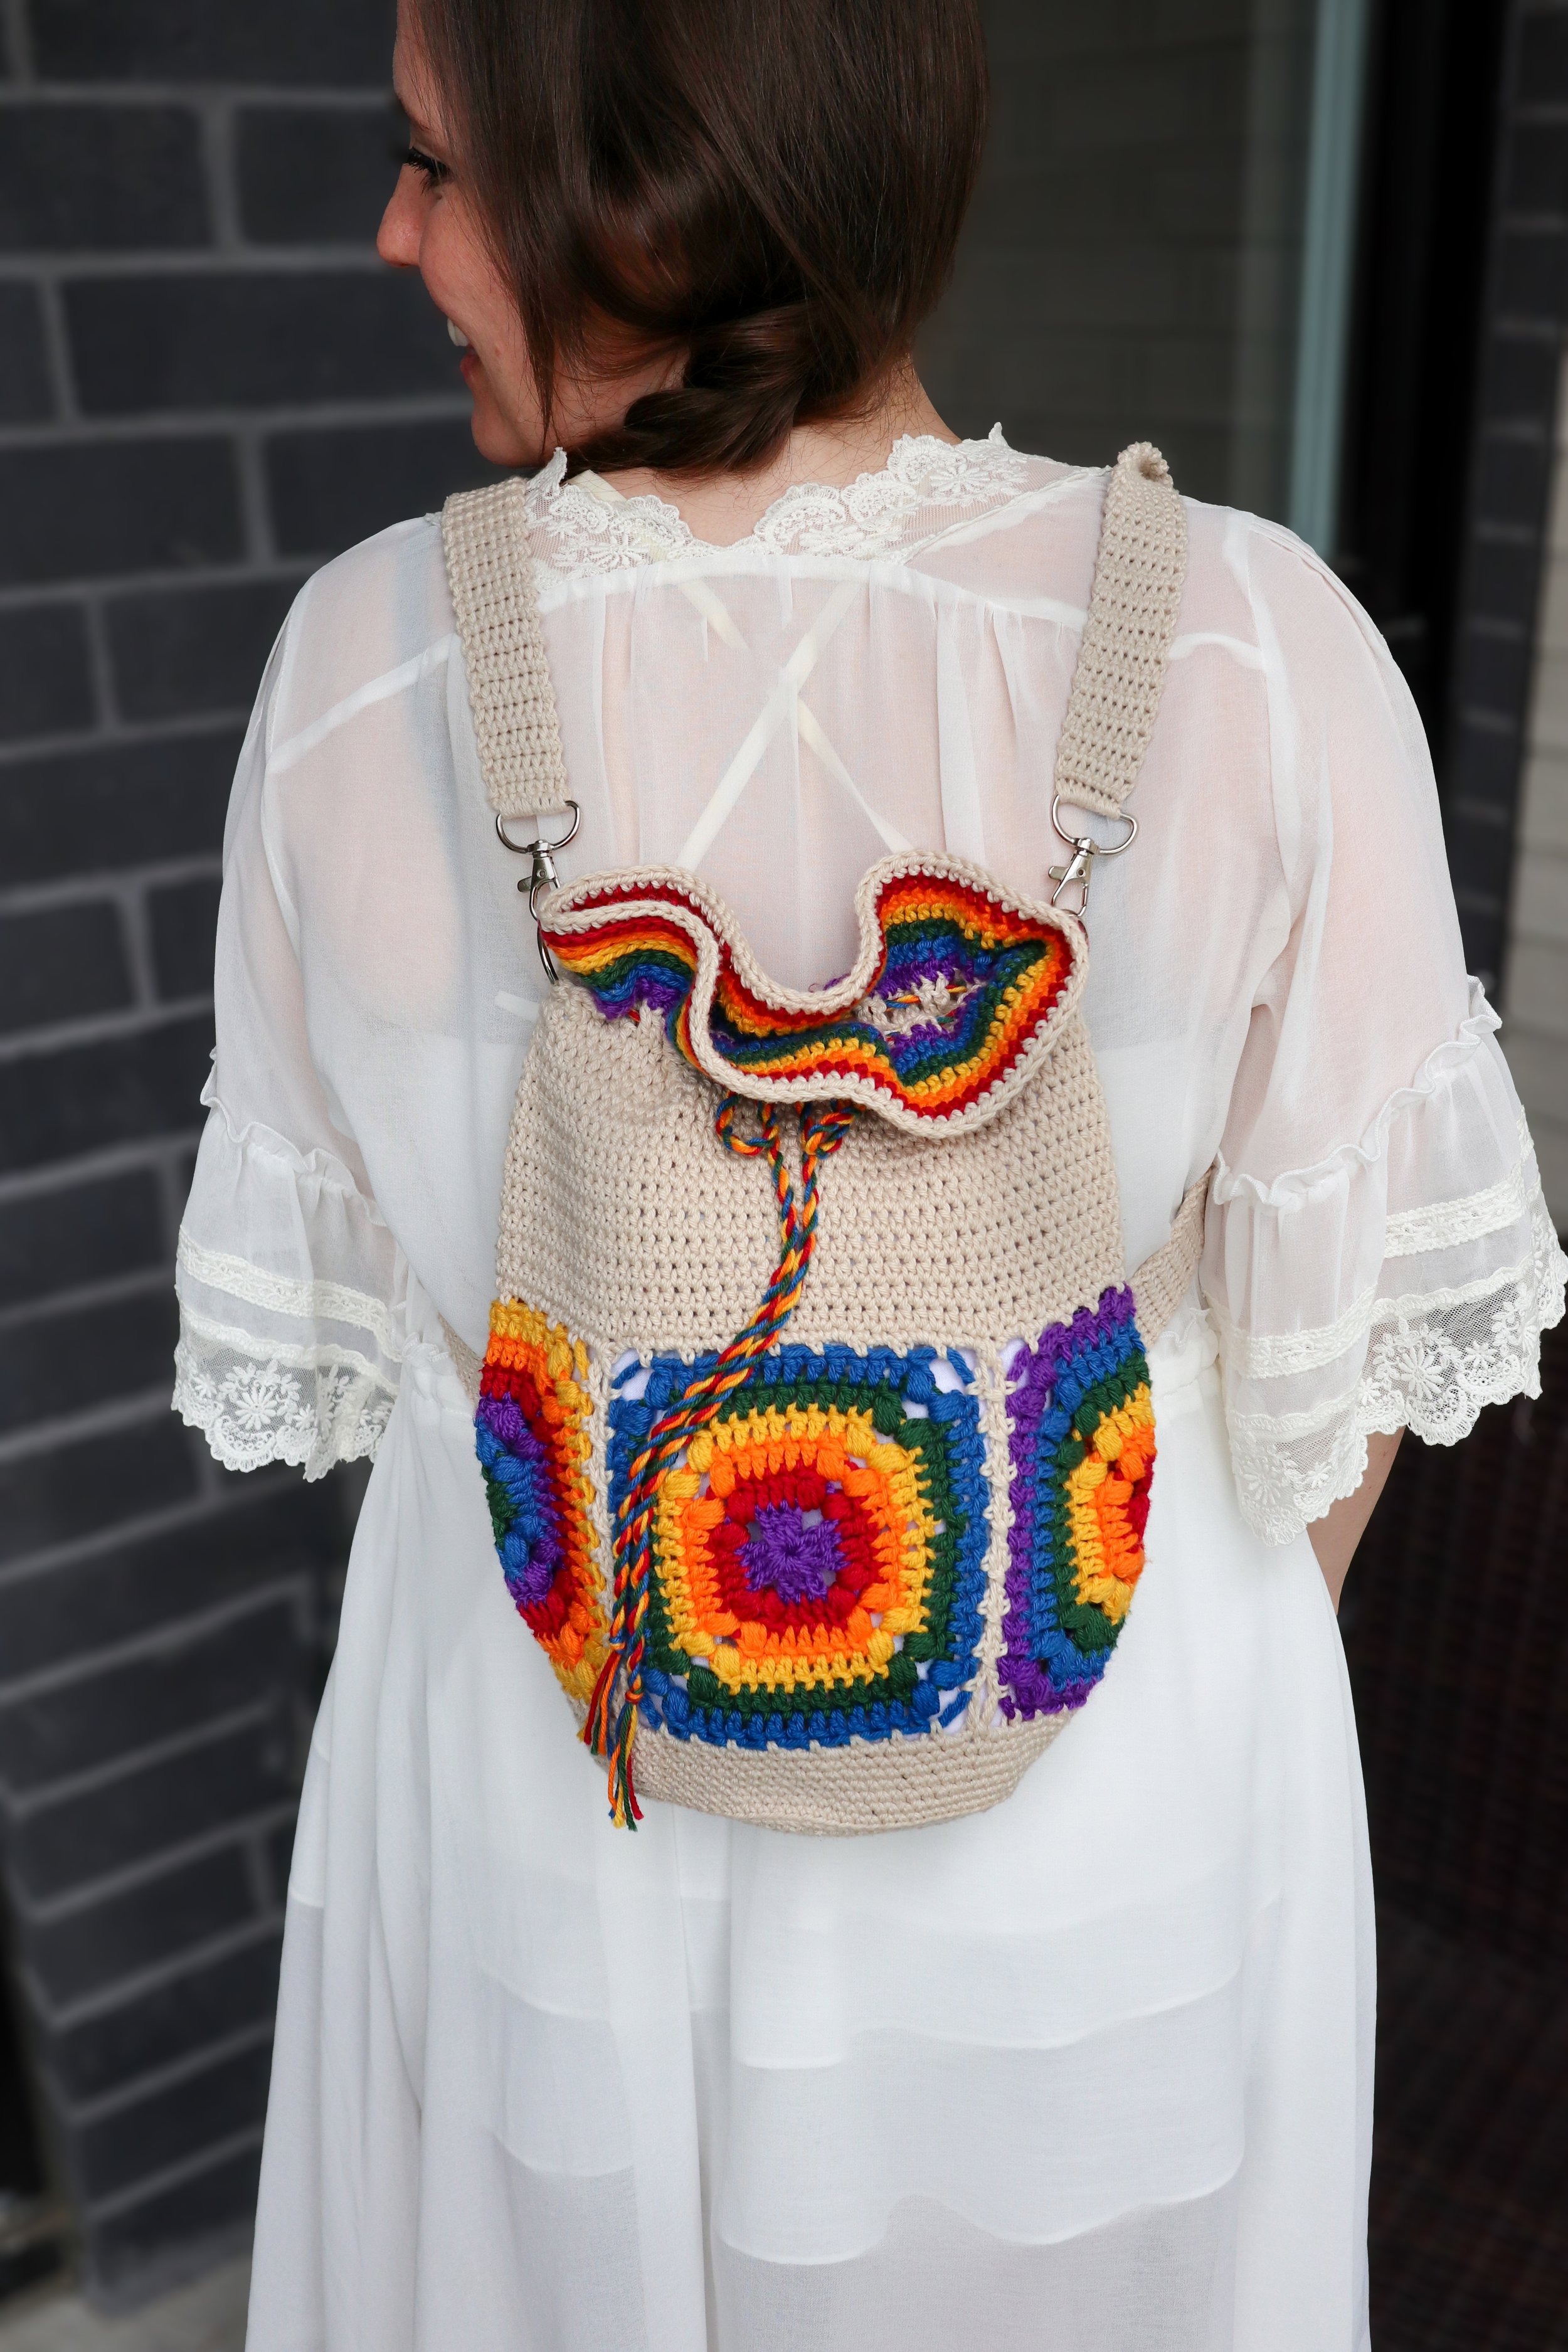
Serendipity Day Bag
HAPPY PRIDE MONTH!!
This month especially I wanted to show my PRIDE, but I also wanted to make something that can represent Pride all year round! What better to do that than a cute bag that you can use forever!
I’m really excited about this design, because it can be customized however YOU want it. Since there’s not one way for you to show your Pride, it’s good that you can go wild and express yourself however you need. I’m super excited to show mine off this year.
Are you doing anything special this year for Pride?
ABOUT THIS Design:
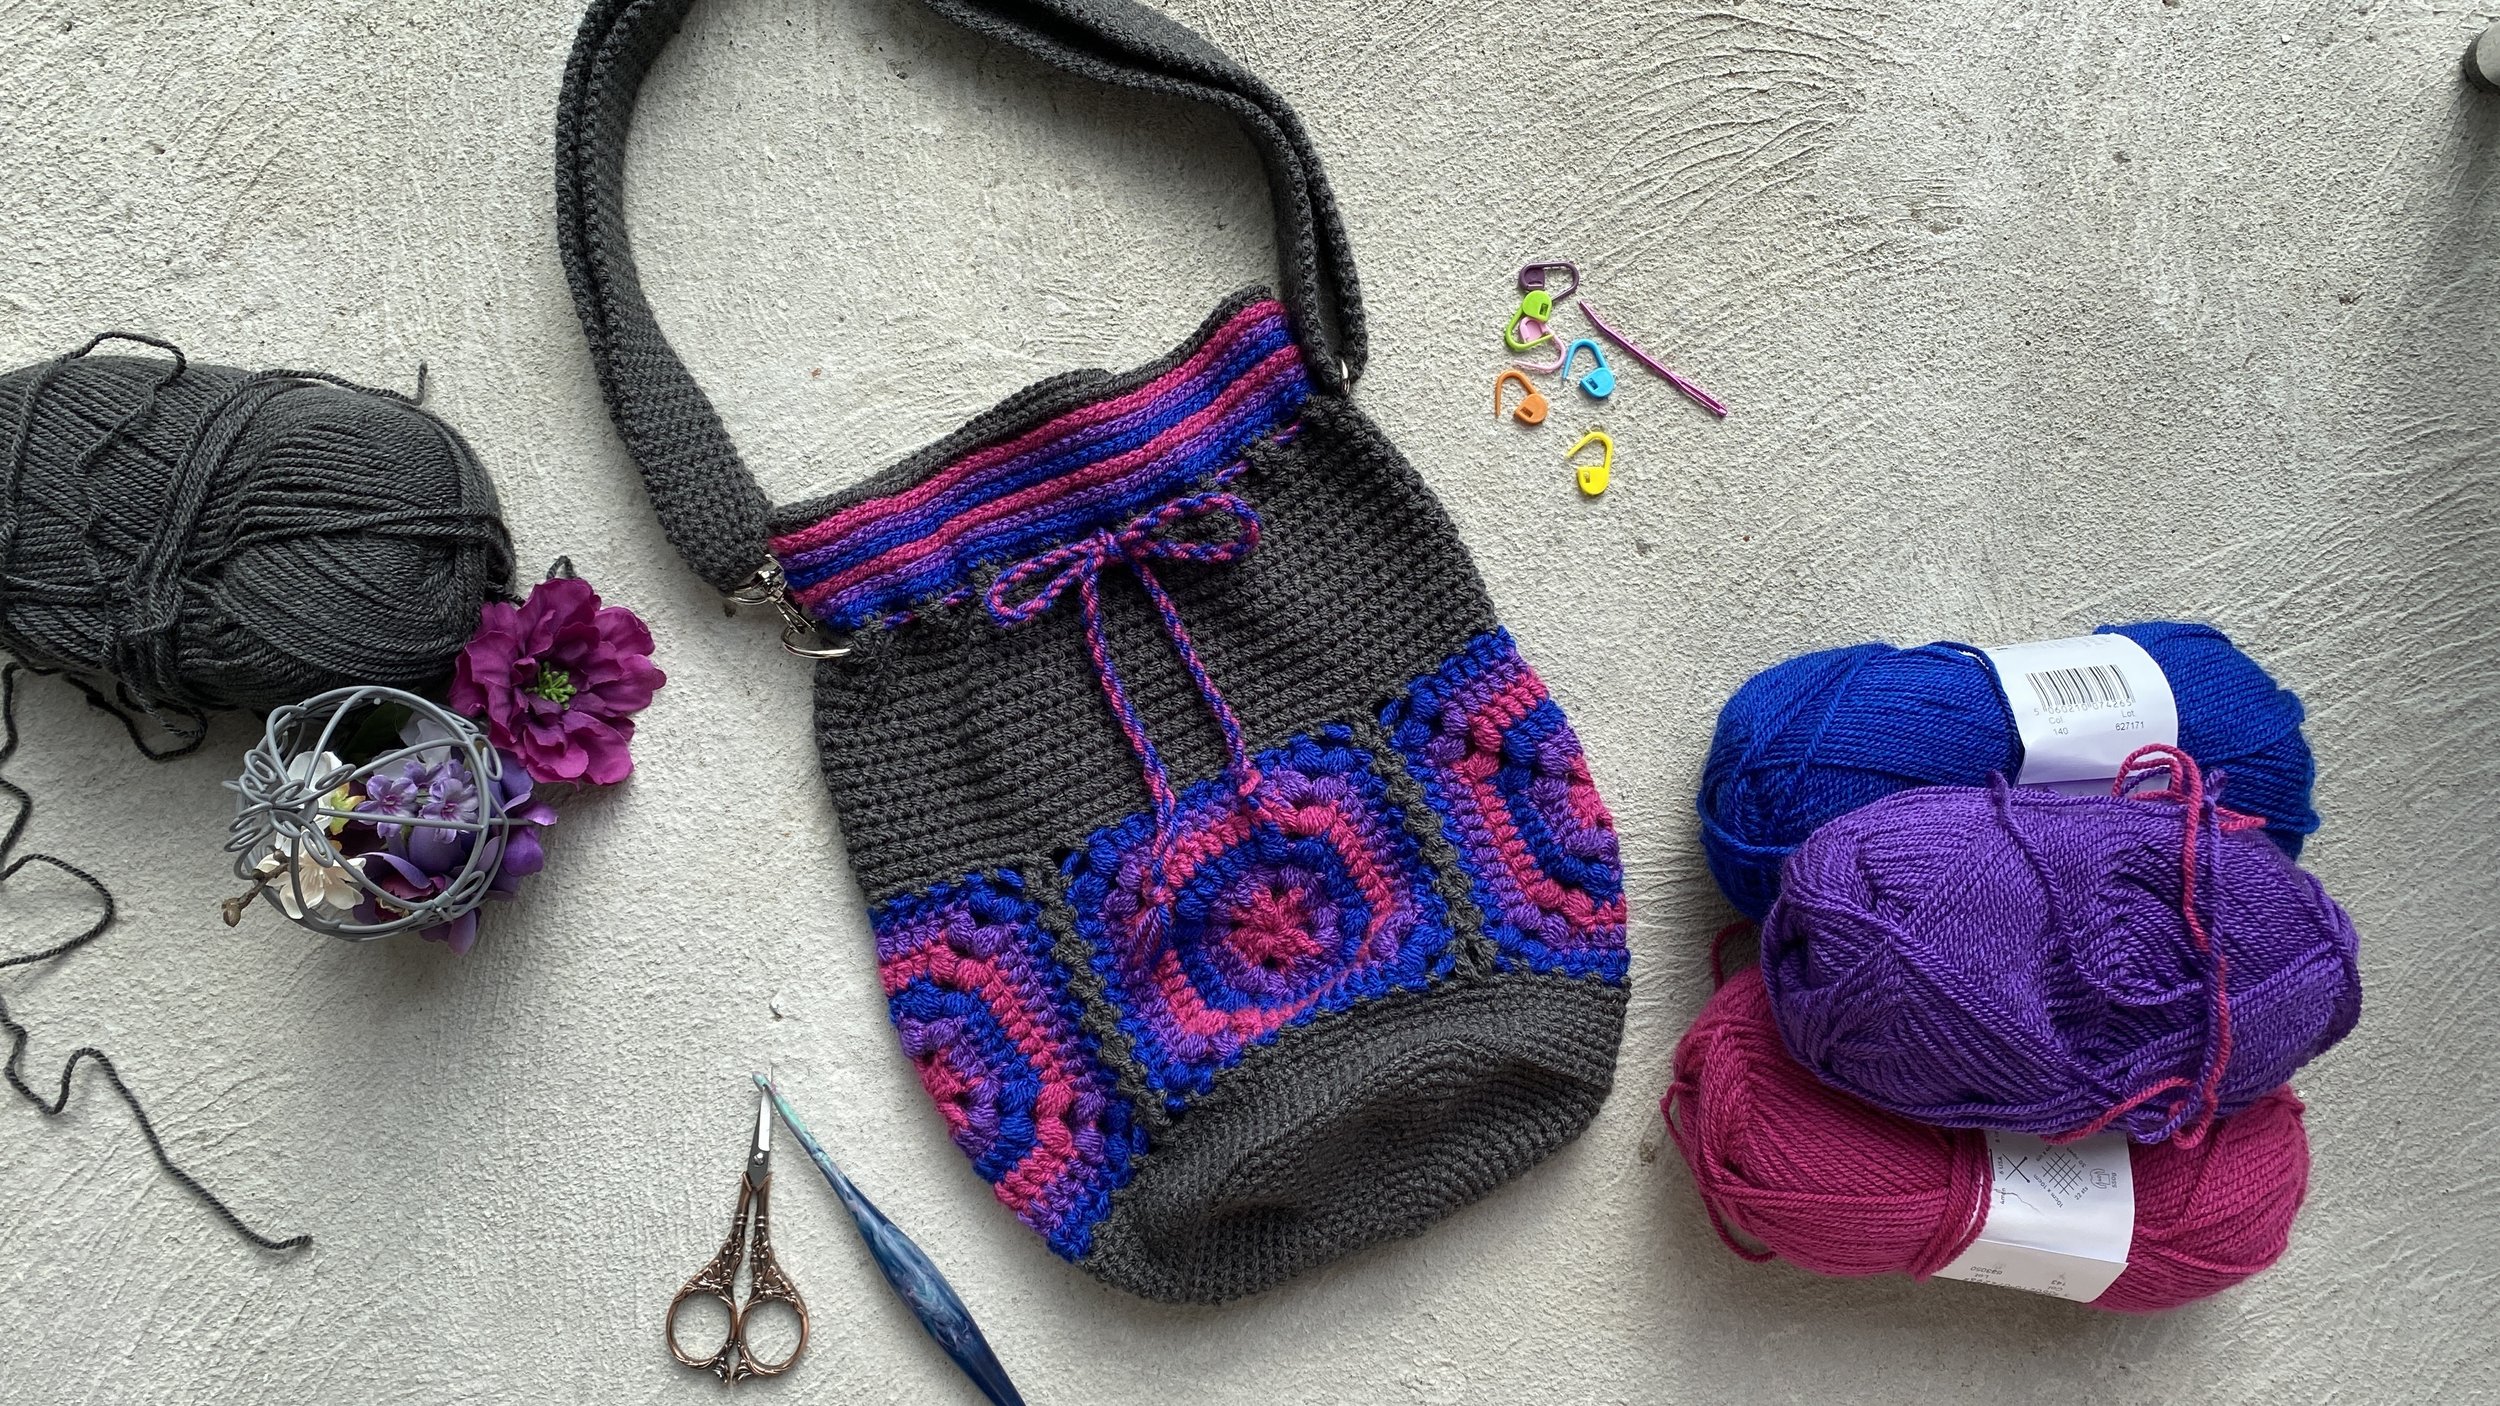
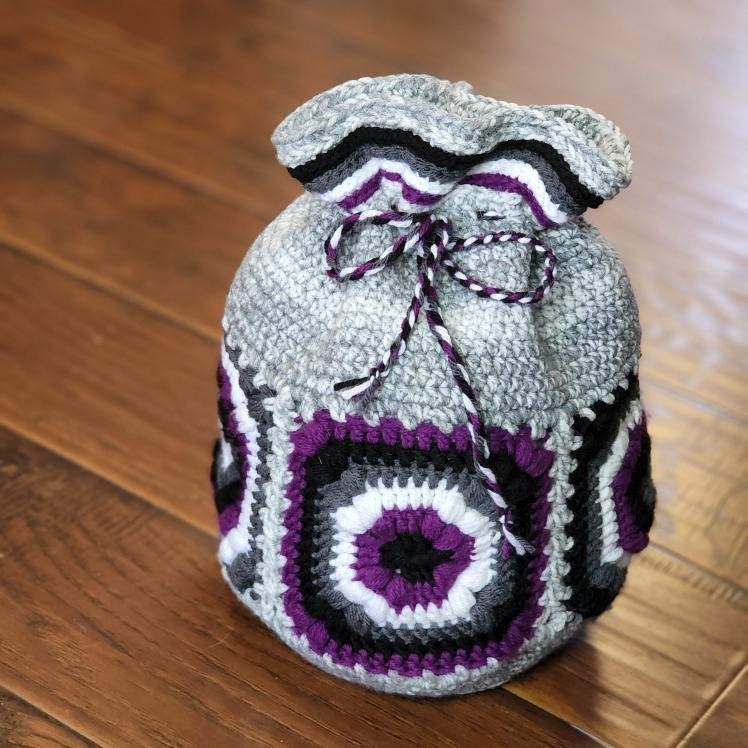
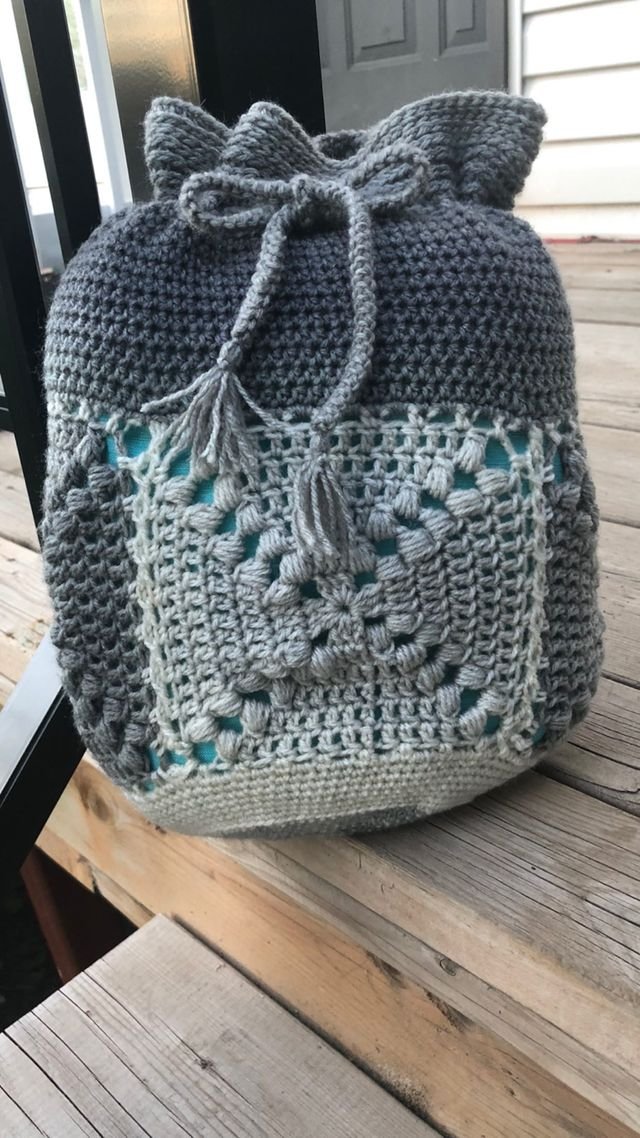
Welcome to the Serendipity Day bag! This is a wonderful little bag that is perfect for a day out and about. I purposefully designed this bag for Pride Month, but you don’t need to limit yourself to one month to show your Pride!
Pride is the promotion of the self-affirmation, dignity, equality, and increased visibility of lesbian, gay, bisexual, transgender, and all others who fall under the queer umbrella (LGBTQ+). Pride, as opposed to shame and social stigma, is the predominant outlook that bolsters most LGBTQ+ rights movements. (Read more about pride here.) This bag is my small contribution to promoting visibility and Pride in who you are!
Also, please consider donating to The Trevor Project to help and support LGBTQ+ youth.
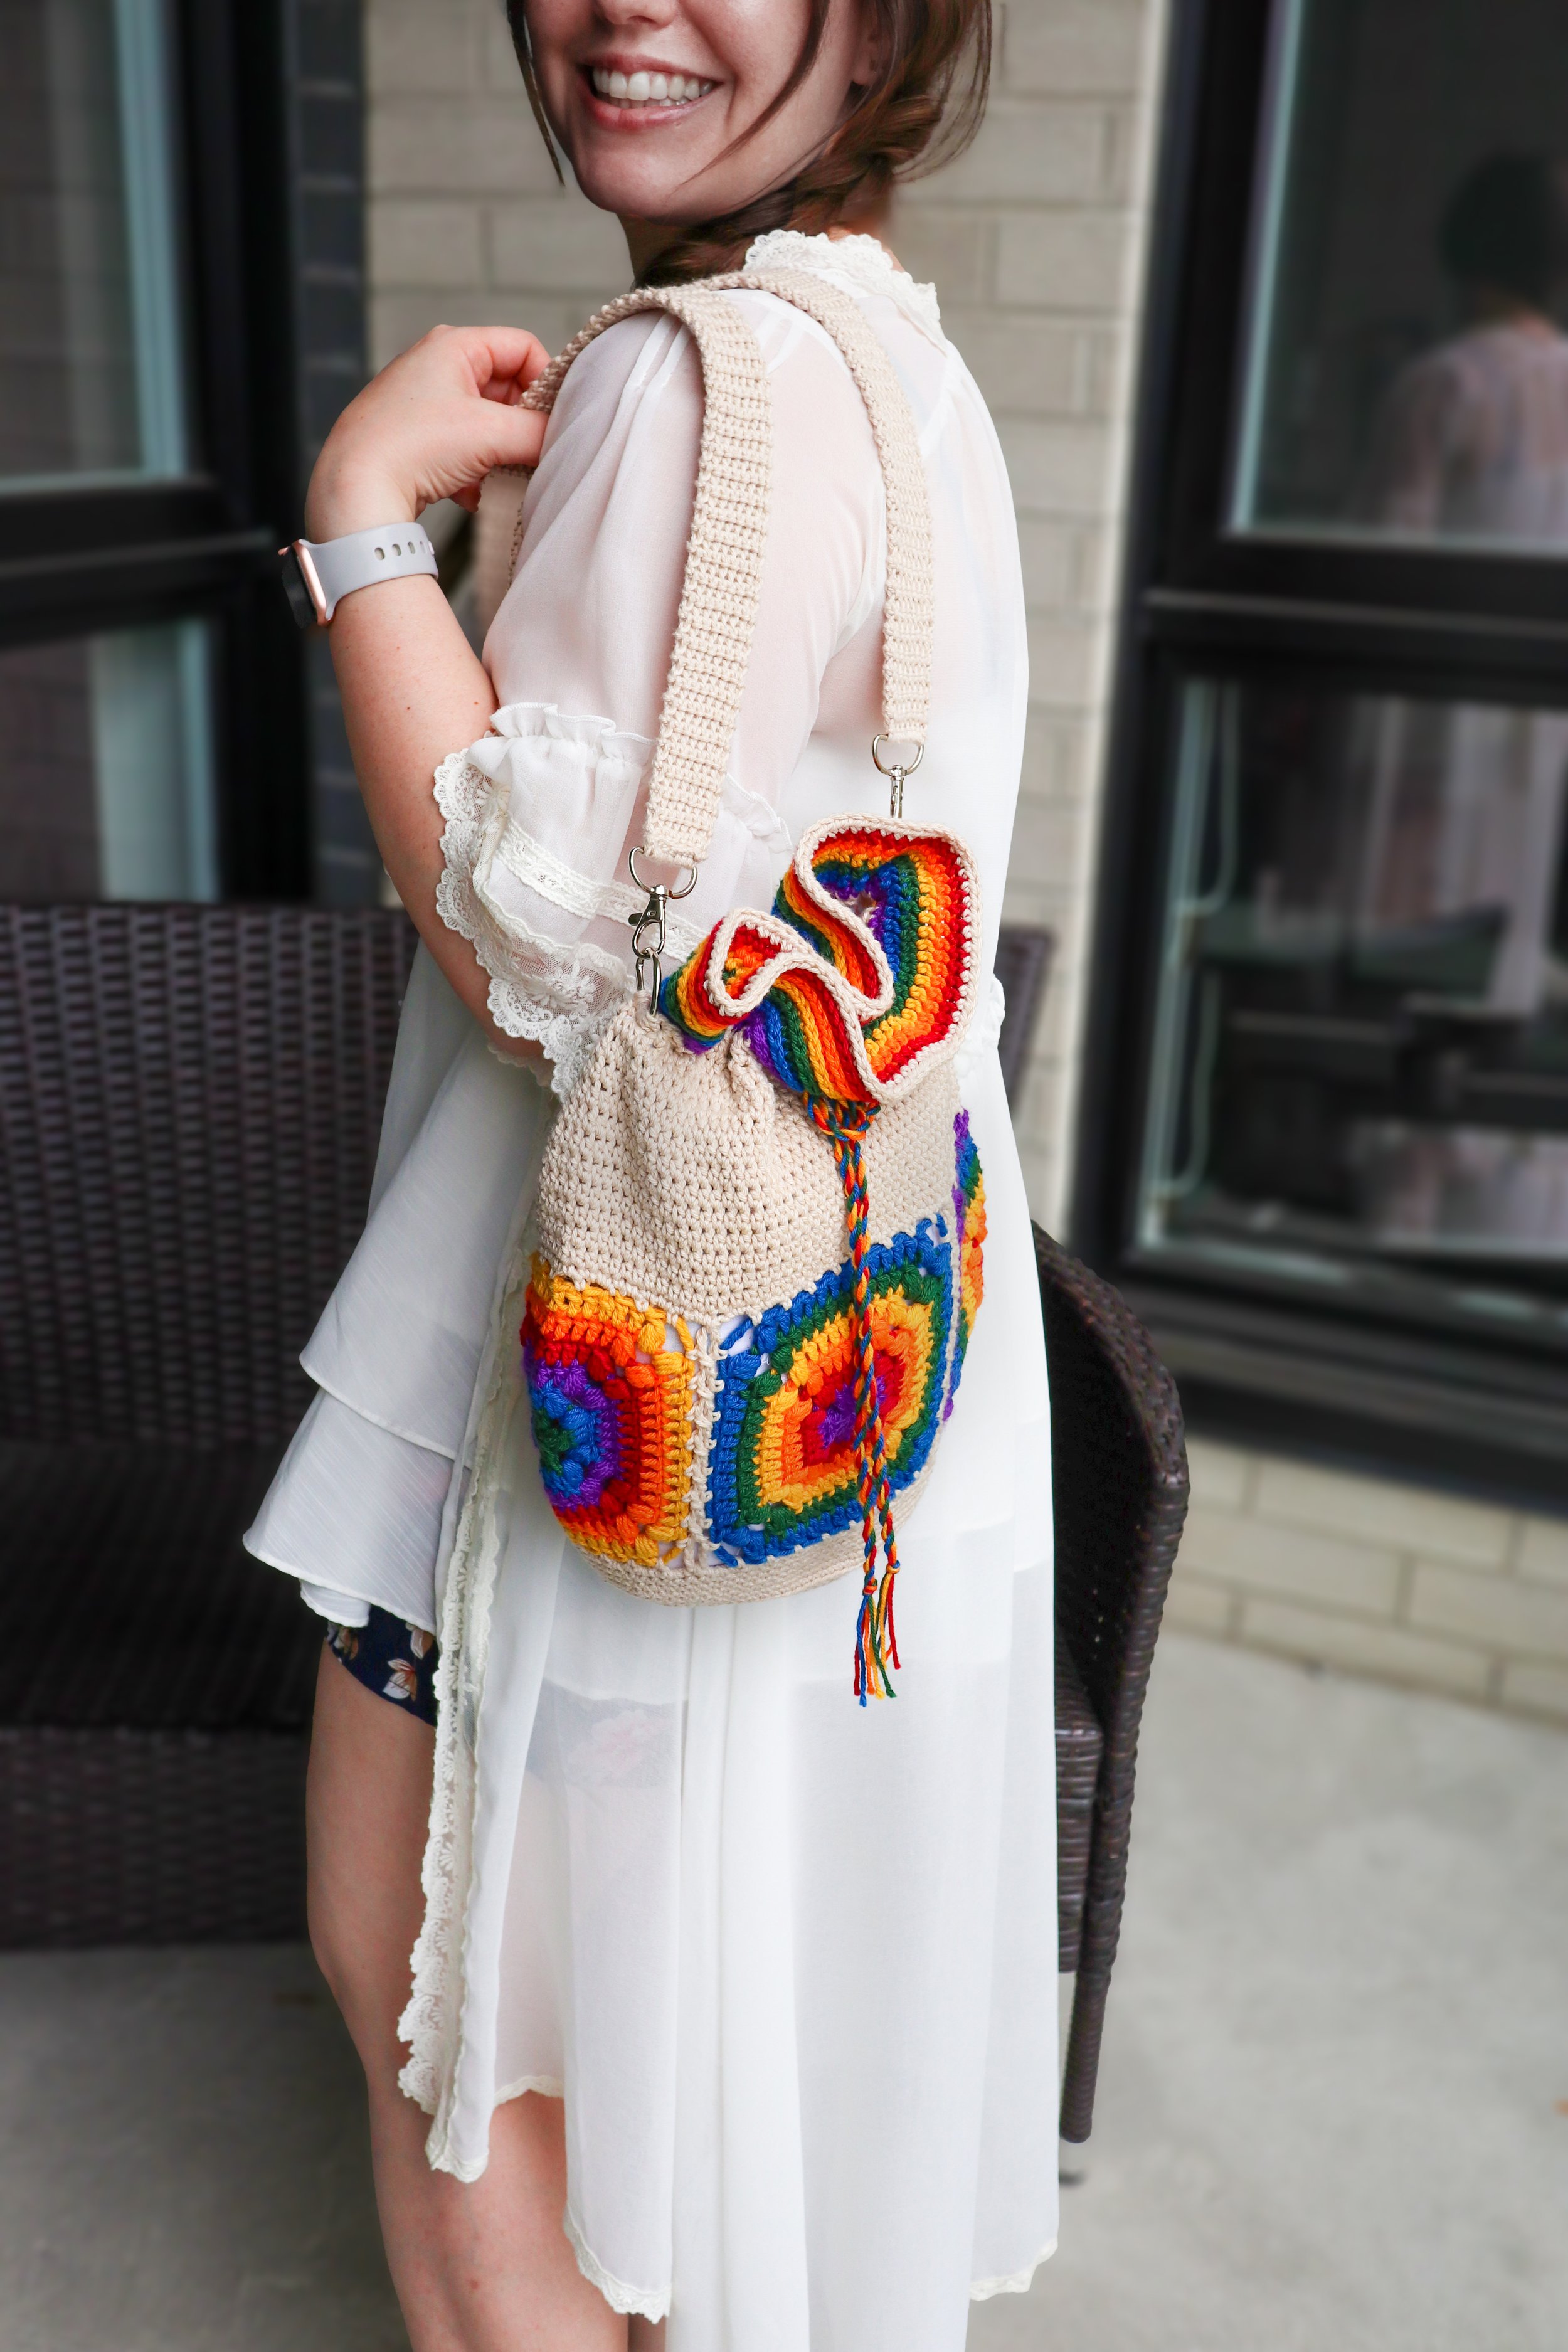
This bag is made with 4 granny squares connected with the Continuous Flat Braid Join, then the bottom and top are crocheted in rounds. The straps are made with the Thermal stitch, which makes a great sturdy fabric that doesn’t over stretch. Pair that with d-ring clips, and you can turn the bag into 3 different styles; a handbag, a sling bag, and a backpack.
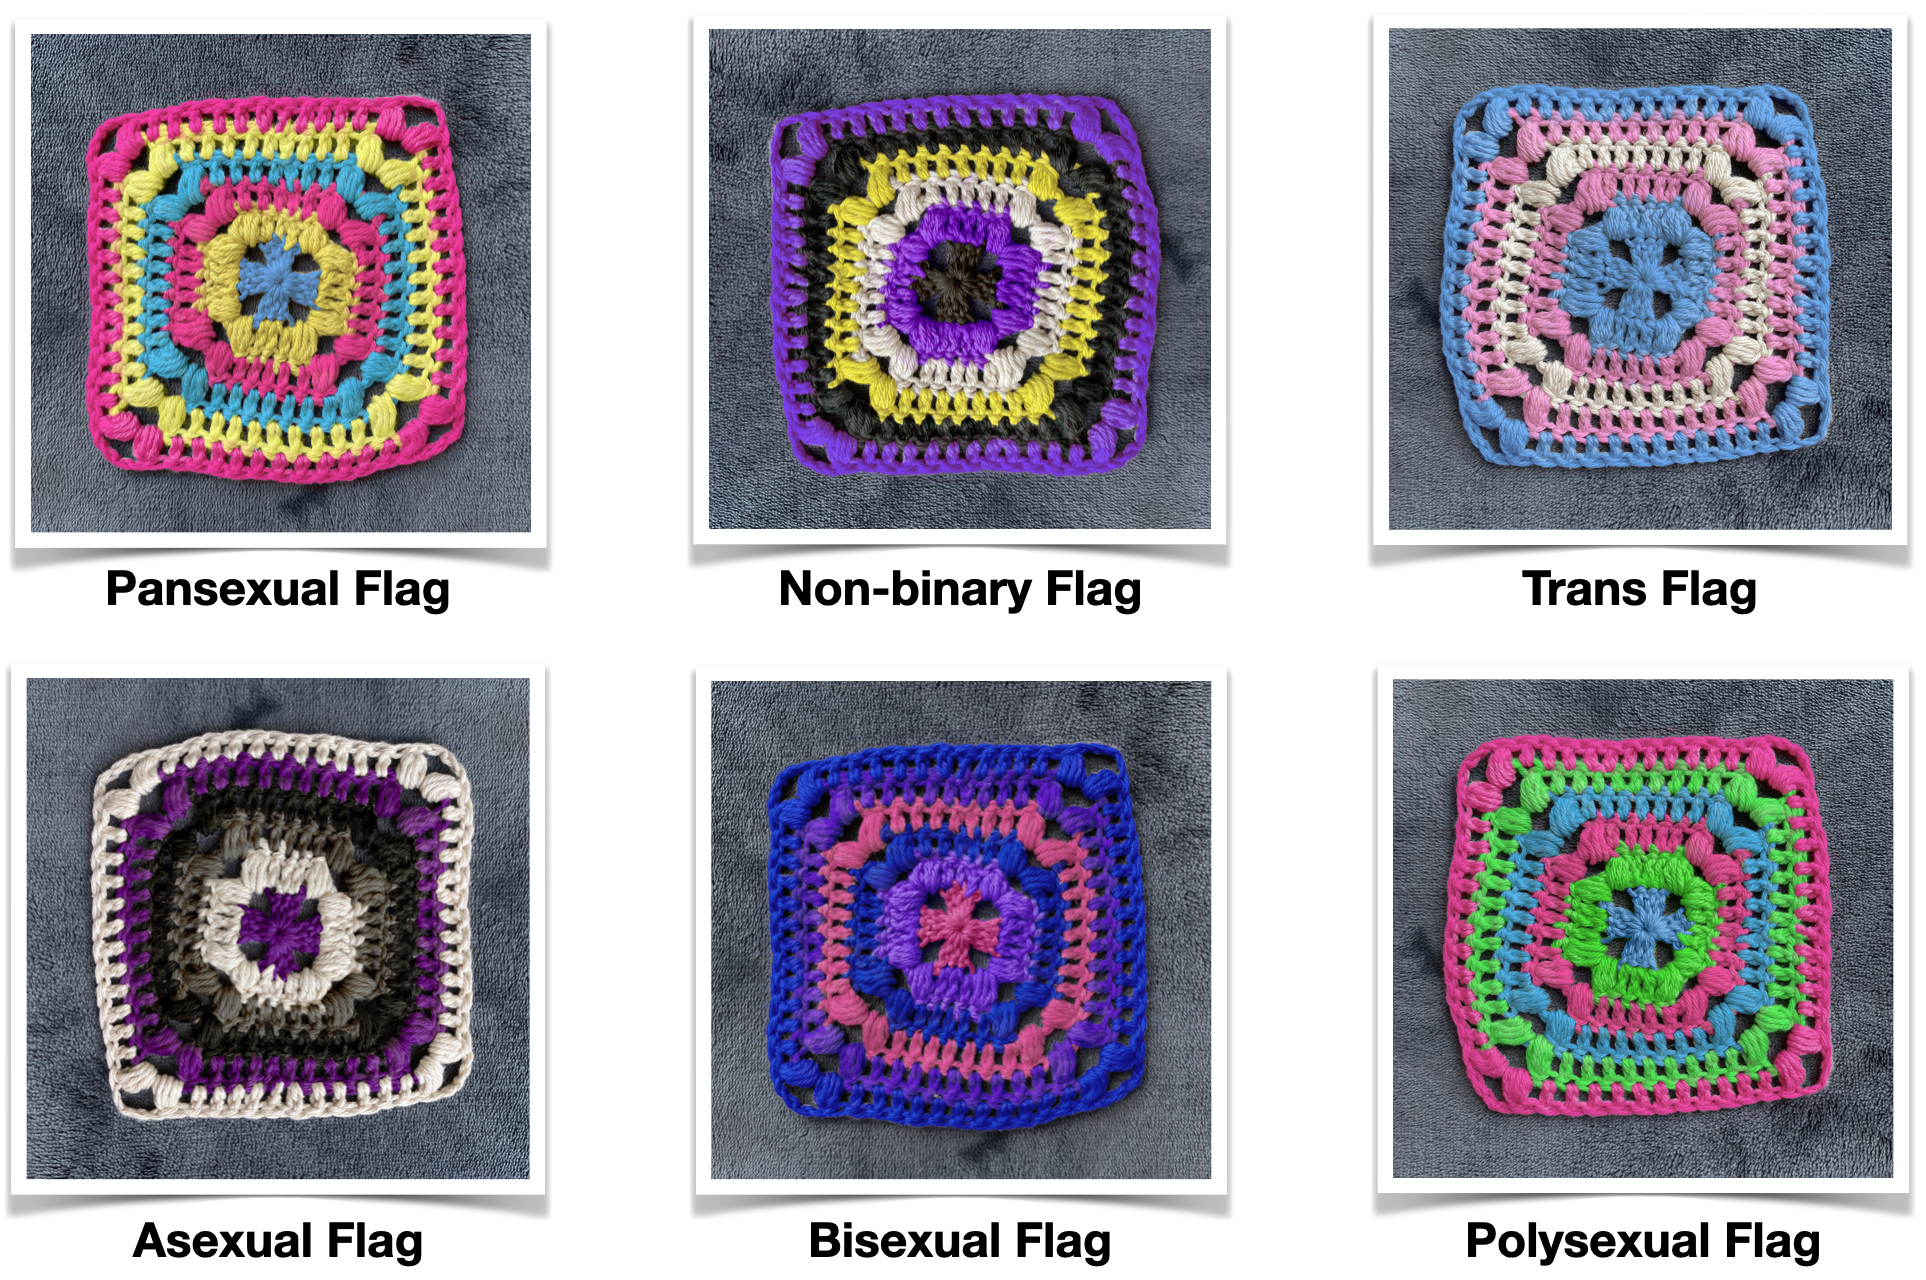
I chose to use the traditional ROYGBIV rainbow (Red, orange, yellow, green, blue, and purple). But you can use any colors you like to make your bag. Check out some of the ideas below on how you can make your flag into squares!
For the sample bag, I used Paintbox Yarns Cotton DK. This is a weight 3, 100% cotton, DK yarn. I chose cotton because it’s a good sturdy fabric; however, you can make this bag with any weight 3 or 4 yarn that you would like. If you use a 4mm hook and weight 4 yarn, be aware it will make a bit larger bag, so make sure you check your gauge to have an idea of how it will turn out. Though, because it is a bag, gauge isn’t terribly important.
I LOVE TO SEE WHAT YOU CREATE!
Please share your creations with the community on social media tagging @ravinsekaidesigns and hashtag #serendipitydaybag
I can’t wait to see the beautiful things you come up with!
FOLLOW ME ON SOCIAL MEDIA
Facebook: Ravin Sekai Designs
Ravelry: RavinSekai
Etsy: Ravin Sekai Designs
Instagram: @ravinsekaidesigns
Pinterest: Ravin Sekai Designs
Patreon: Ravin Sekai Designs

WHAT YOU NEED:
Hook Size: 4 mm hook, or size needed to obtain gauge
Yarn: weight 3 or 4 cotton yarn. Sample crocheted in Paintbox Yarns Cotton weight 3 yarn. 305 yards MC, 240 yards other colors. (I had 6 colors other than the cream on my bag, so 40 yards each color was used). 545 yards total.
Other: Bag hardware (D-rings with at least 1” inside measurement, strap/keychain clips), stitch markers, measuring tape.
Gauge: 19sts/ 13rows = 4” in hdc. Each granny square is 5” x5” after blocking. Gauge is not super important for this project.
Finished Bag Size: 12” tall x 9” wide when laid flat.

ABBREVIATIONS:
Abbreviations in US terms
Ch: chain
MC, C1, C2, etc.: main color, Color 1, Color 2, etc.
Pm: place marker
Sm: stitch marker
Sl st: slip stitch
Rep: repeat
CSSC: Cross Stitch/yarn under crochet (yu). Insert your hook as you would for a normal sc, yu and bring through, finish your stitch like you would a normal sc.
Sc: single crochet
Scblo: single crochet in the back loop only
Yo: yarn over
Pf st: puff stitch, [YO, insert hook into st, YO, pull through just the st] rep 4 times in the same st (9 loops on hook), YO, pull through 8 loops, YO, pull through the last 2 loops. This makes a 9 loop puff.
Hdc: half double crochet
Dc: double crochet
Dec: invisible decrease, CSSC 2 together through the front loop only
BOR: beginning of row
Hdc3lo: hdc in the third loop only. Skip the front and back loops of the st you are working and hdc in the loop behind them. (See notes)
Notes:
For the sample, I used weight 3 yarn, but you can use weight 4 as well. Just be aware that your bag may be larger in size, and your granny squares may be a bit poofier.
Ch3s on granny squares count as 1dc. Ch2 on the top does not count as a hdc.
On the top portion, the first stitches when you join rounds (seams) are staggered in order to prevent them from spiralling around the top as you work. We do this by skipping the first st of the row every other row, and then finishing it at the end of the row. A great video to show this method by Wilma Westenberg of Wilmade and her written instructions can be found here on her website. https:// wilmade.com/crochet-a-straight-seam-joined-rounds/
Crocheting in the 3rd loop of a hdc stitch pushes the top of the stitch forward so that the front and back loops of your stitch, which normally sit at the top are now visible at the front of the stitch. It creates a horizontal ridge of “v” shapes. A good video can be found here at Heart Hook Home: https://youtu.be/9dHzmZ03MQA
When you sl st at the end of a round, pull the sl st through the work from the front to the back. This creates a less noticeable seam.
Here is a video on how to do the thermal stitch for the strap by Heart Hook Home: https://youtu.be/_NeKe_vhToE

Save It For Later
Pin to Pinterest
THE PATTERN:
For the free pattern of this design please continue on this page. Please consider supporting me by purchasing the 100% ad-free PDF with all charts, picture tutorials, and extras for this pattern on my Ravelry or ETSY pages. Or consider joining my Patreon for member perks.
The Granny Square [make 4]
I made my granny squares with traditional pride rainbow colors, one color each row. Then, I alternated the color I started with in the center to create the look you see in the sample. So, my first square was C1-C6, then my second square started with C6, then C1-C5. But, you can do your squares however you would like. Here are a few samples of how to turn your PRIDE Flag into squares.
With 4mm hook, Ch4, sl st in 1st chain (makes a circle)
Row 1: ch 7, *3dc in center of circle, ch4* rep * * twice more, 2dc in circle, sl st in ch3 of starting ch7.
Row 2: ch3, *[pf st, ch4, pf st] all in ch4 below, 3dc*, rep * * twice more, [pf st, ch4, pf st] in final ch4, 2dc, sl st in top of starting ch3.
Row 3: ch3, 1dc, *[pf st, ch4, pf st] all in ch4, 5dc* rep * * twice more, [pf st, ch4, pf st] in final ch4, 3dc, sl st in top of starting ch3.
Row 4: ch3, 2dc, *[pf st, ch4, pf st] all in ch4, 7dc* rep * * twice more, [pf st, ch4, pf st] in final ch4, 4dc, sl st in top of starting ch3.
Row 5: ch3, 3dc, *[pf st, ch4, pf st] all in ch4, 9dc* rep * * twice more, [pf st, ch4, pf st] in final ch4, 5dc, sl st in top of starting ch3.
Row 6: ch3, 4dc, *[pf st, ch4, pf st] all in ch4, 11dc* rep * * twice more, [pf st, ch4, pf st] in final ch4, 6dc, sl st in top of starting ch3.
FO
Block Squares to approx 5”x5”
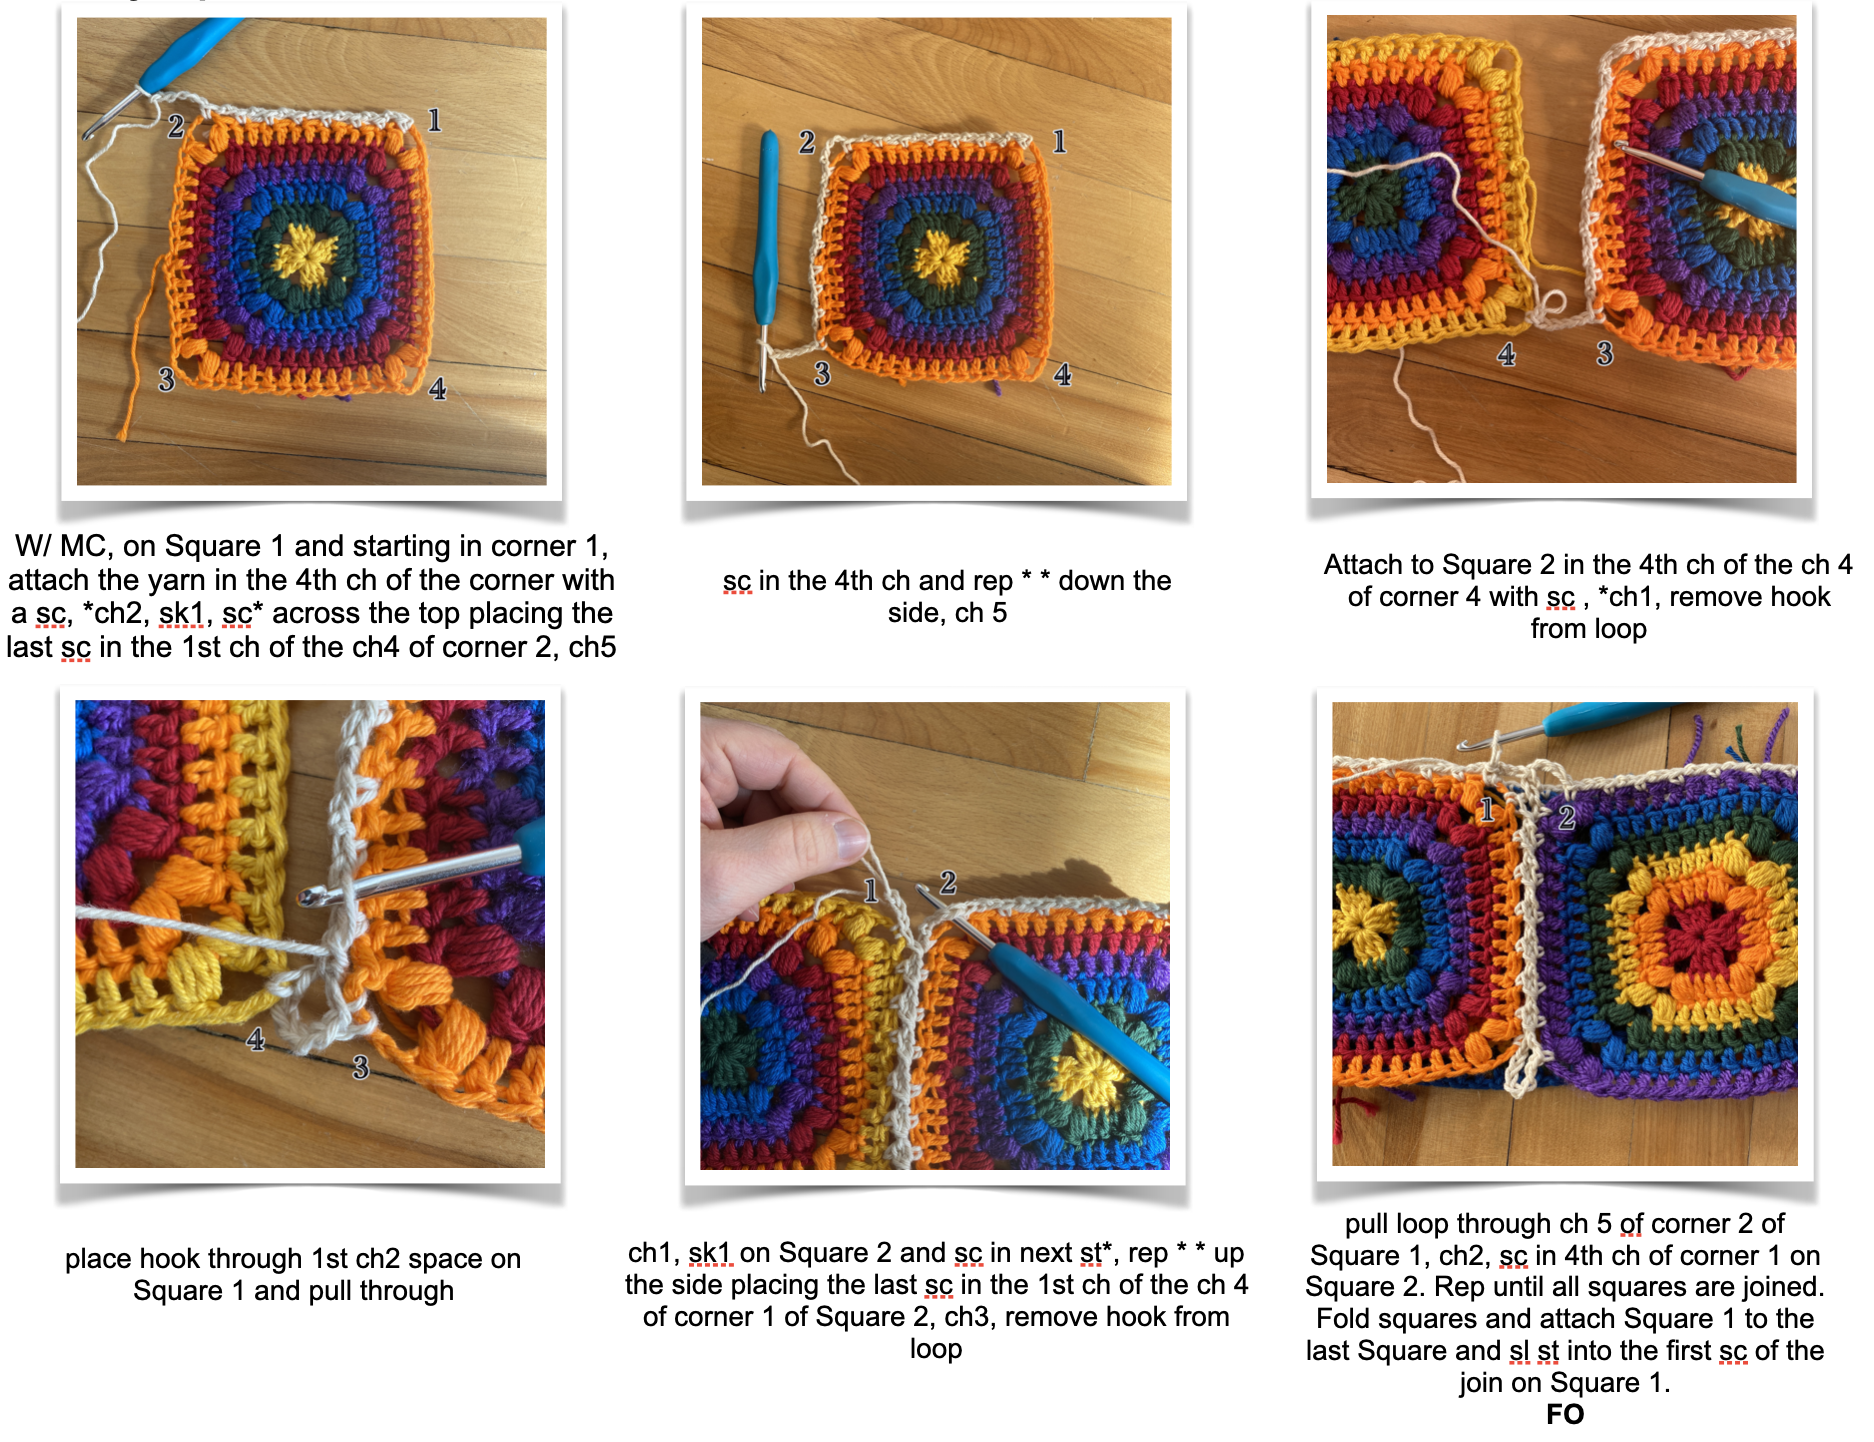
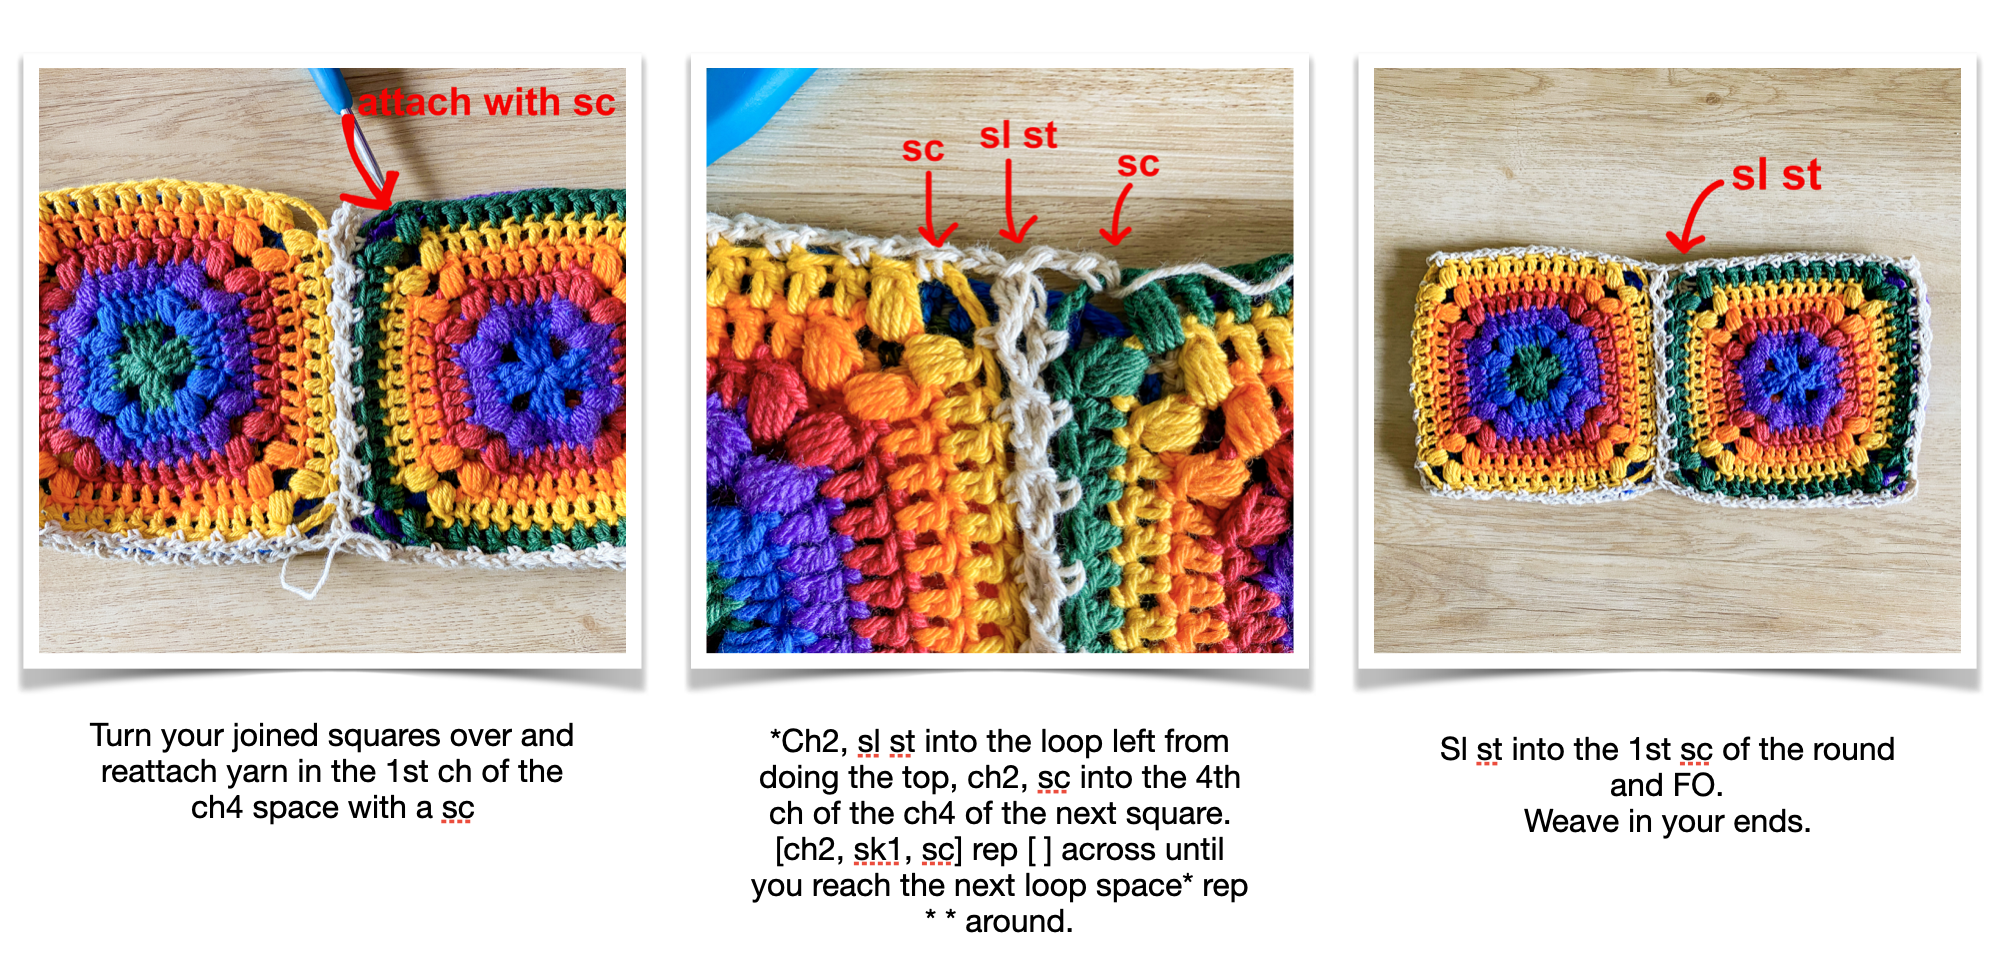
Join Granny Squares With Continuous Flat Braid:

Bisexual Flag Colors
Bottom:
The bottom of the bag will be made in continuous rounds.
Round 1: With MC, reattach yarn with sl st to the center loop between squares (the loop made by connecting 2 ch5s at the corner of the joined squares), 1 sc in same space (Pm in the 1st st, which is now your BOR), 2 sc in ch5 space, [*1 sc in next sc, 2sc in ch2 space, 1 sc in next sc, 1sc in next ch 2 space* rep * * 2 more times, 1sc in next sc, 2sc in ch2 space, 1sc in the next sc, 2 sc in ch5 space, 1 sc in center loop, 2 sc in next ch5 space] rep [ ] around until the last square. 2 sc in ch 5 space. [96 total sts]
Round 2 - Round 7: CSSC around for 6 rounds
Round 8: CSSC blo around
Round 9: (14 CSSC, dec) x6 [90 sts]
Round 10: (13 CSSC, dec) x6 [84 sts]
Round 11: (12 CSSC, dec) x6 [78 sts]
Round 12: (11 CSSC, dec) x6 [72 sts]
Round 13: (10 CSSC, dec) x6 [66 sts]
Round 14: (9 CSSC, dec) x6 [60 sts]
Round 15: (8 CSSC, dec) x6 [54 sts]
Round 16: (7 CSSC, dec) x6 [48 sts]
Round 17: (6 CSSC, dec) x6 [42 sts]
Round 18: (5 CSSC, dec) x6 [36sts]
Round 19: (4 CSSC, dec) x6 [30 sts]
Round 20: (3 CSSC, dec) x6 [24 sts]
Round 21: (2 CSSC, dec) x6 [18 sts]
Round 22: (1 CSSC, dec) x6 [12 sts]
Round 23: (dec) x6 [6 sts]
FO
Leave a yarn tail and weave it through the front loop of the 6 remaining sts, then pull tight to close the hole. Weave the tail through a few more times to secure it.
Top:
Round 1: W/ MC, rep Round 1 of the bottom around the top of the bag, sl st into the 1st sc of the round. [96 total sts]
Round 2: ch2, hdc into the same st as the sl st, hdc around, sl st into 1st st of round [96 sts]
Round 3: ch1, sk the 1st st where you just made the sl st and start in the second st, hdc around, then make the last 1hdc in the st that we skipped at the beginning of the row by working over the chain, sl st into 1st st of the round.
Round 4 - Round 13: rep Row 2 - Row 3
Round 14: ch2, following the same starting/ending join directions as above, *2dc, ch1, sk1* rep * * around.
Round 15: change to C1, hdc around following the same join directions as before. [96 total sts]
Round 16 - Round 20: changing color each row, ch1, hdc3lo around (see notes if needed). Join in the same method as before.
Round 21: W/ MC, ch1, hdc3lo around. Join in the same method as before.
FO and weave in ends
Strap:

The strap is about 1.25” wide, and I made my strap 50” long as that’s the perfect length for straps for my height. This allows for both the backpack version and the handbag version. It is a bit long for a side bag, but it’s easy enough to draw the strap through a loop and re-hook it into the strap to make it shorter. See notes for a video on how to make the Thermal St.
Row 1: 7sc to clip hardware. Turn.
Row 2: ch1, 7scblo only. Turn.
Row 3: ch1, 7scblo of this row and the front loop of the previous row (the loop you did not use of the previous row) to the end of the row. Turn.
Row 4 - Until preferred length: rep Row 3
Last Row: Going around the 2nd clip hardware for the other side of the bag, sc through both loops of this row and the front loop of the previous row.
FO with a tail. Use the tail to sew down the sc so that this side looks like the other.
To make the loop to hook your clasp to wear the bag as a cross body, first figure out where the loop should be by drawing the strap through the d-ring on one side and checking where you’d like the bag to sit. Place a sm in that spot. Then, attach the yarn at that sm with a sl st to the side and ch7. Sl st to the opposite side. Ch1 and sc back across the ch. FO with a sl st into the same spot.

Draw String:
Take a long strand of each color (at least 50”) and holding the ends together, fasten the end to something sturdy. Divide the strands into 2 and twist the 2 hanks together around each other like you are braiding them very tight, until they start to twist back on themselves and you have about 42” of cord. Tie a knot on both ends making sure that your knot is in the twisted section to make sure it doesn’t completely untwist. The cord will untwist a bit into a nice drawstring.
Fold your bag so that one square is centered at the front, and the two side squares are folded in half like in picture 2. Using something with a straight edge, figure out which set of dc are in the center. PM.
Starting on one side, weave the cord in and out of the holes. Your drawstring should go in on one side of the sm and out the other.

D-Ring Placement:
Back Ring:
Fold your bag so that one square is centered at the back, and the two side squares are folded in half. Using a ruler, center the D-ring with the center of the granny square and sew on.
Side Rings:
On the front side, count 8 sets of dc both left and right from the center set and sew the a d-ring under the 8th set of dc on each side.

Happy Creating!
IF YOU LIKED THIS PATTERN, PLEASE SUPPORT ME ON PATREON OR BUY ME A COFFEE!

BUY ME A KO-FI

SUPPORT ME ON PATREON
I LOVE TO SEE WHAT YOU CREATE!
Please share your creations with the community on social media tagging @ravinsekaidesigns and hashtag #serendipitydaybag
I can’t wait to see the beautiful things you come up with!
FOLLOW ME ON SOCIAL MEDIA
Facebook: Ravin Sekai Designs
Ravelry: RavinSekai
Instagram: @ravinsekaidesigns
Pinterest: Ravin Sekai Designs
Patreon: Ravin Sekai Designs

Hi! I’m Rachel.
I’m a quirky world traveller, avid knitter, crochet lover, pattern maker, and all around nerd! I spend a lot of time clowning around, and I often have the goofiest smile on my face. This website is the landing place for my new patterns, random thoughts, and general craziness. I hope you enjoy my randomness and my yarnie goodness!
Archive
- September 2023
- March 2023
- November 2022
- October 2022
- September 2022
- August 2022
- July 2022
- June 2022
- May 2022
- April 2022
- March 2022
- February 2022
- January 2022
- November 2021
- October 2021
- September 2021
- August 2021
- July 2021
- June 2021
- May 2021
- April 2021
- March 2021
- February 2021
- January 2021
- December 2020
- November 2020
- October 2020
- September 2020
- August 2020
- July 2020
- June 2020
- May 2020
- April 2020
- March 2020
- February 2020
- January 2020
- December 2019
- November 2019
- October 2019
- September 2019
- August 2019
- July 2019
- June 2019
- May 2019
- April 2019
You Might Also Like:


