
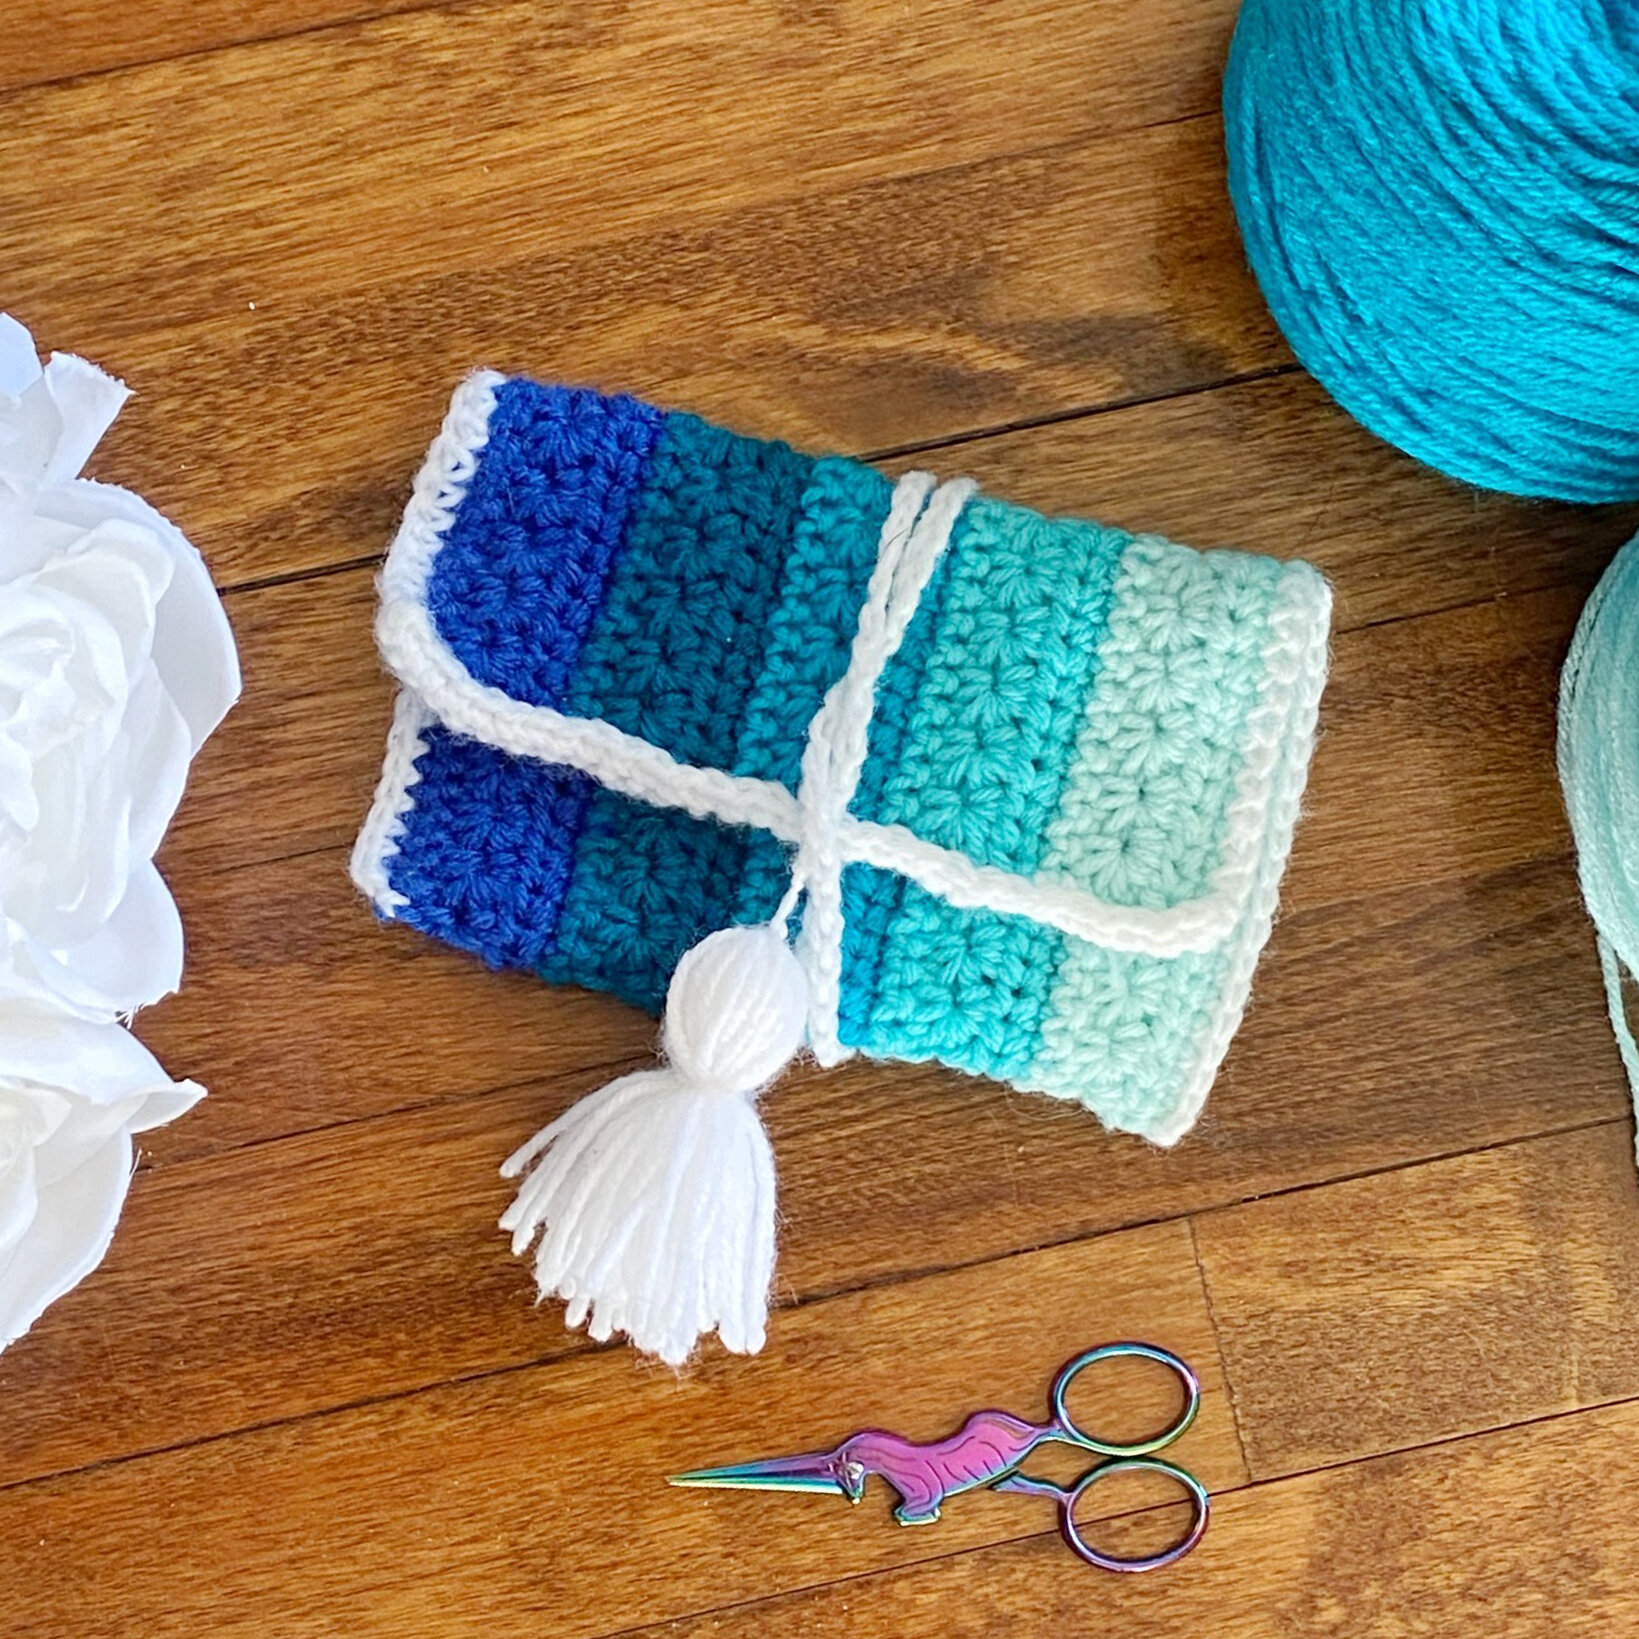
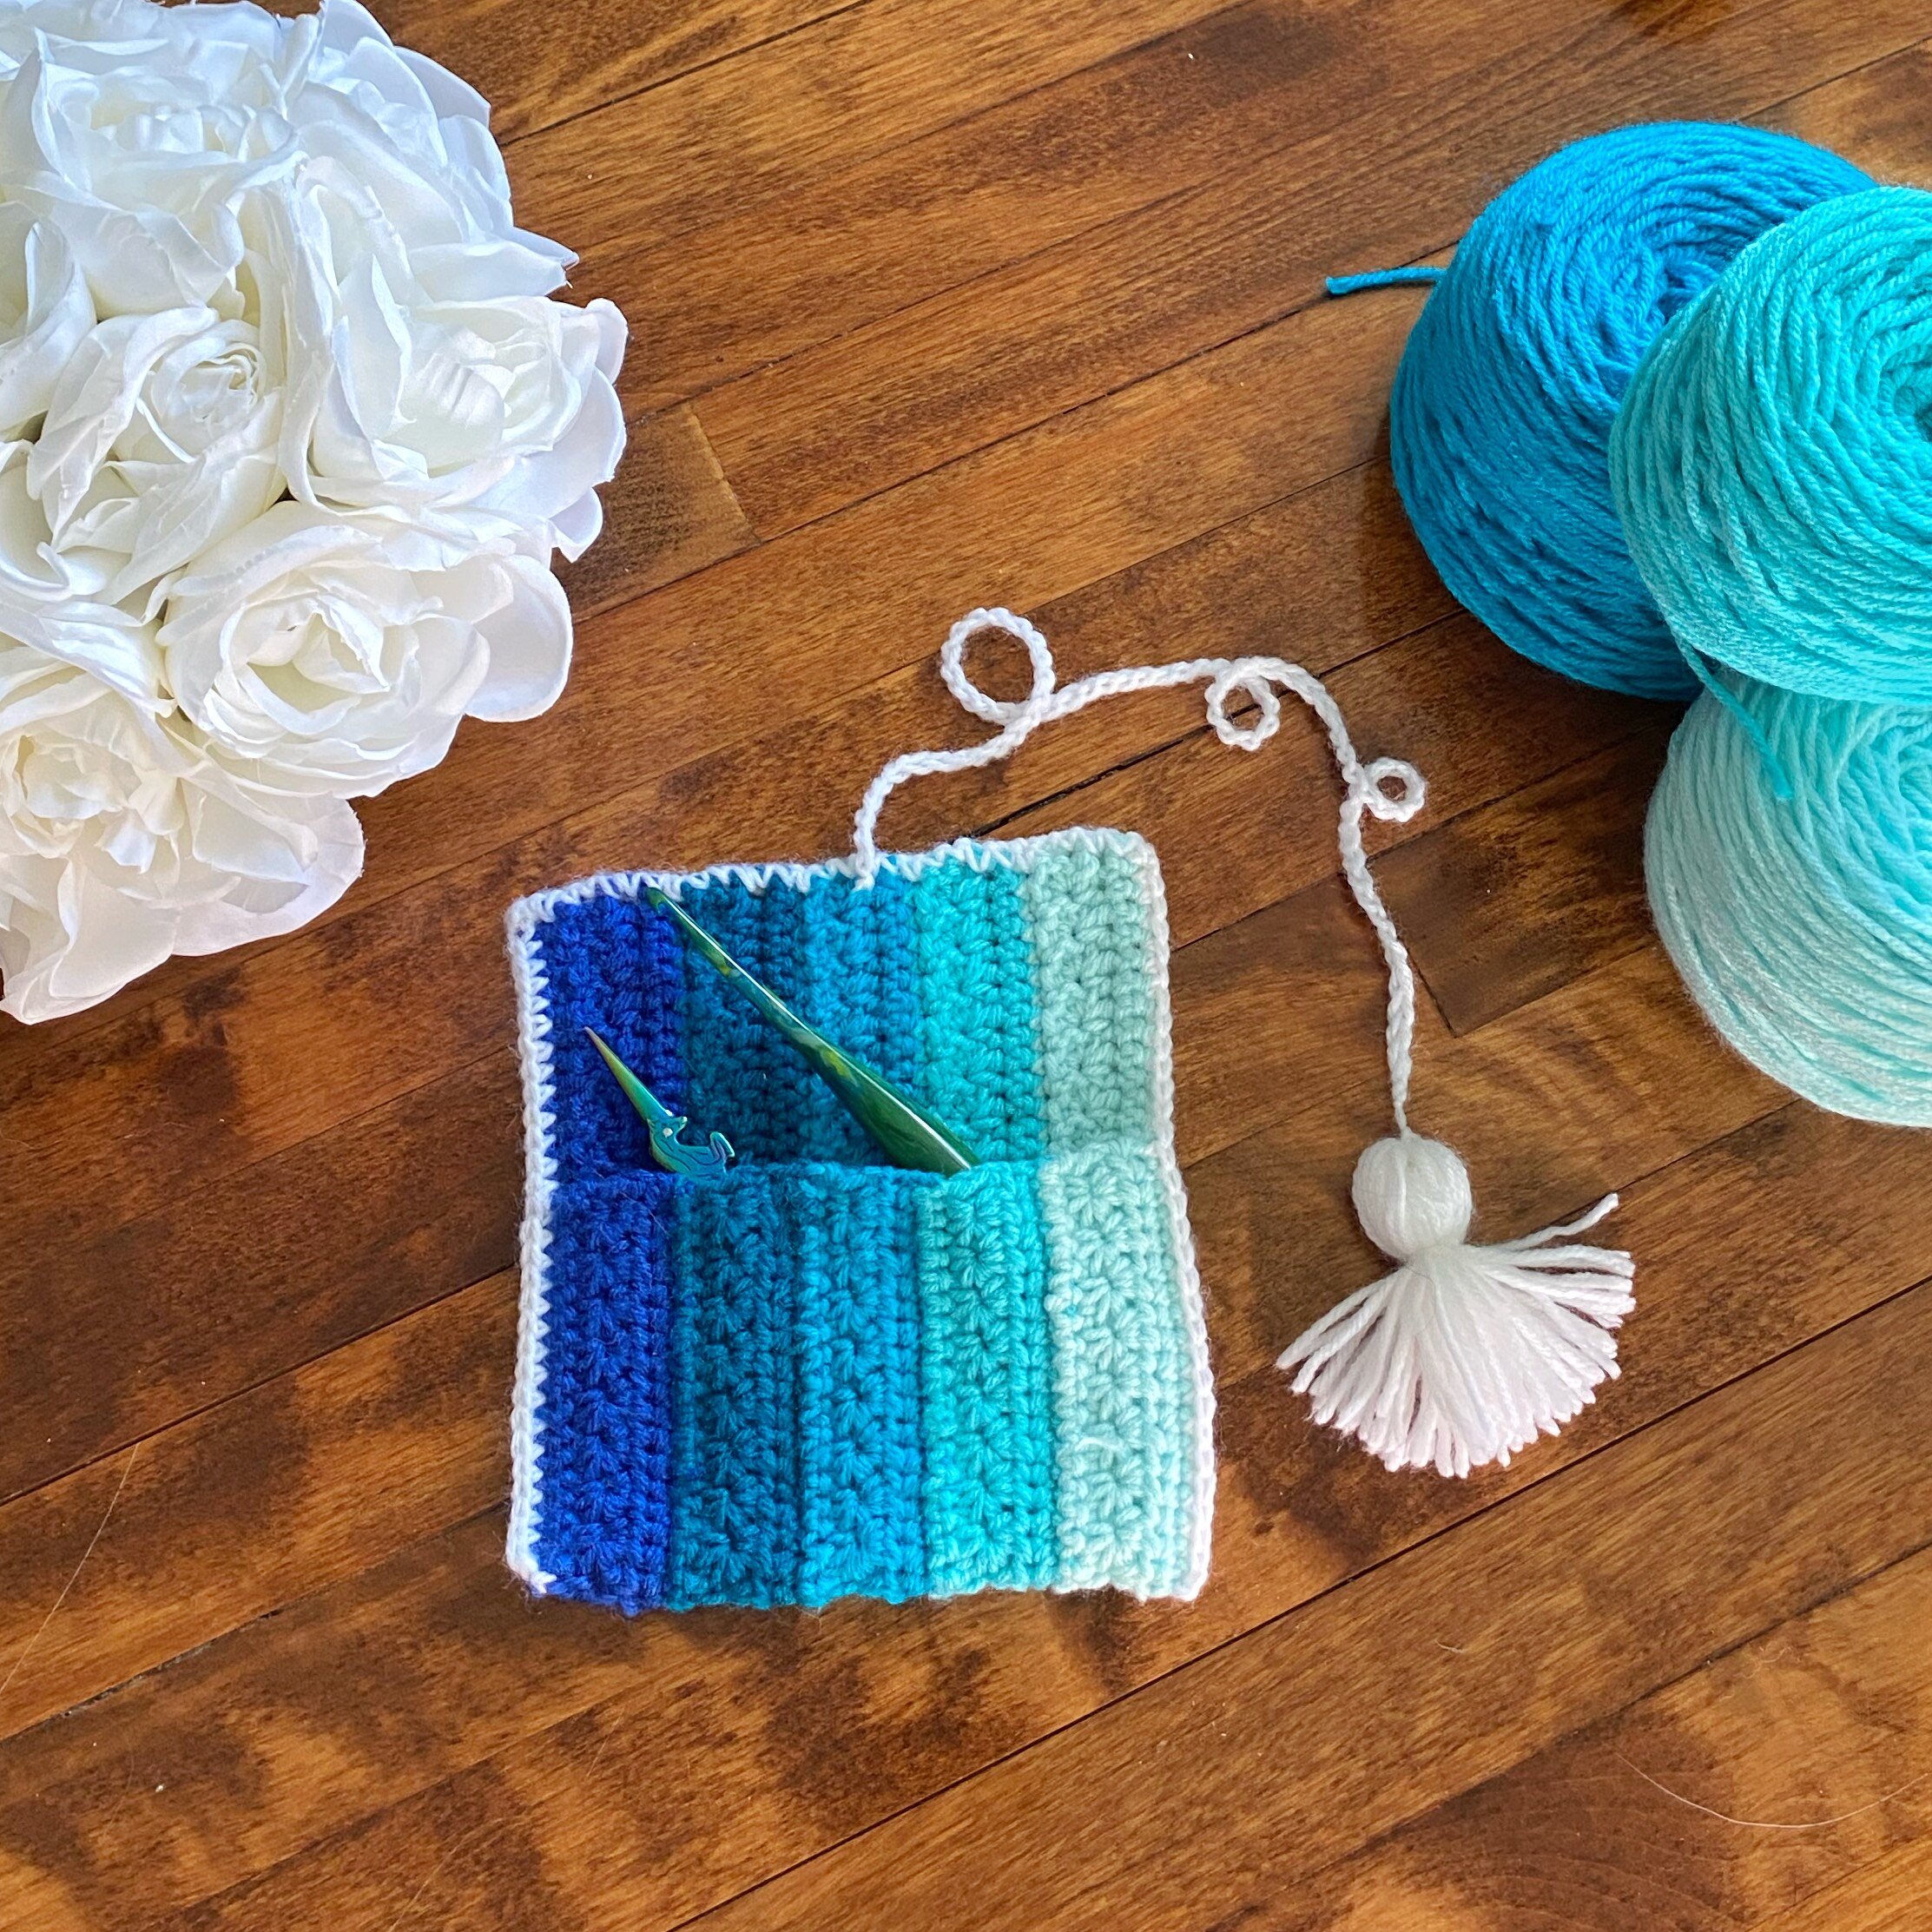
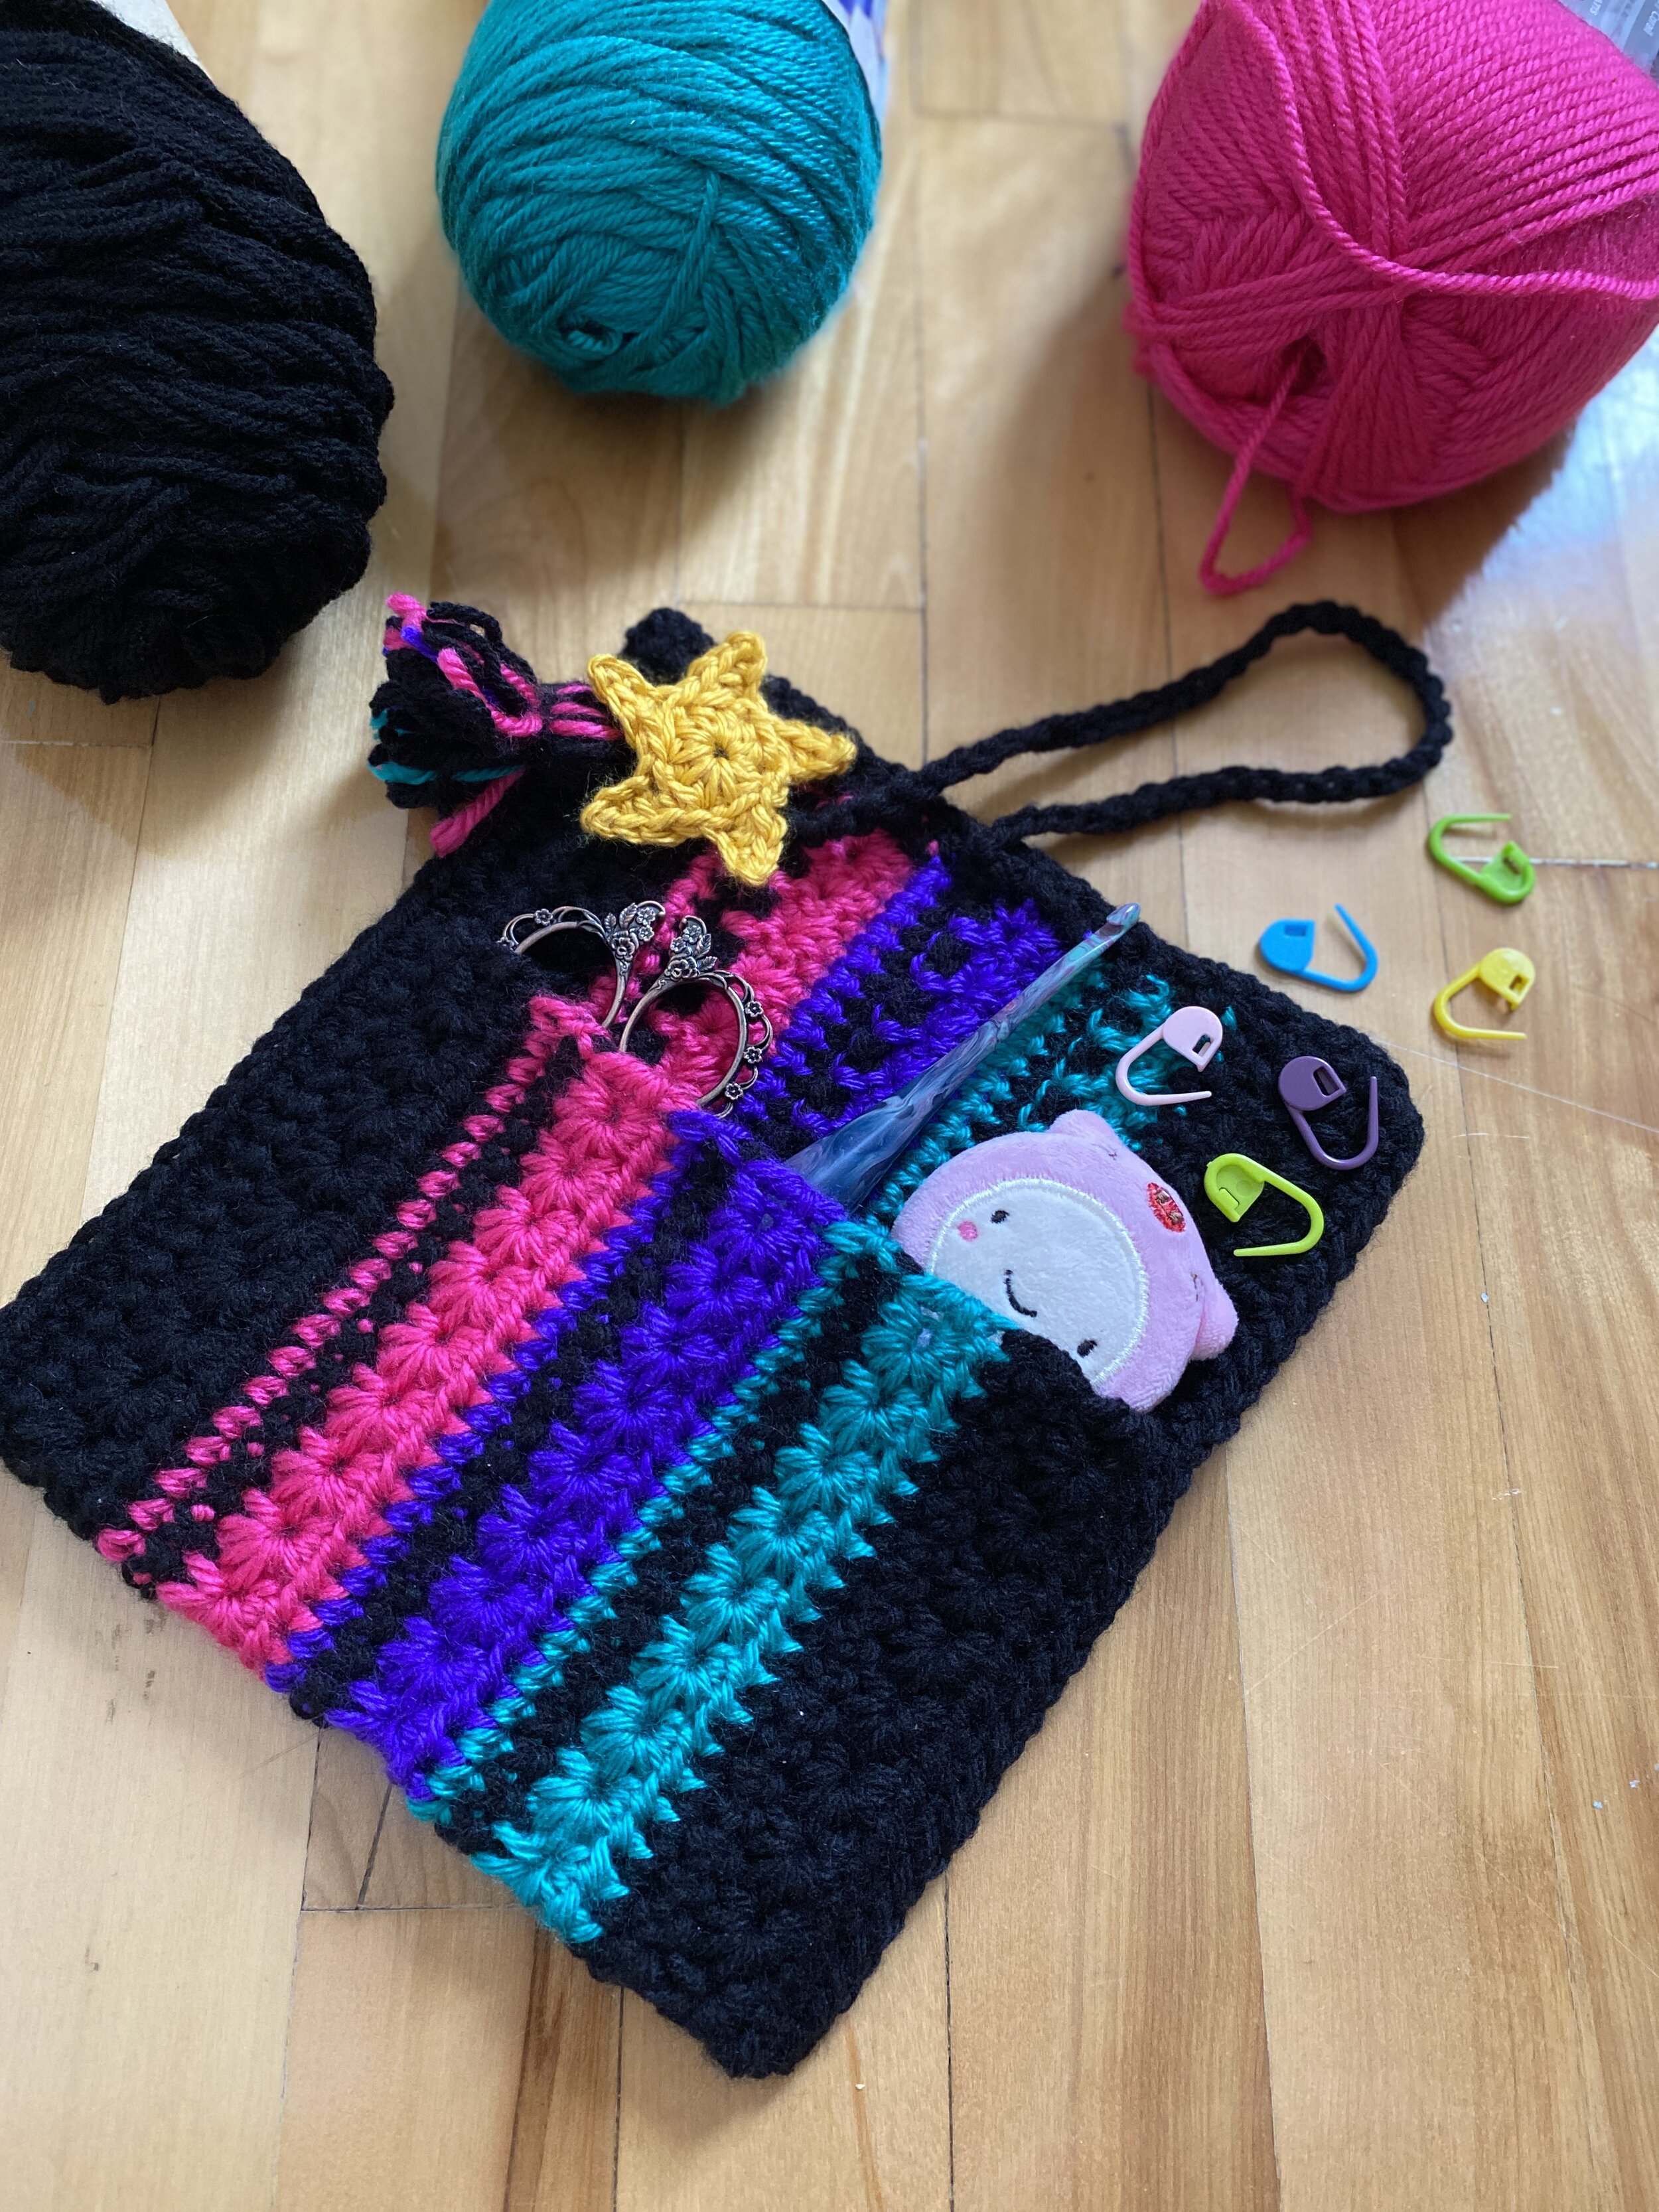
Magic Carpet Clutch

It’s June! The sun is shining for the most part and the temperatures are reaching that lazy summer heat. I’ve been feeling particular sluggish lately. I am not a summer person! Give me FALL any time, but spring and summer are my kryptonite. Allergies and sweating make me more than a hot mess.
So, if you’re like me, right now you’re probably not in the mood to work on a larger project! The idea of having all that weight and yarn in my lap makes me hot and bothered just thinking about it. That’s one of the reasons this weeks pattern came into being. Small quick patterns for easy gratification, without adding stress or heat to the equation!
ABOUT THIS clutch:
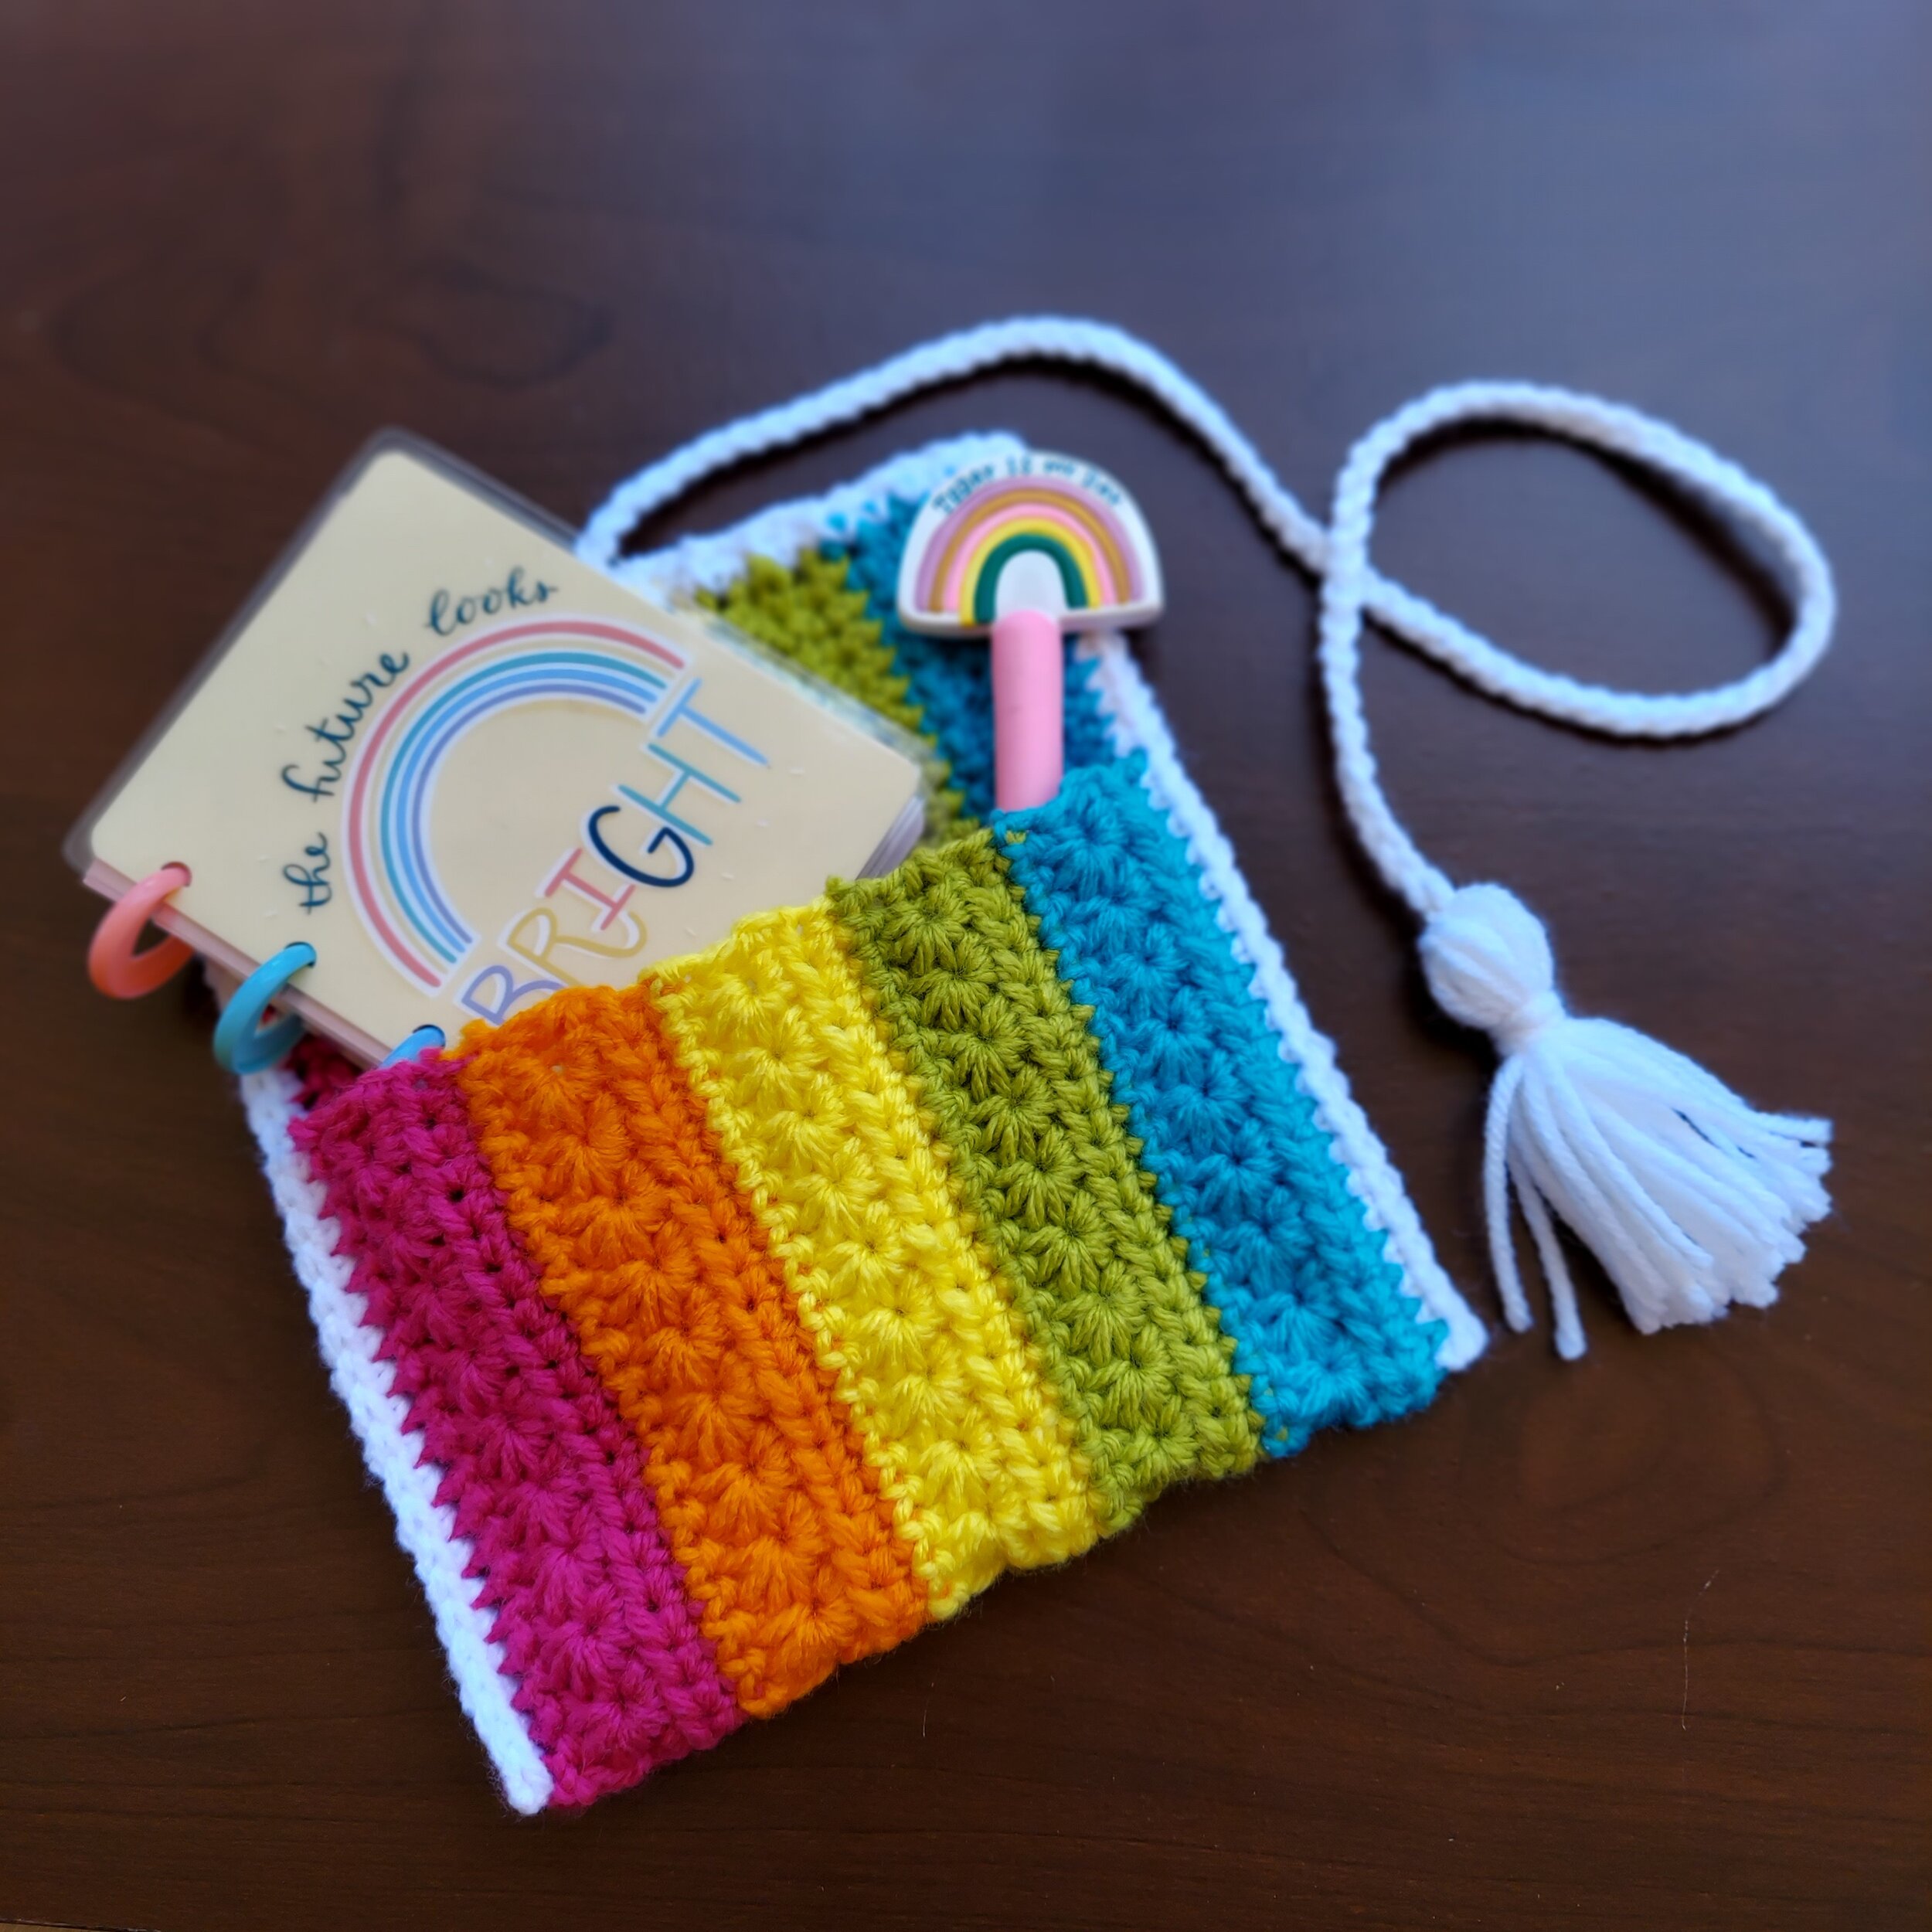
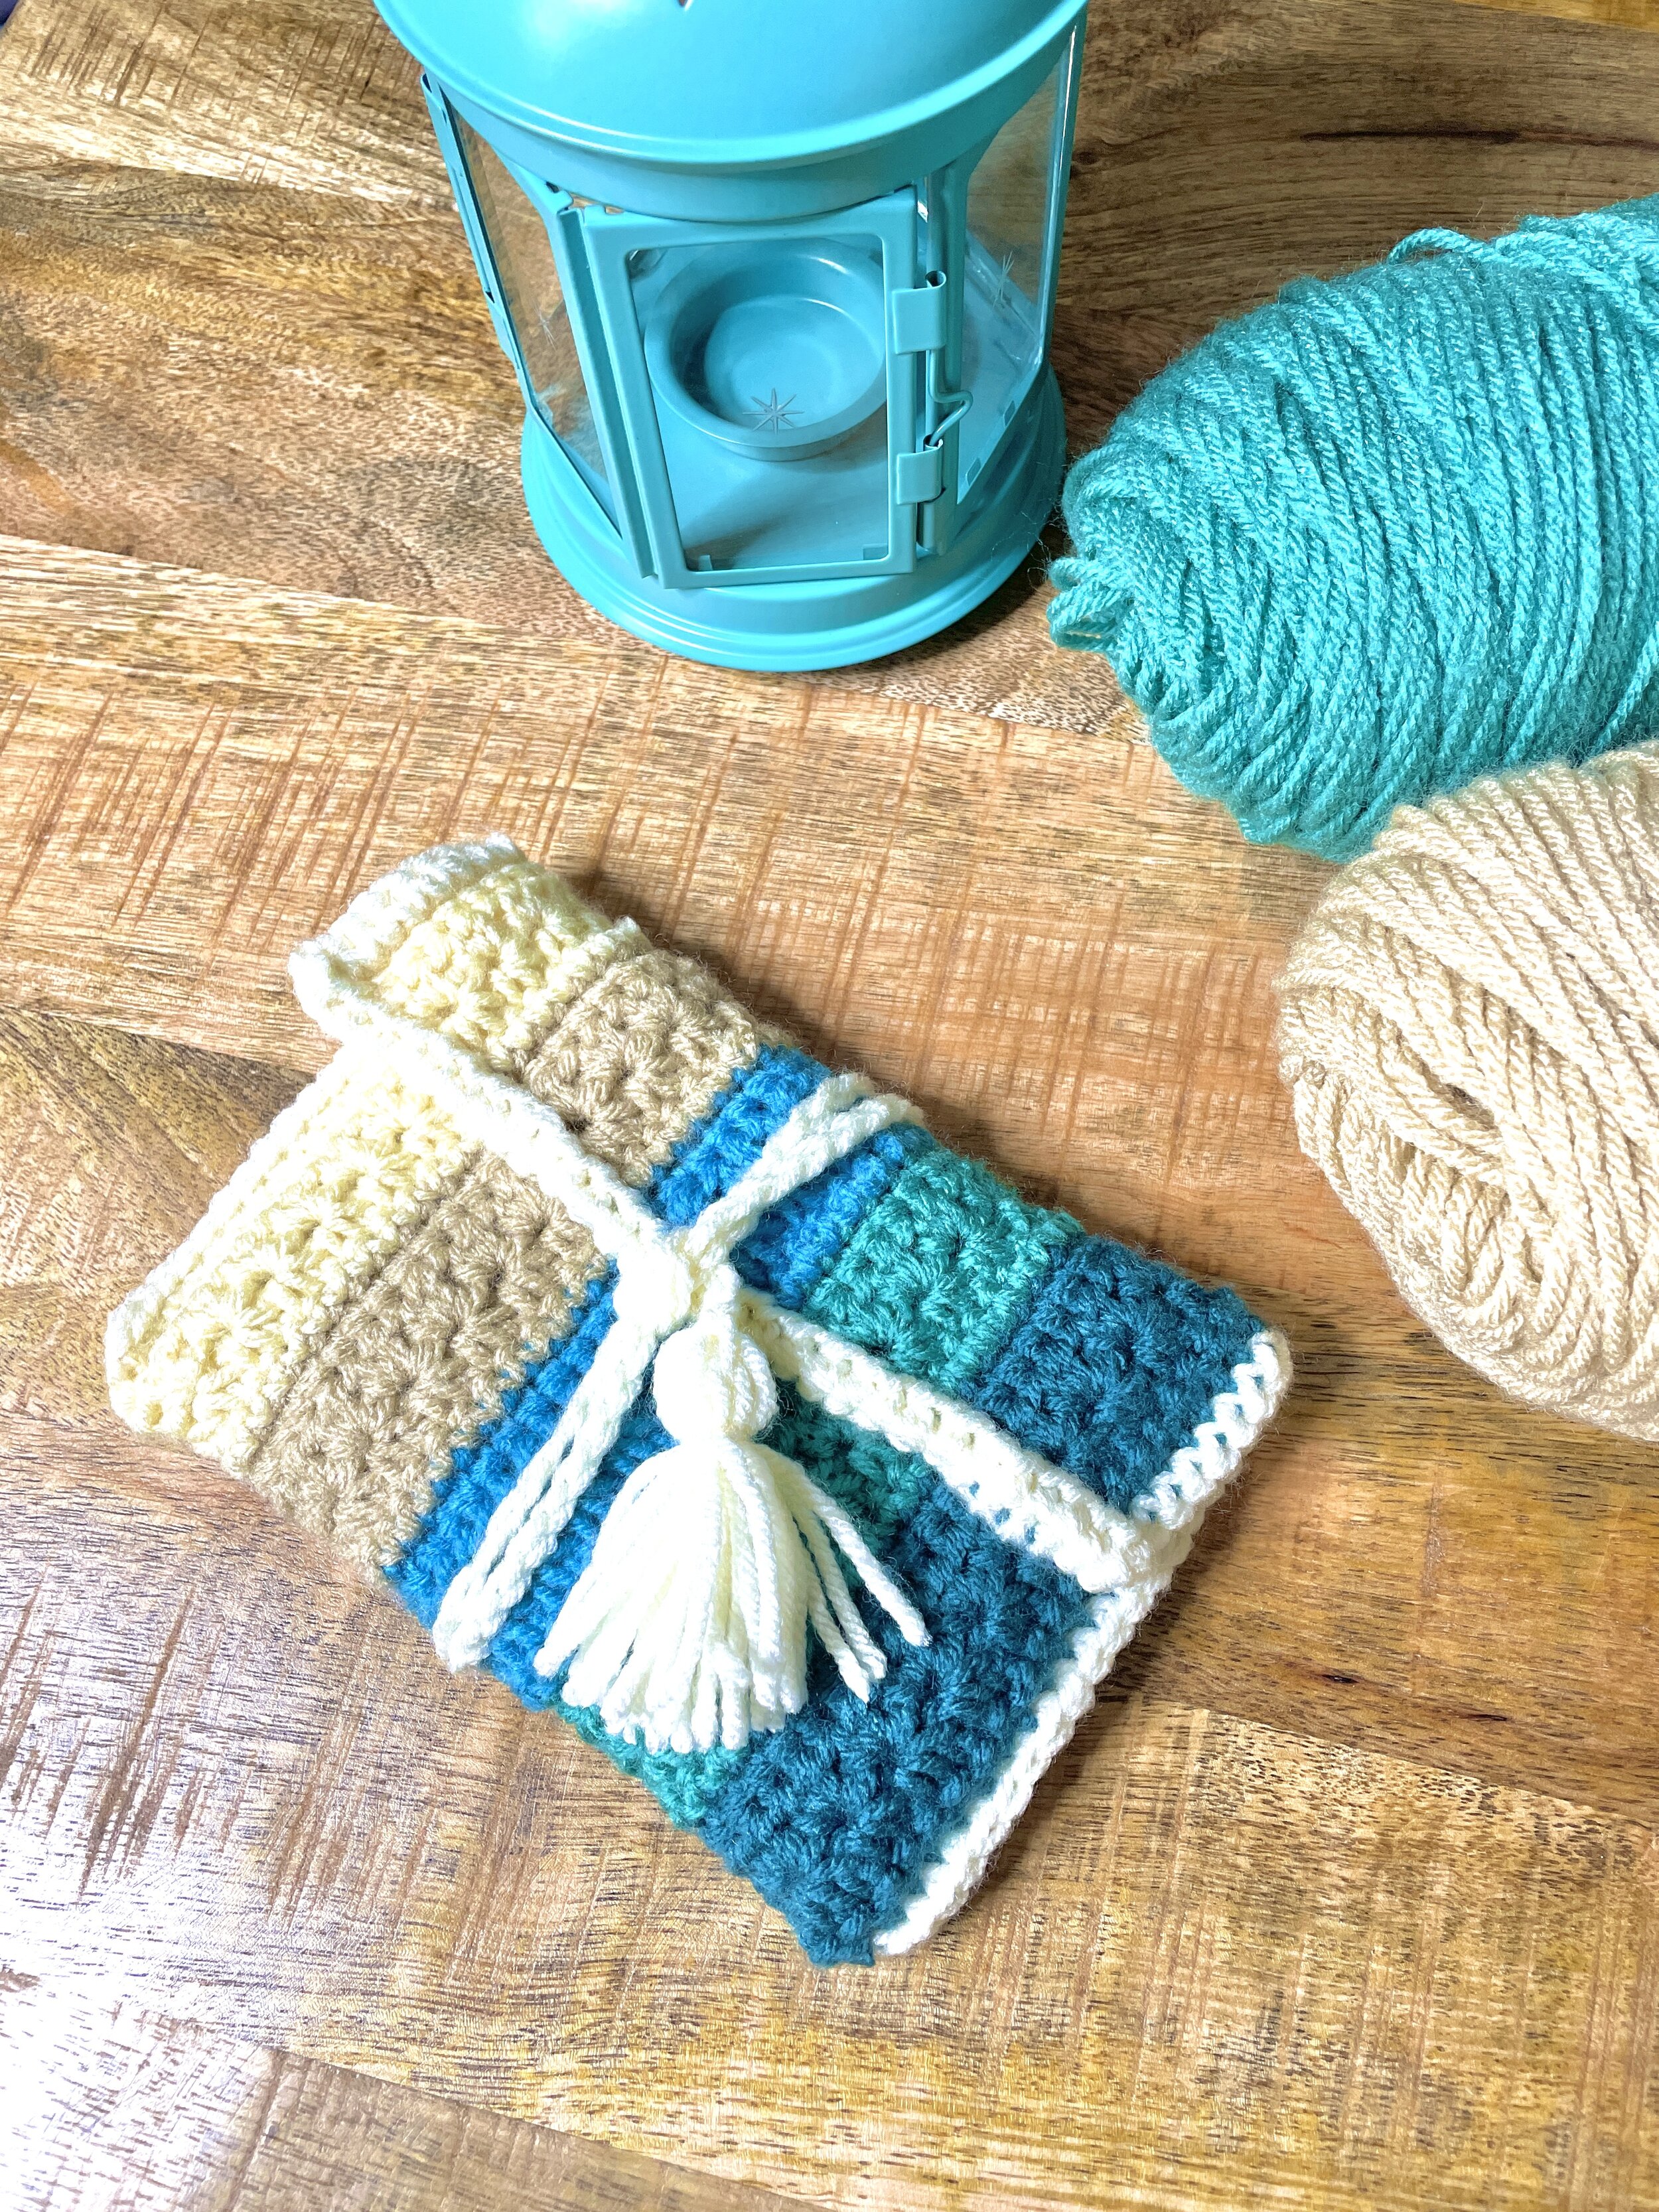
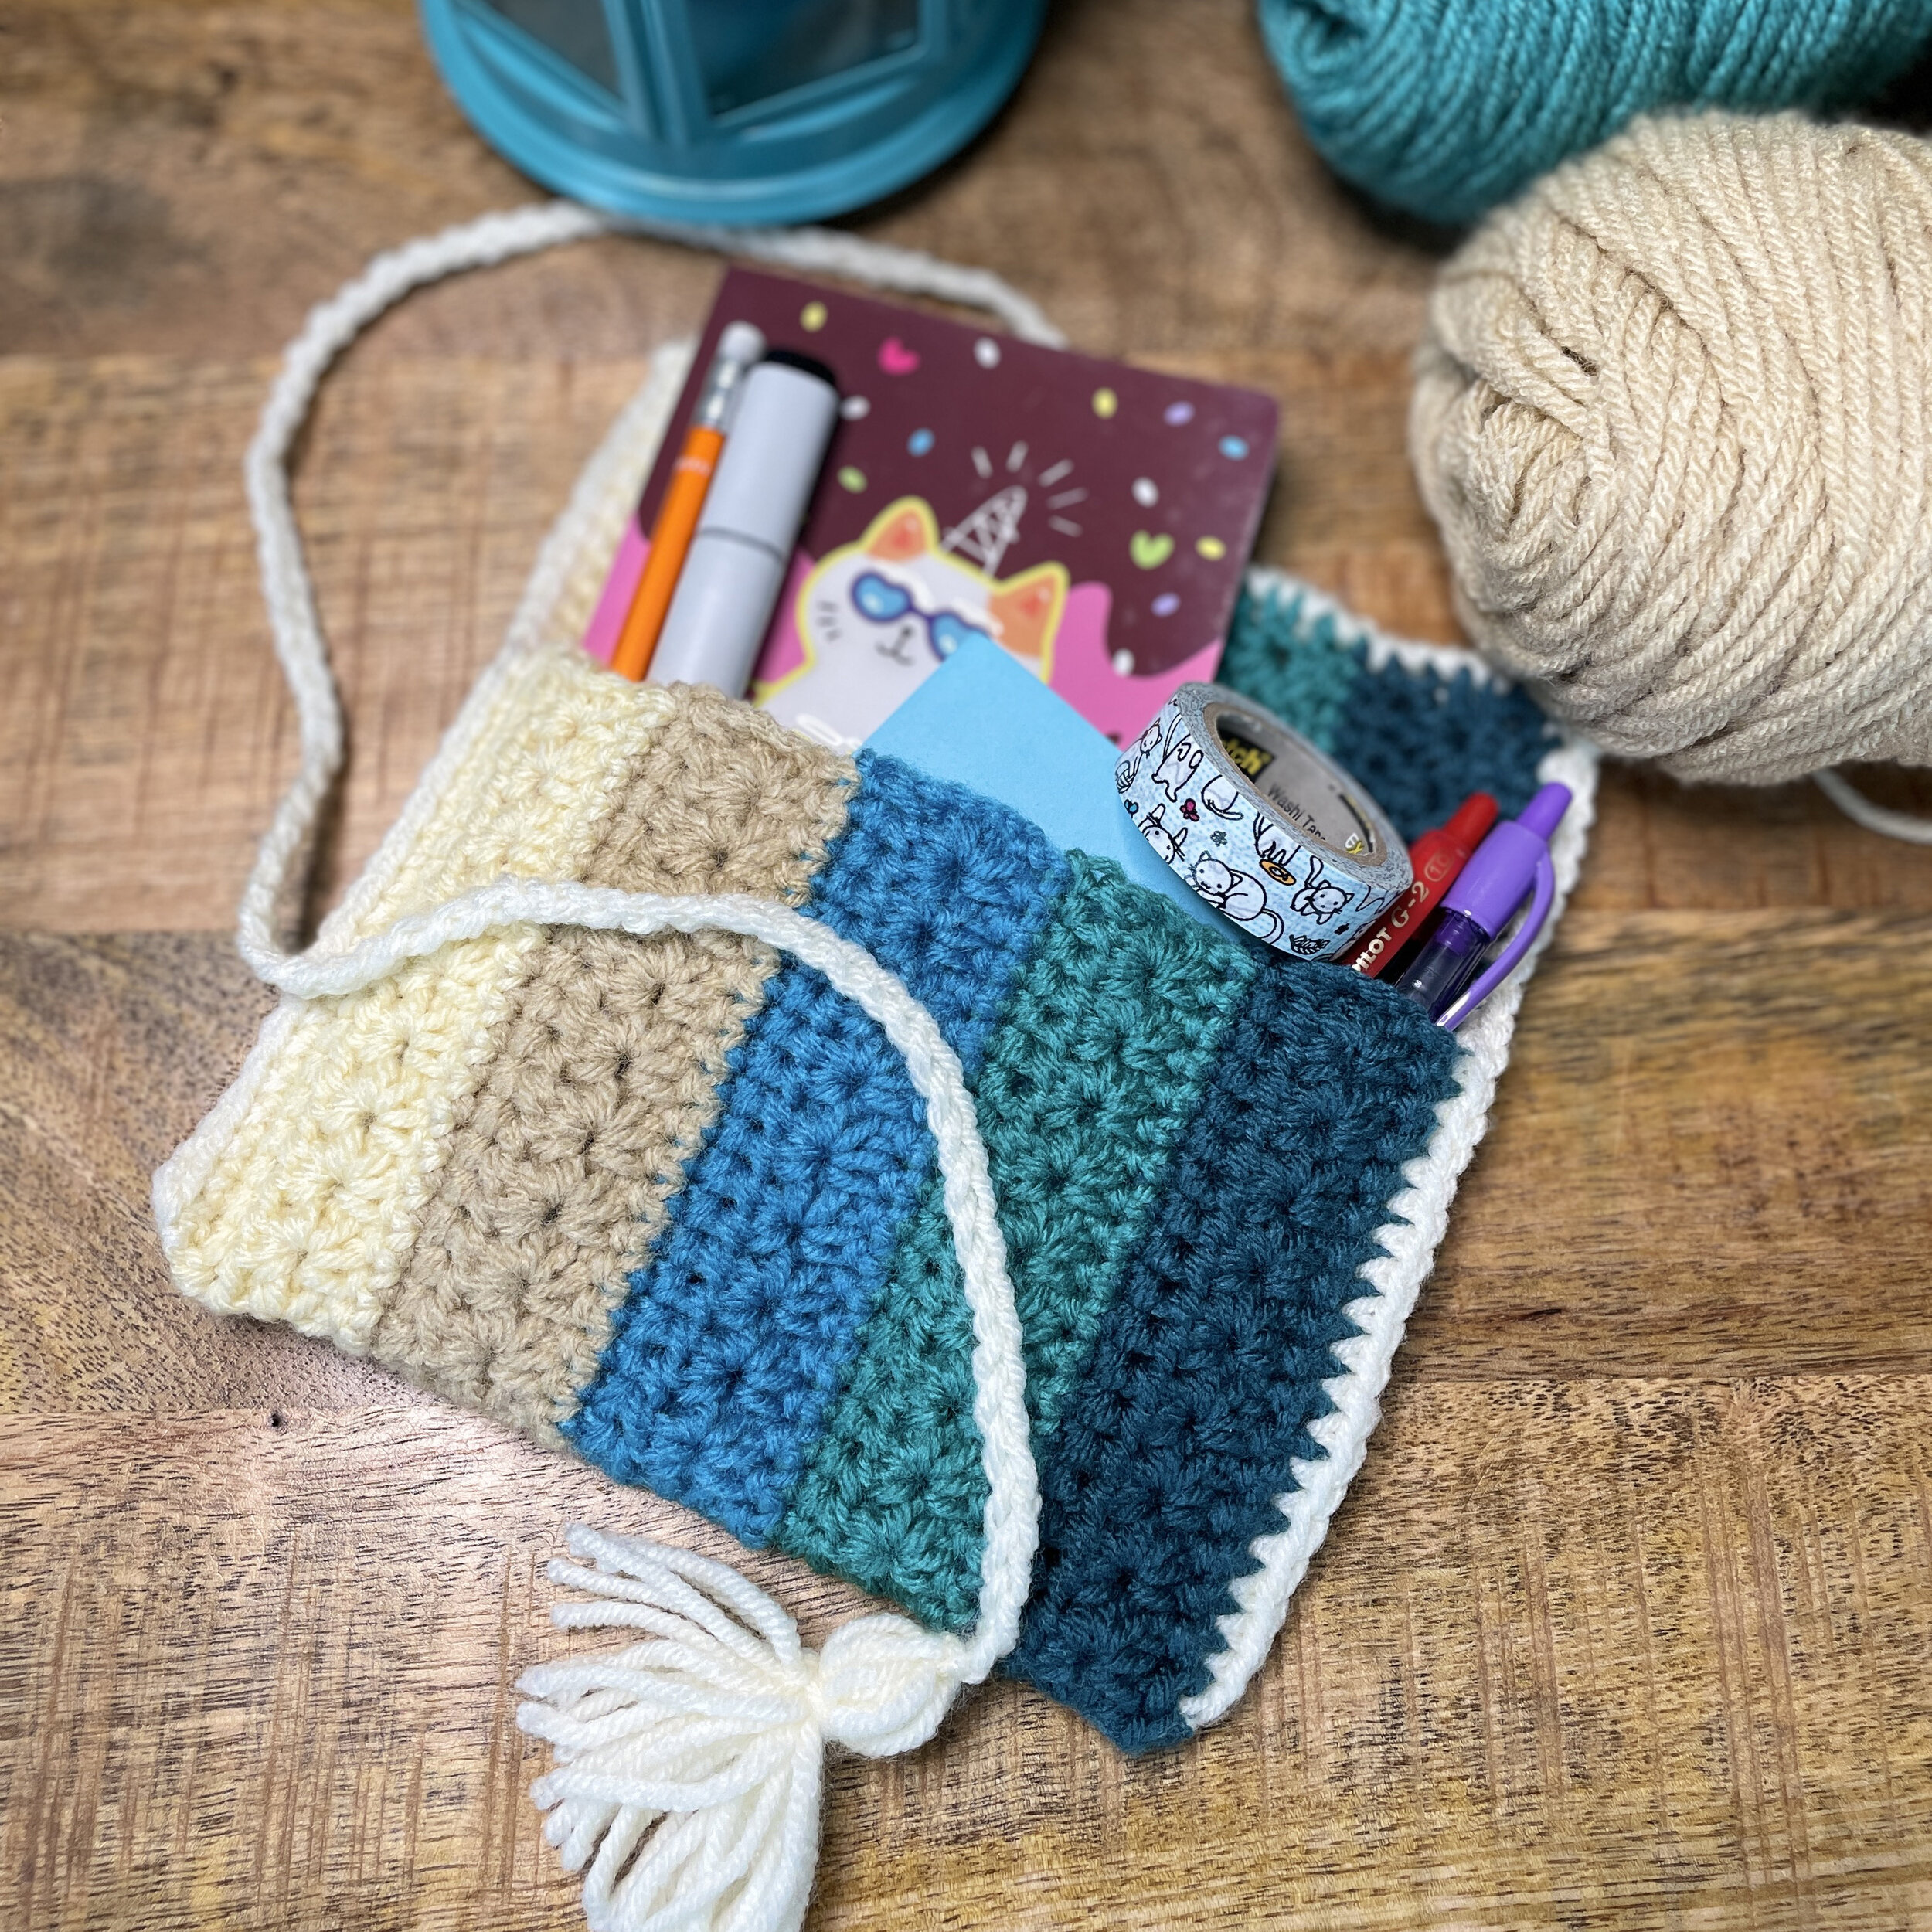
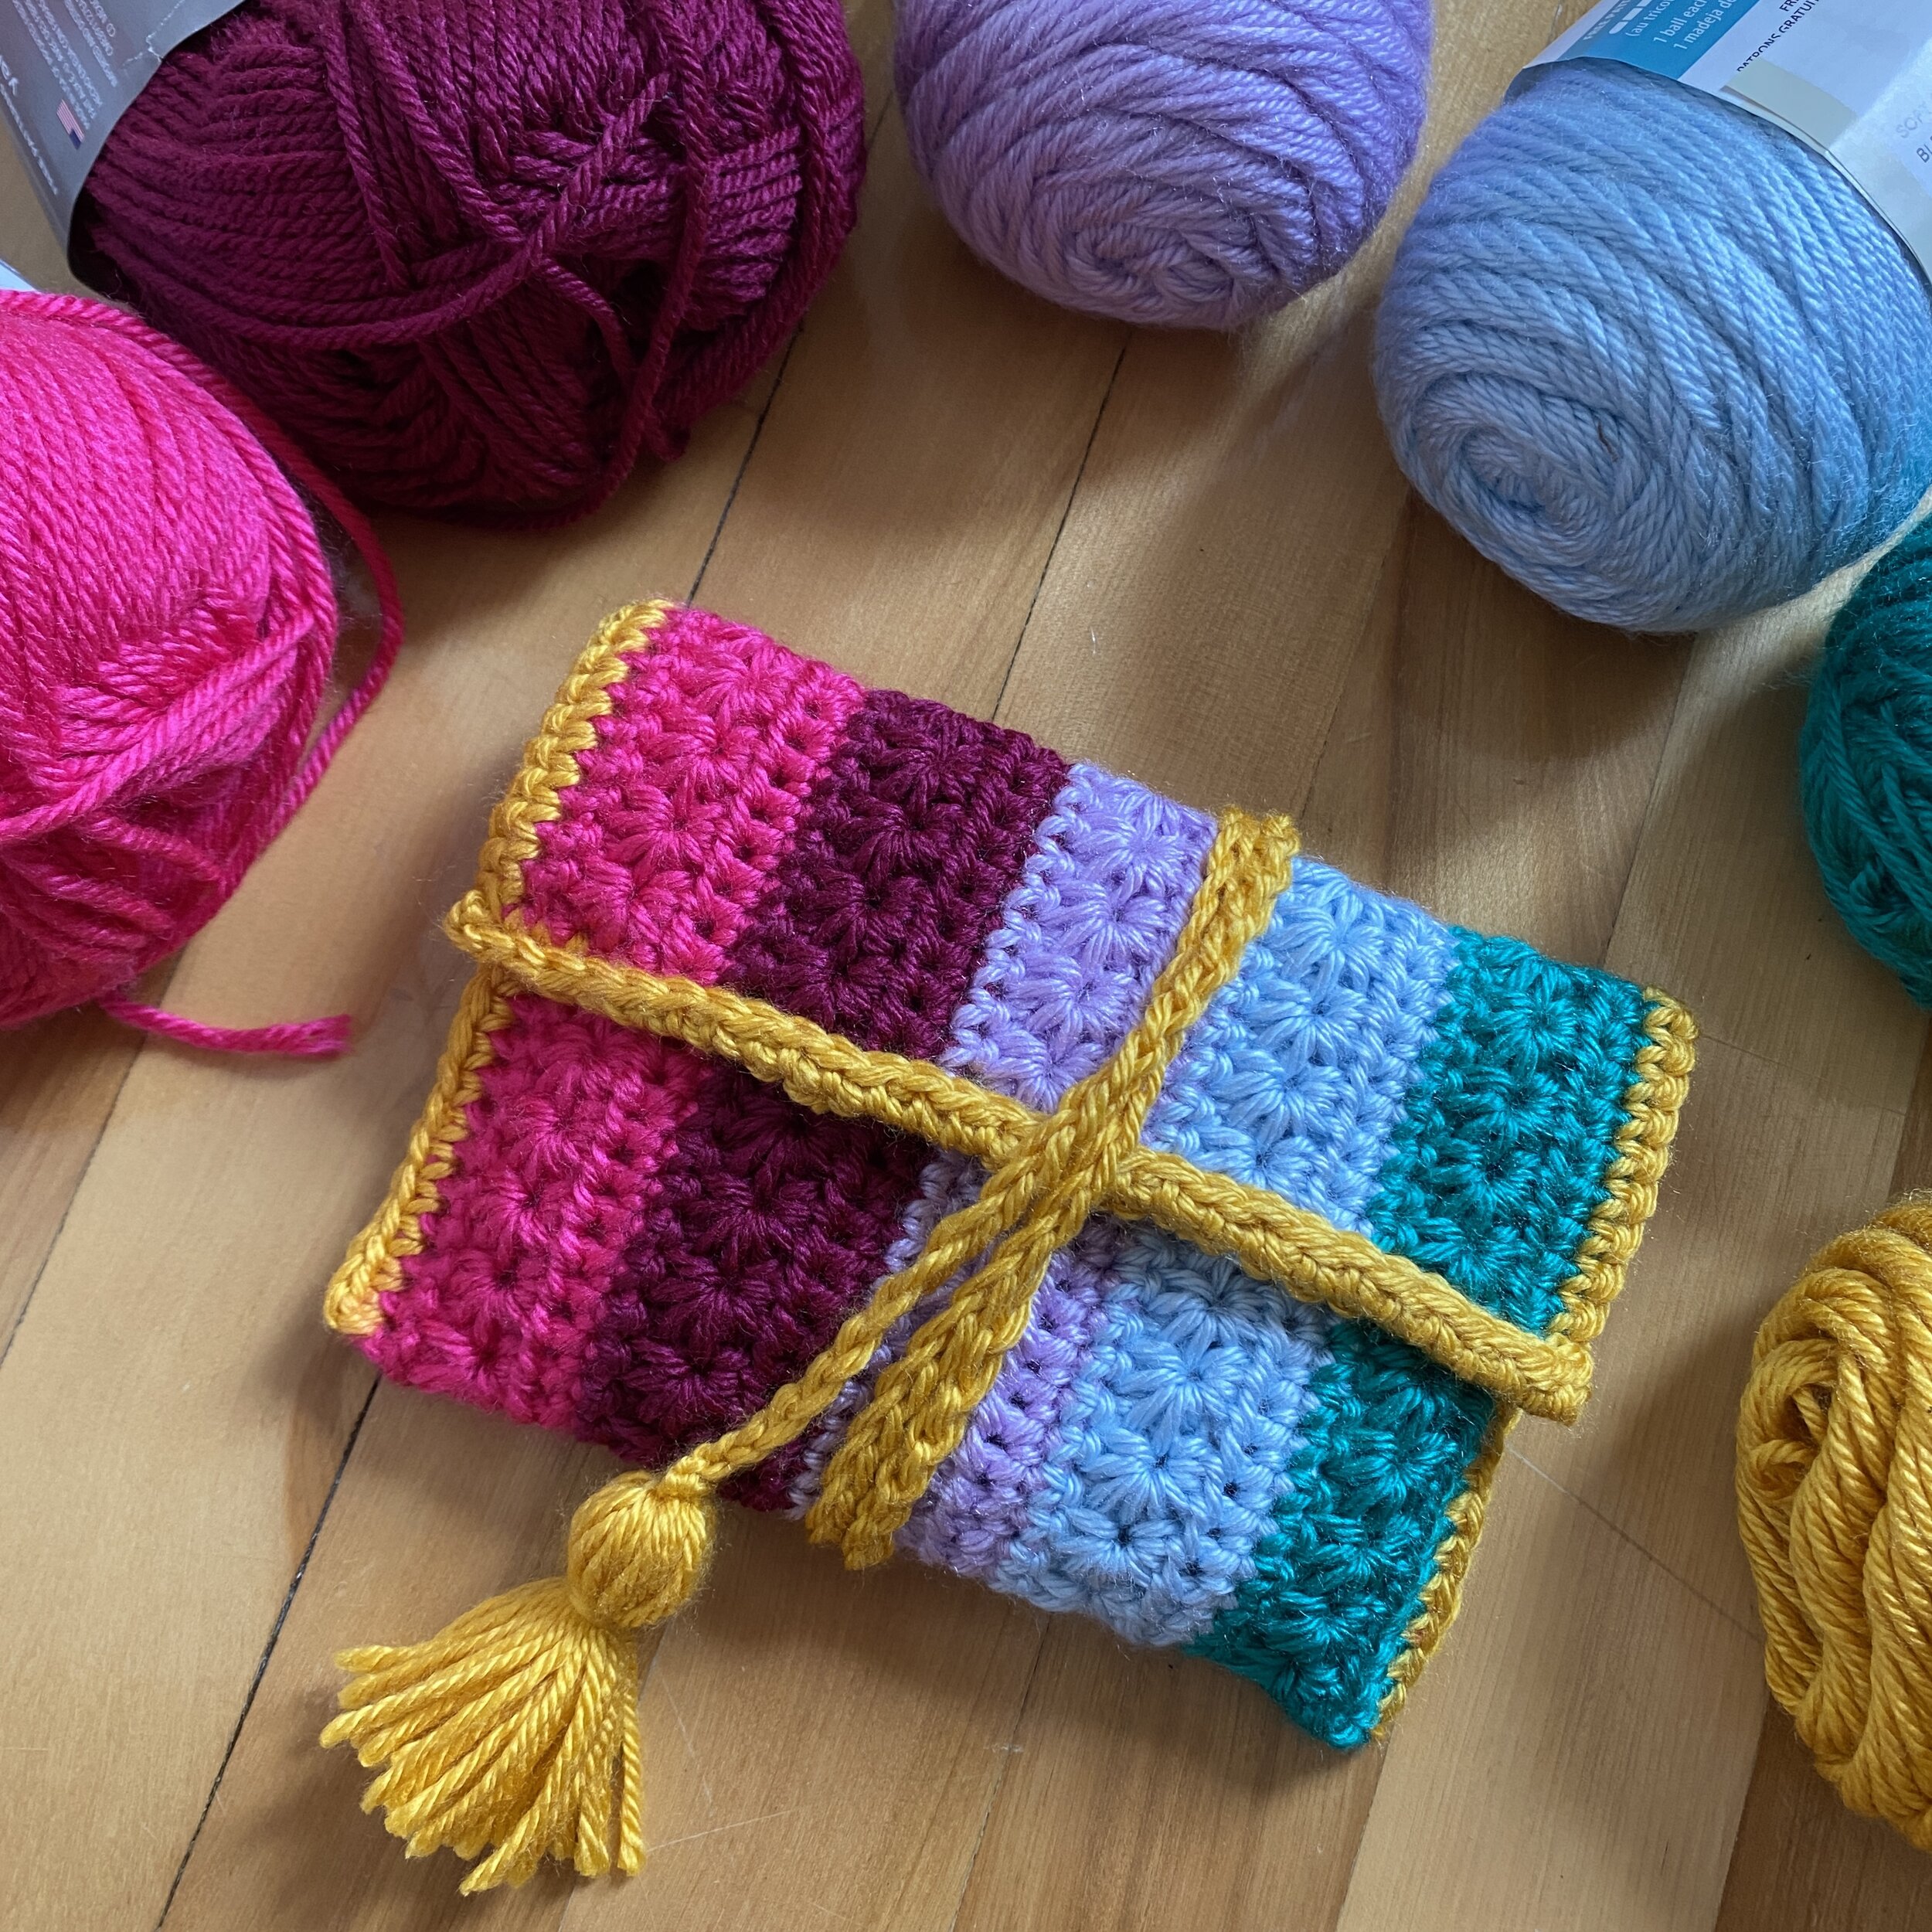
This is the Magic Carpet Clutch! When my friend Lizette saw this design, she said she automatically though of a magic carpet! She said the colors and the tassels looked like something from Aladdin. And, you know what? She’s RIGHT! Hence the name!
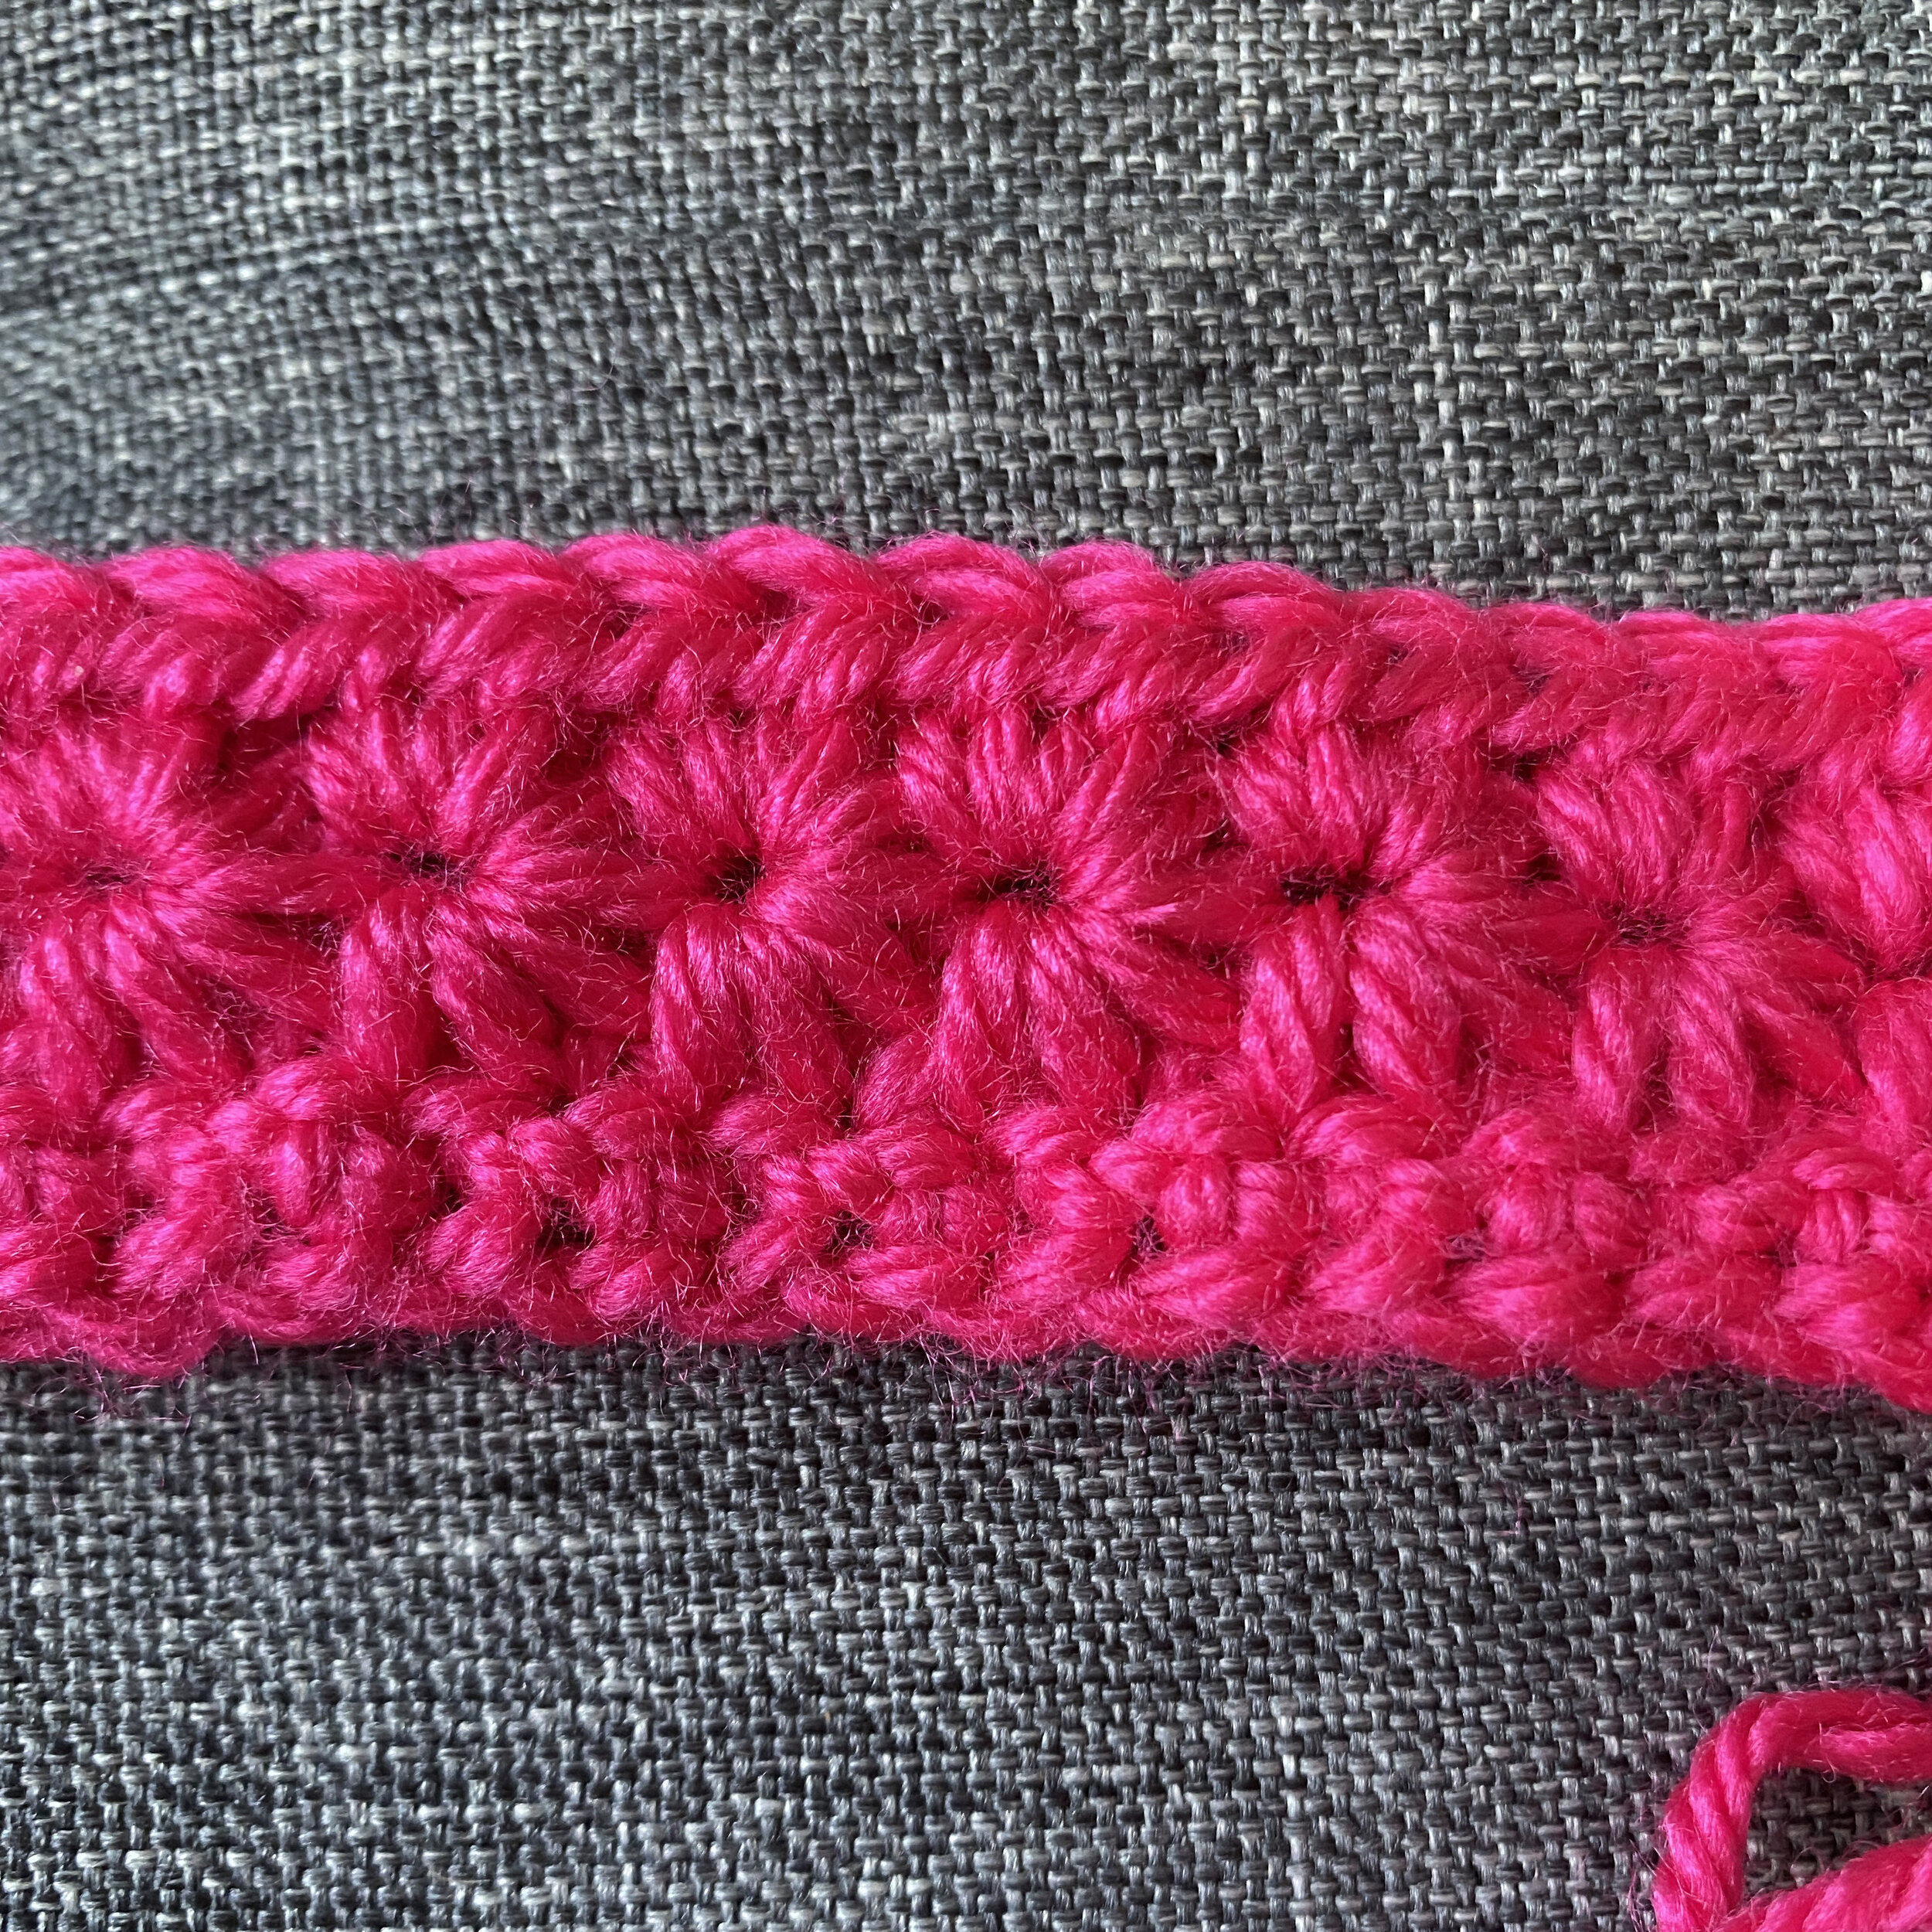
This clutch quick, fun, and perfect for taking with you in the car or on a plane during vacation season. It is a great stash buster for any time you need a quick project to work on. The Star Stitch that the clutch is made with feels like it’s extremely difficult at first, but once you get the hang of it, you’ll be busting out rows of stars on your drive to visit family or on your way to the lake, etc!
For my clutch, I used about 90 yards of yarn total, which is less than 20 yards of each color. This pattern is great to use up extra yarn you have lying around from previous projects. Use any weight 4 yarn for your clutch. I used a combination of Red Heart Soft and Caron Simply Soft.
Also, gauge is not super important for this pattern unless you’re looking for a particular size of bag. You can use any type of yarn. Just be aware that using a lighter weight yarn, the bag will be smaller, and a heavier weight will give you a larger bag.
THANK YOU! to all my wonderful testers!
I LOVE TO SEE WHAT YOU CREATE!
Please share your creations with the community on social media tagging @ravinsekaidesigns and hashtag #magiccarpetclutch
I can’t wait to see the beautiful things you come up with!
FOLLOW ME ON SOCIAL MEDIA
Facebook: Ravin Sekai Designs
Ravelry: RavinSekai
Instagram: @ravinsekaidesigns
Pinterest: Ravin Sekai Designs
Patreon: Ravin Sekai Designs

Pin to Pinterest
WHAT YOU NEED:
Hook Size: 5mm hook, or size needed to obtain gauge
Yarn: Medium weight 4 yarn. Sample crocheted in Red Heart Soft and Caron Simply Soft. 91 yards total. About 18 yards each color
Gauge: 17 st/ 11 rows in sc = 4” (gauge is not important).
Finished Size: 7” wide x 4.5” tall
ABBREVIATIONS:
Abbreviations in US terms
Ch: chain
st/sts: stitch/stitches
Sl st: slip stitch
Sc: single crochet
Hdc: half double crochet
Rep: repeat
FO: fasten off
Cont.: continue
SM: stitch marker
C1, C6: color 1, color 6
RS: right side. The side you will have facing outward.
WS: wrong side. The side you have inside the pouch.
Notes:
1. You need 4-6 colors to complete your bags if you make the size pictured. However, you can make a wider/larger clutch bag if you make a couple more star stitch stripes and add more stitches to each row. Make sure you start with an even # of chains (odd number of sts).
2. A good tutorial for the star stitch can be found at CraftingforWeeks Youtube channel: https://www.youtube.com/watch?v=S9q4YTqOh4E
3. A good tassel guide can be found at Sewrella’s Youtube channel: https://www.youtube.com/watch?v=THGfiIFnhjI

THE PATTERN:
For the free pattern of this clutch please continue on this page. Please consider supporting me by purchasing the 100% ad-free PDF with FULL picture tutorials for this pattern on my Ravelry or ETSY pages. Or consider joining my Patreon for member perks.
Main Body:
With C1 ch 50 st
Row 1: sc in the 2nd ch from hook and in every ch to end. Turn. (49 sts)
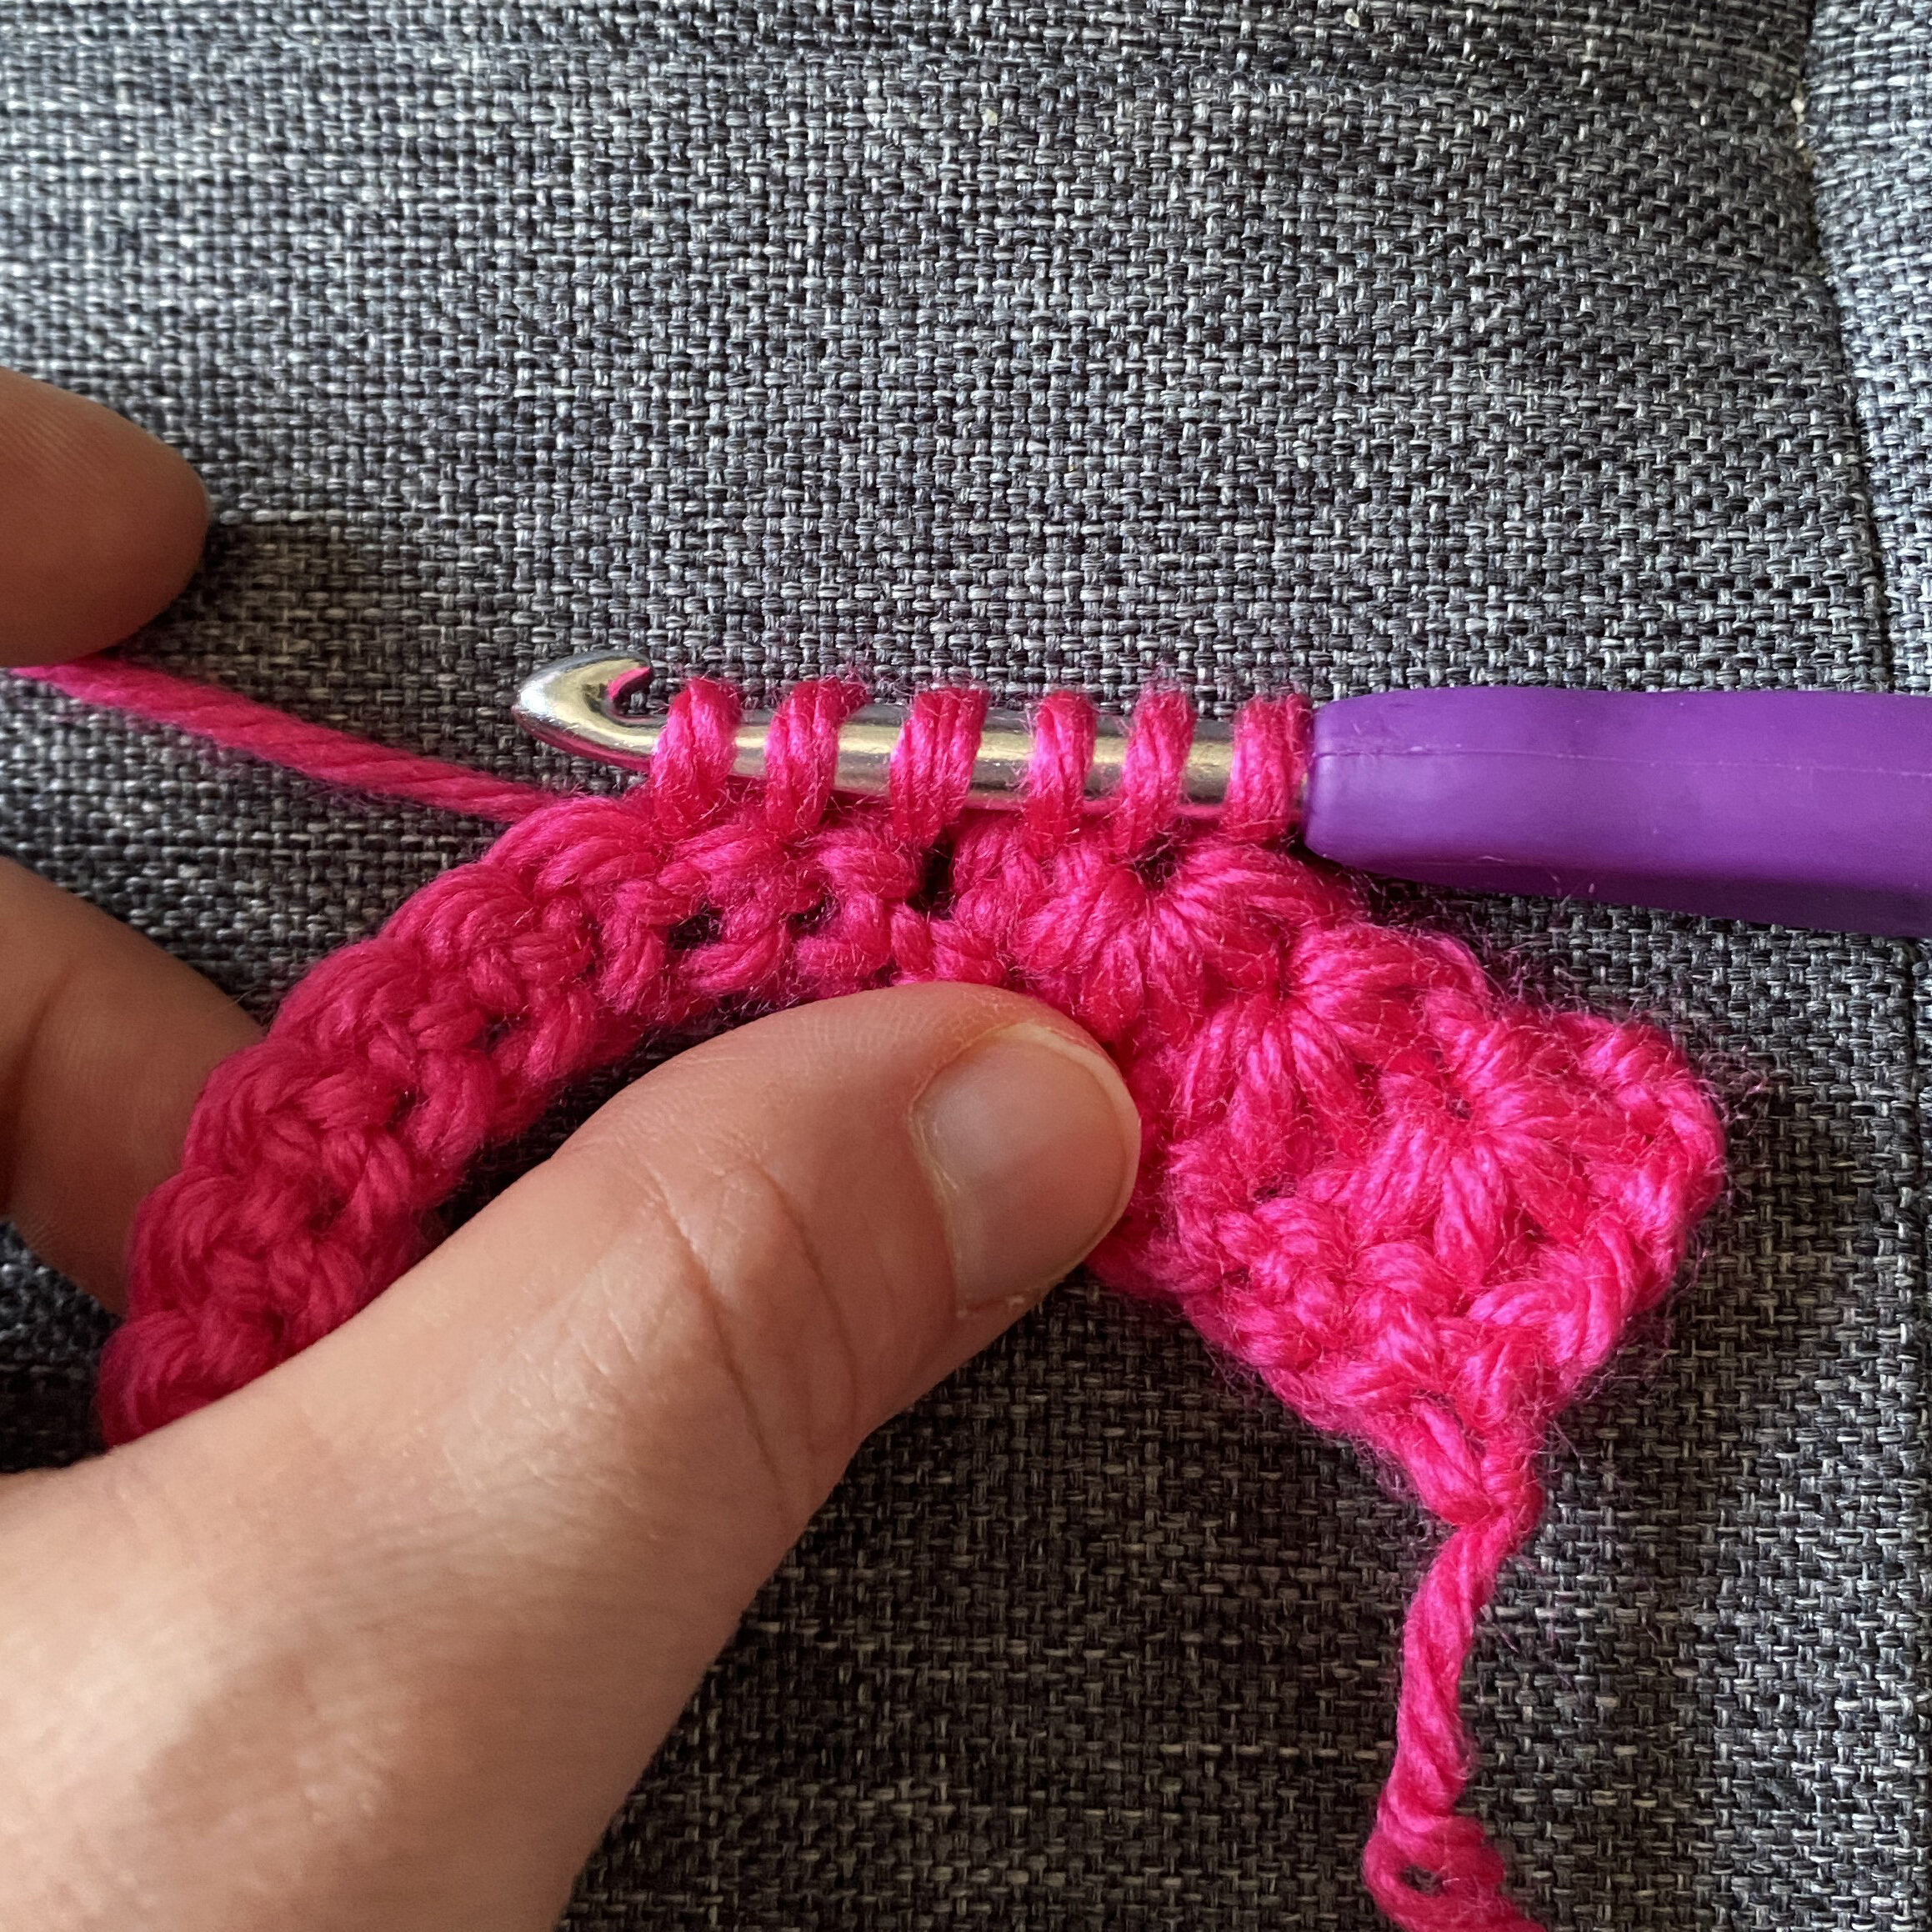
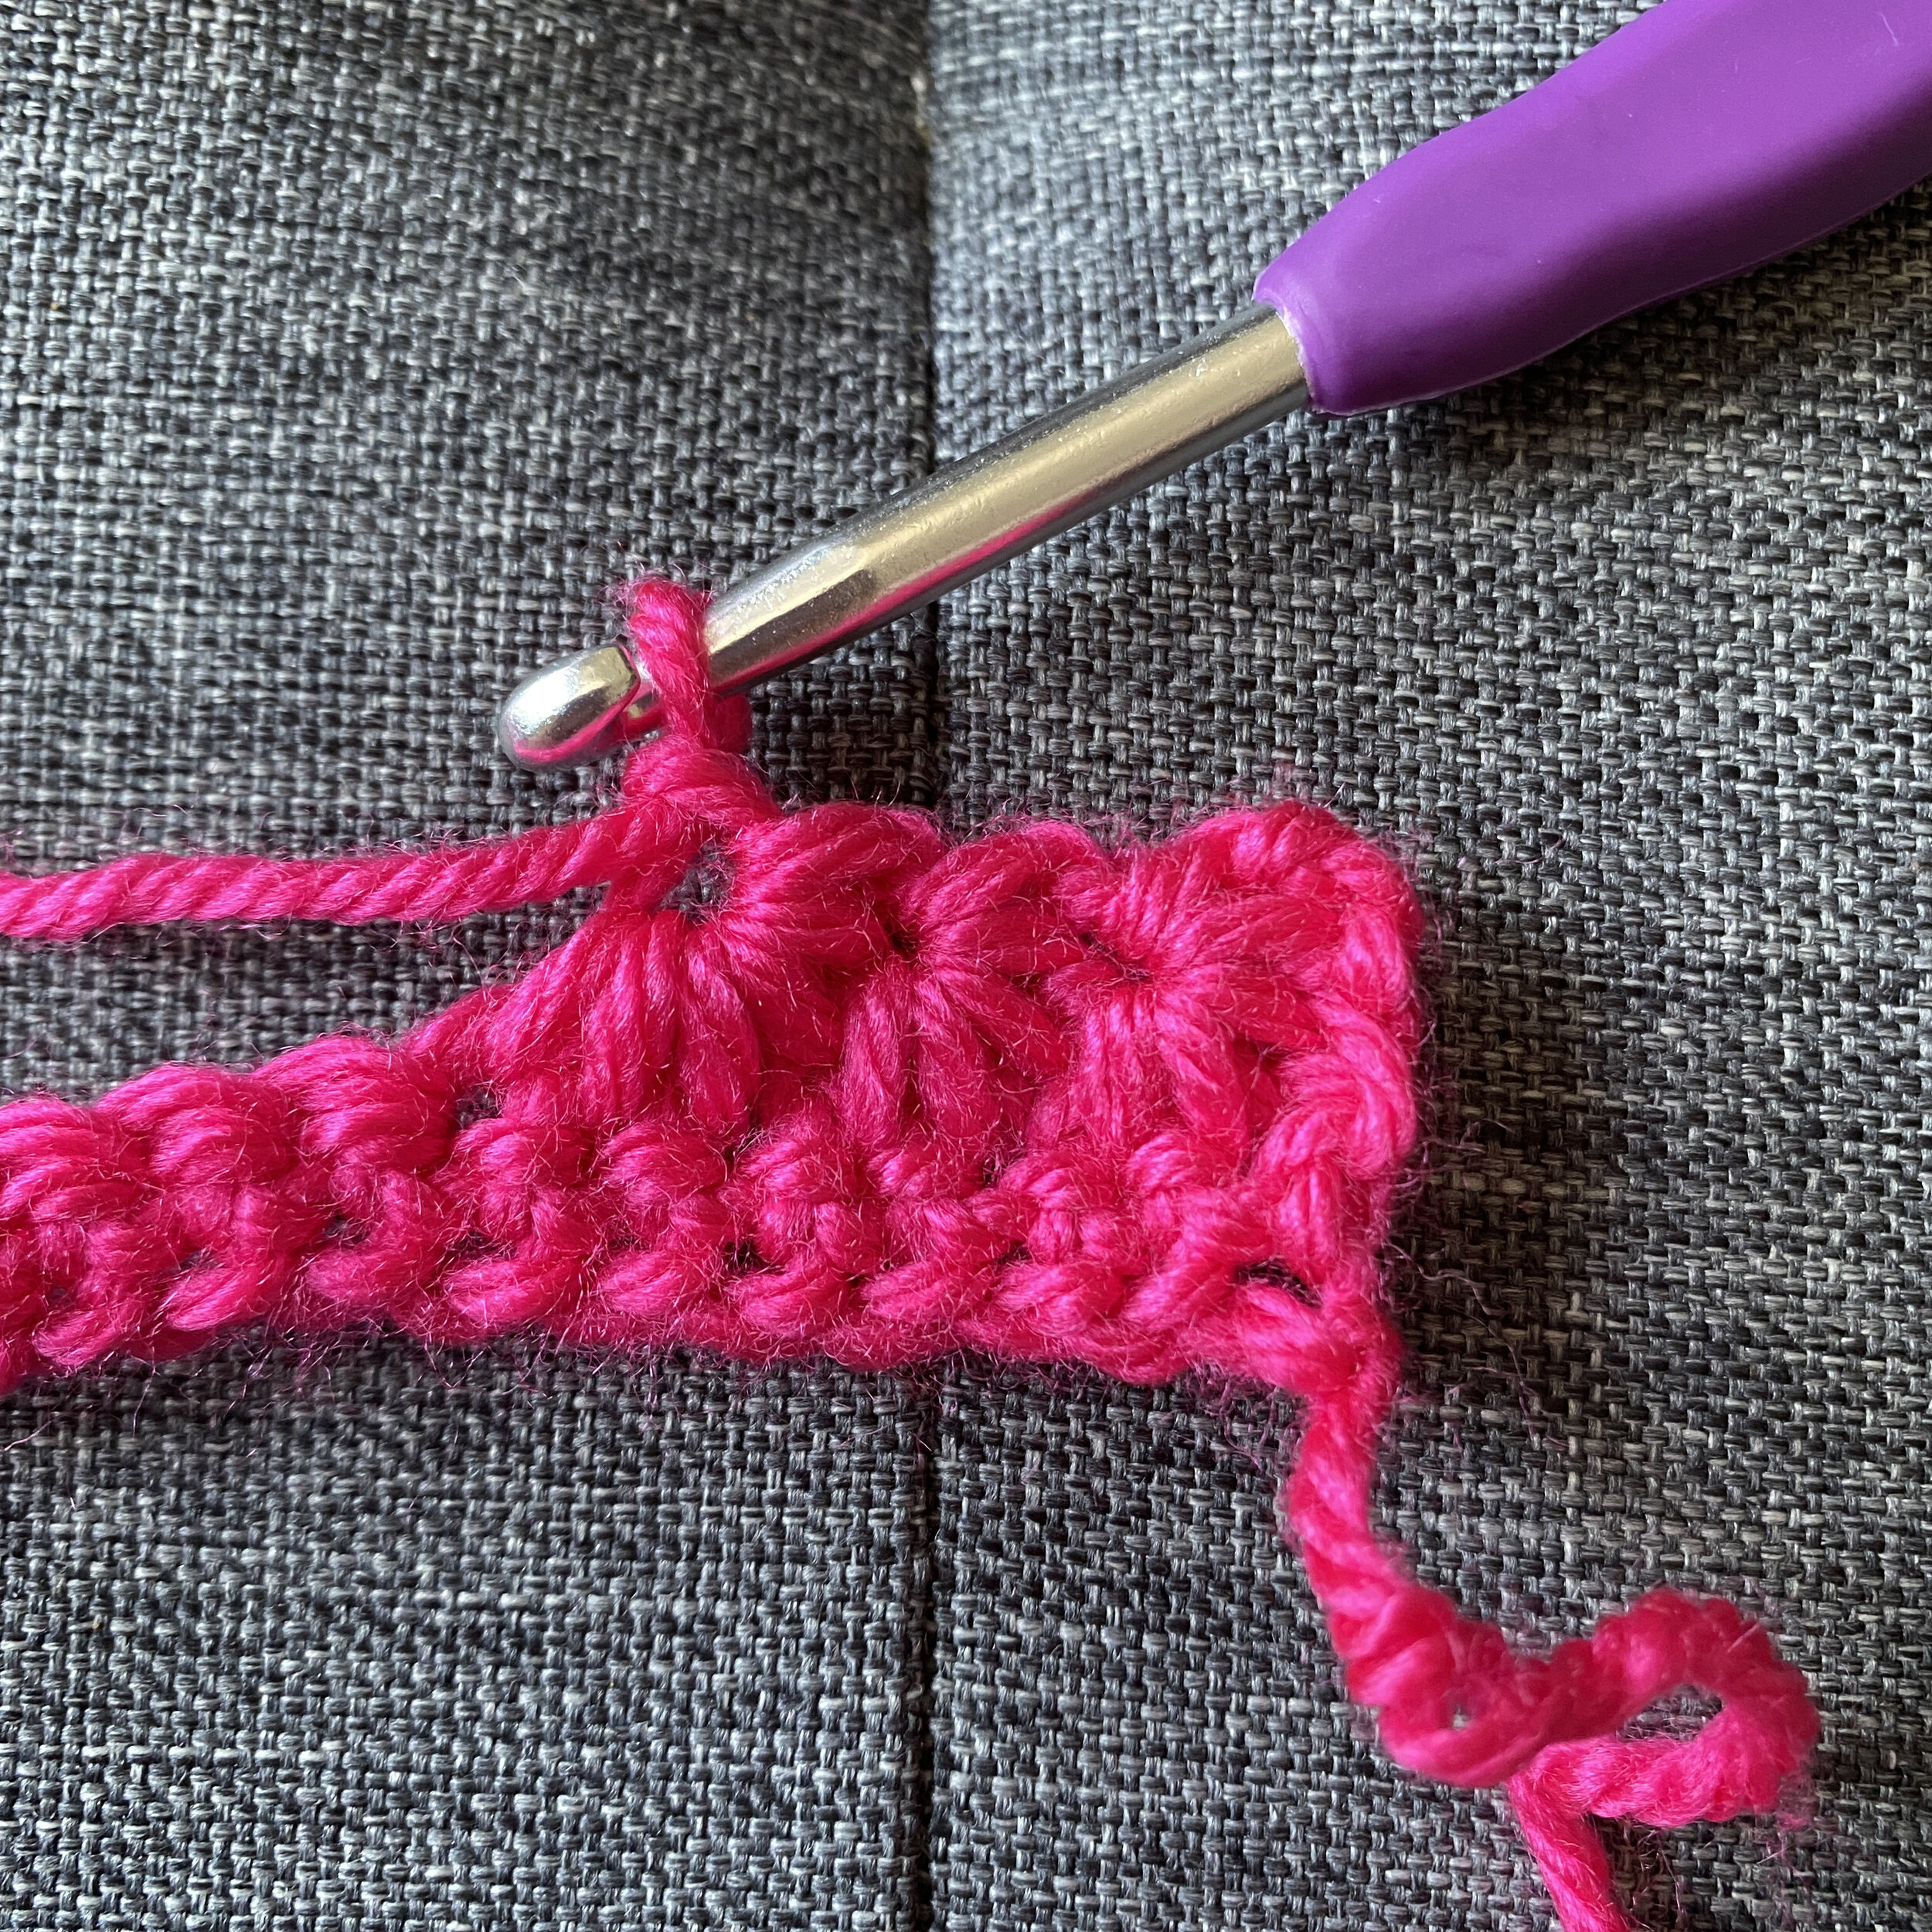
Row 2: ch3, in the 2nd ch from hook insert you hook and pull up a loop, in the 3rd ch do the same, in the 1st sc pull up another loop, insert in each next 2 sts and pull up loops, yo, pull through 6 loops, ch1, *insert hook into ch1 (the eye of the star) and pull up a loop, insert hook before the last spike of the star and pull up another loop, insert hook in the last sc of the previous star and pull up a loop, insert in each next 2 sts and pull up loops (6 loops on hook), yo, pull through 6 loops, ch1*, rep * * until last st, hdc in last st again. Turn.
Row 3: ch1, 2hdc in the ch1 space (the eye) of each half-star below, at the end of the row place a hdc in the ch3 at the start of the previous row. (the top of the 1st star st). Turn.

Row 4: ch1, sc across. (49 sts)
Row 5: change to C2, ch1, sc across.
Row 6: rep Row 2 - Row 5.
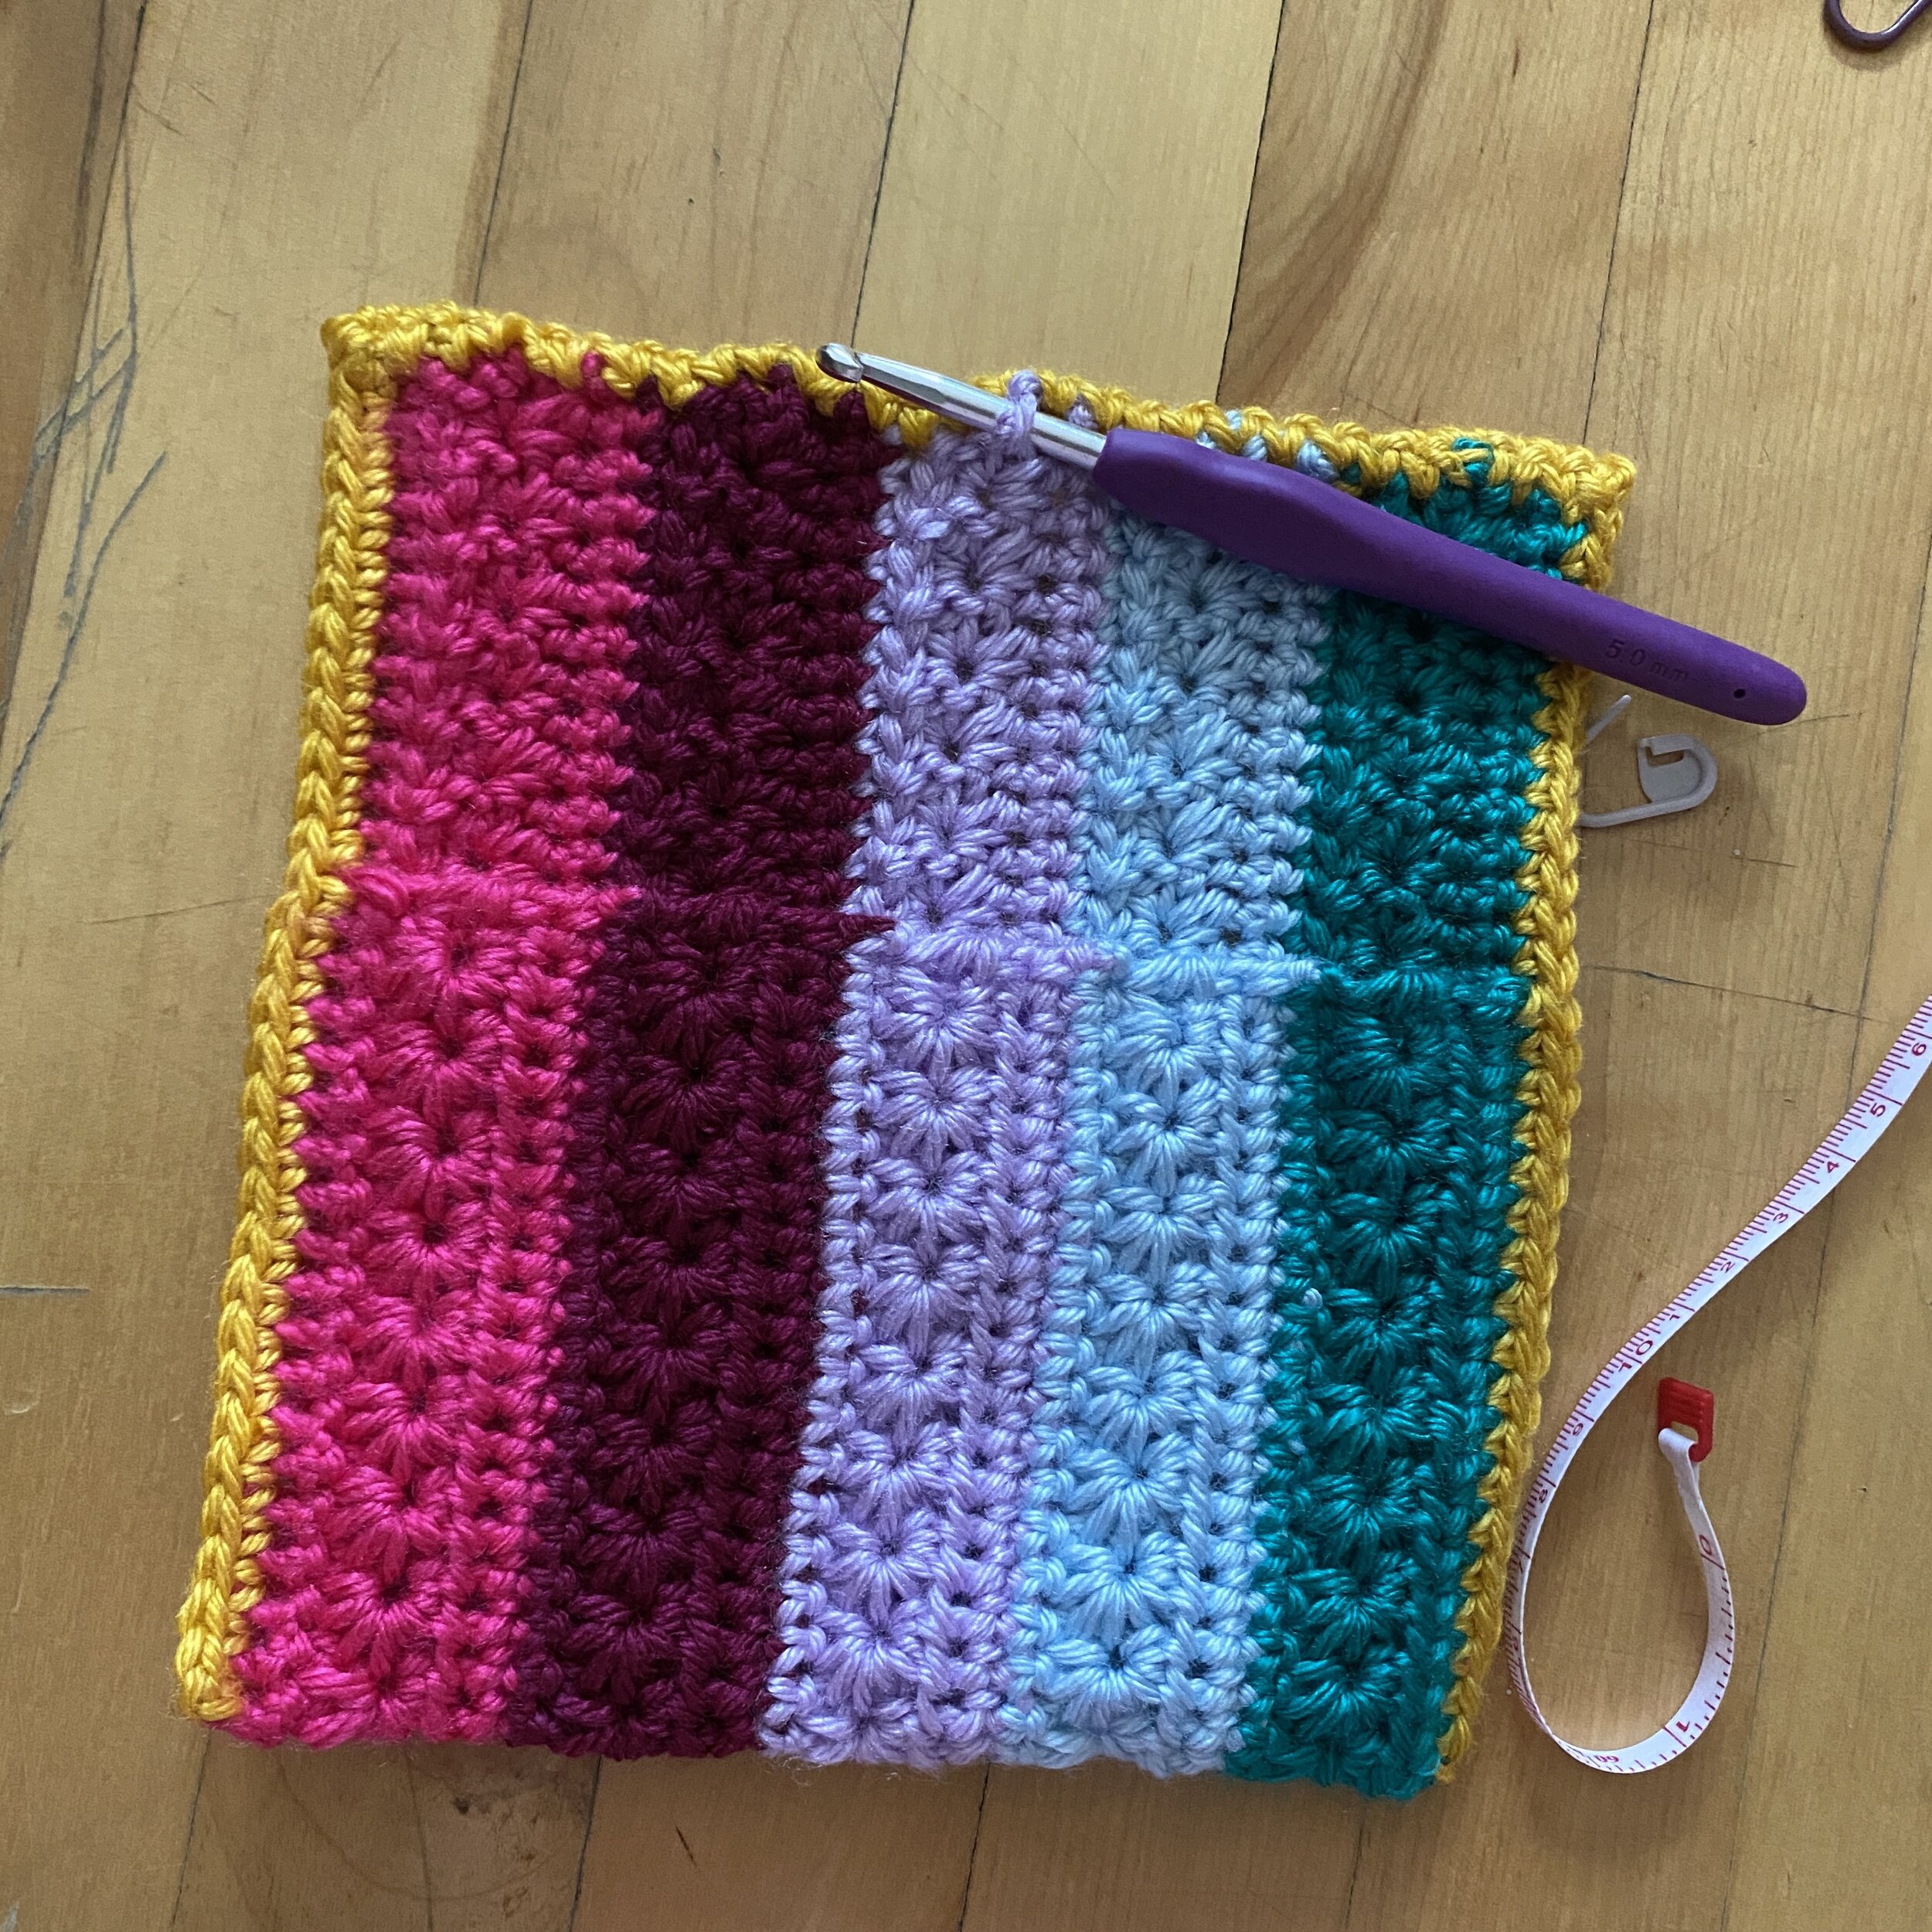
Cont. in this manner, changing colors after each Row 4 until you have finished 5 colors ending on a Row 4. Piece should measure about 11.5” long.
Assembly:
Border:
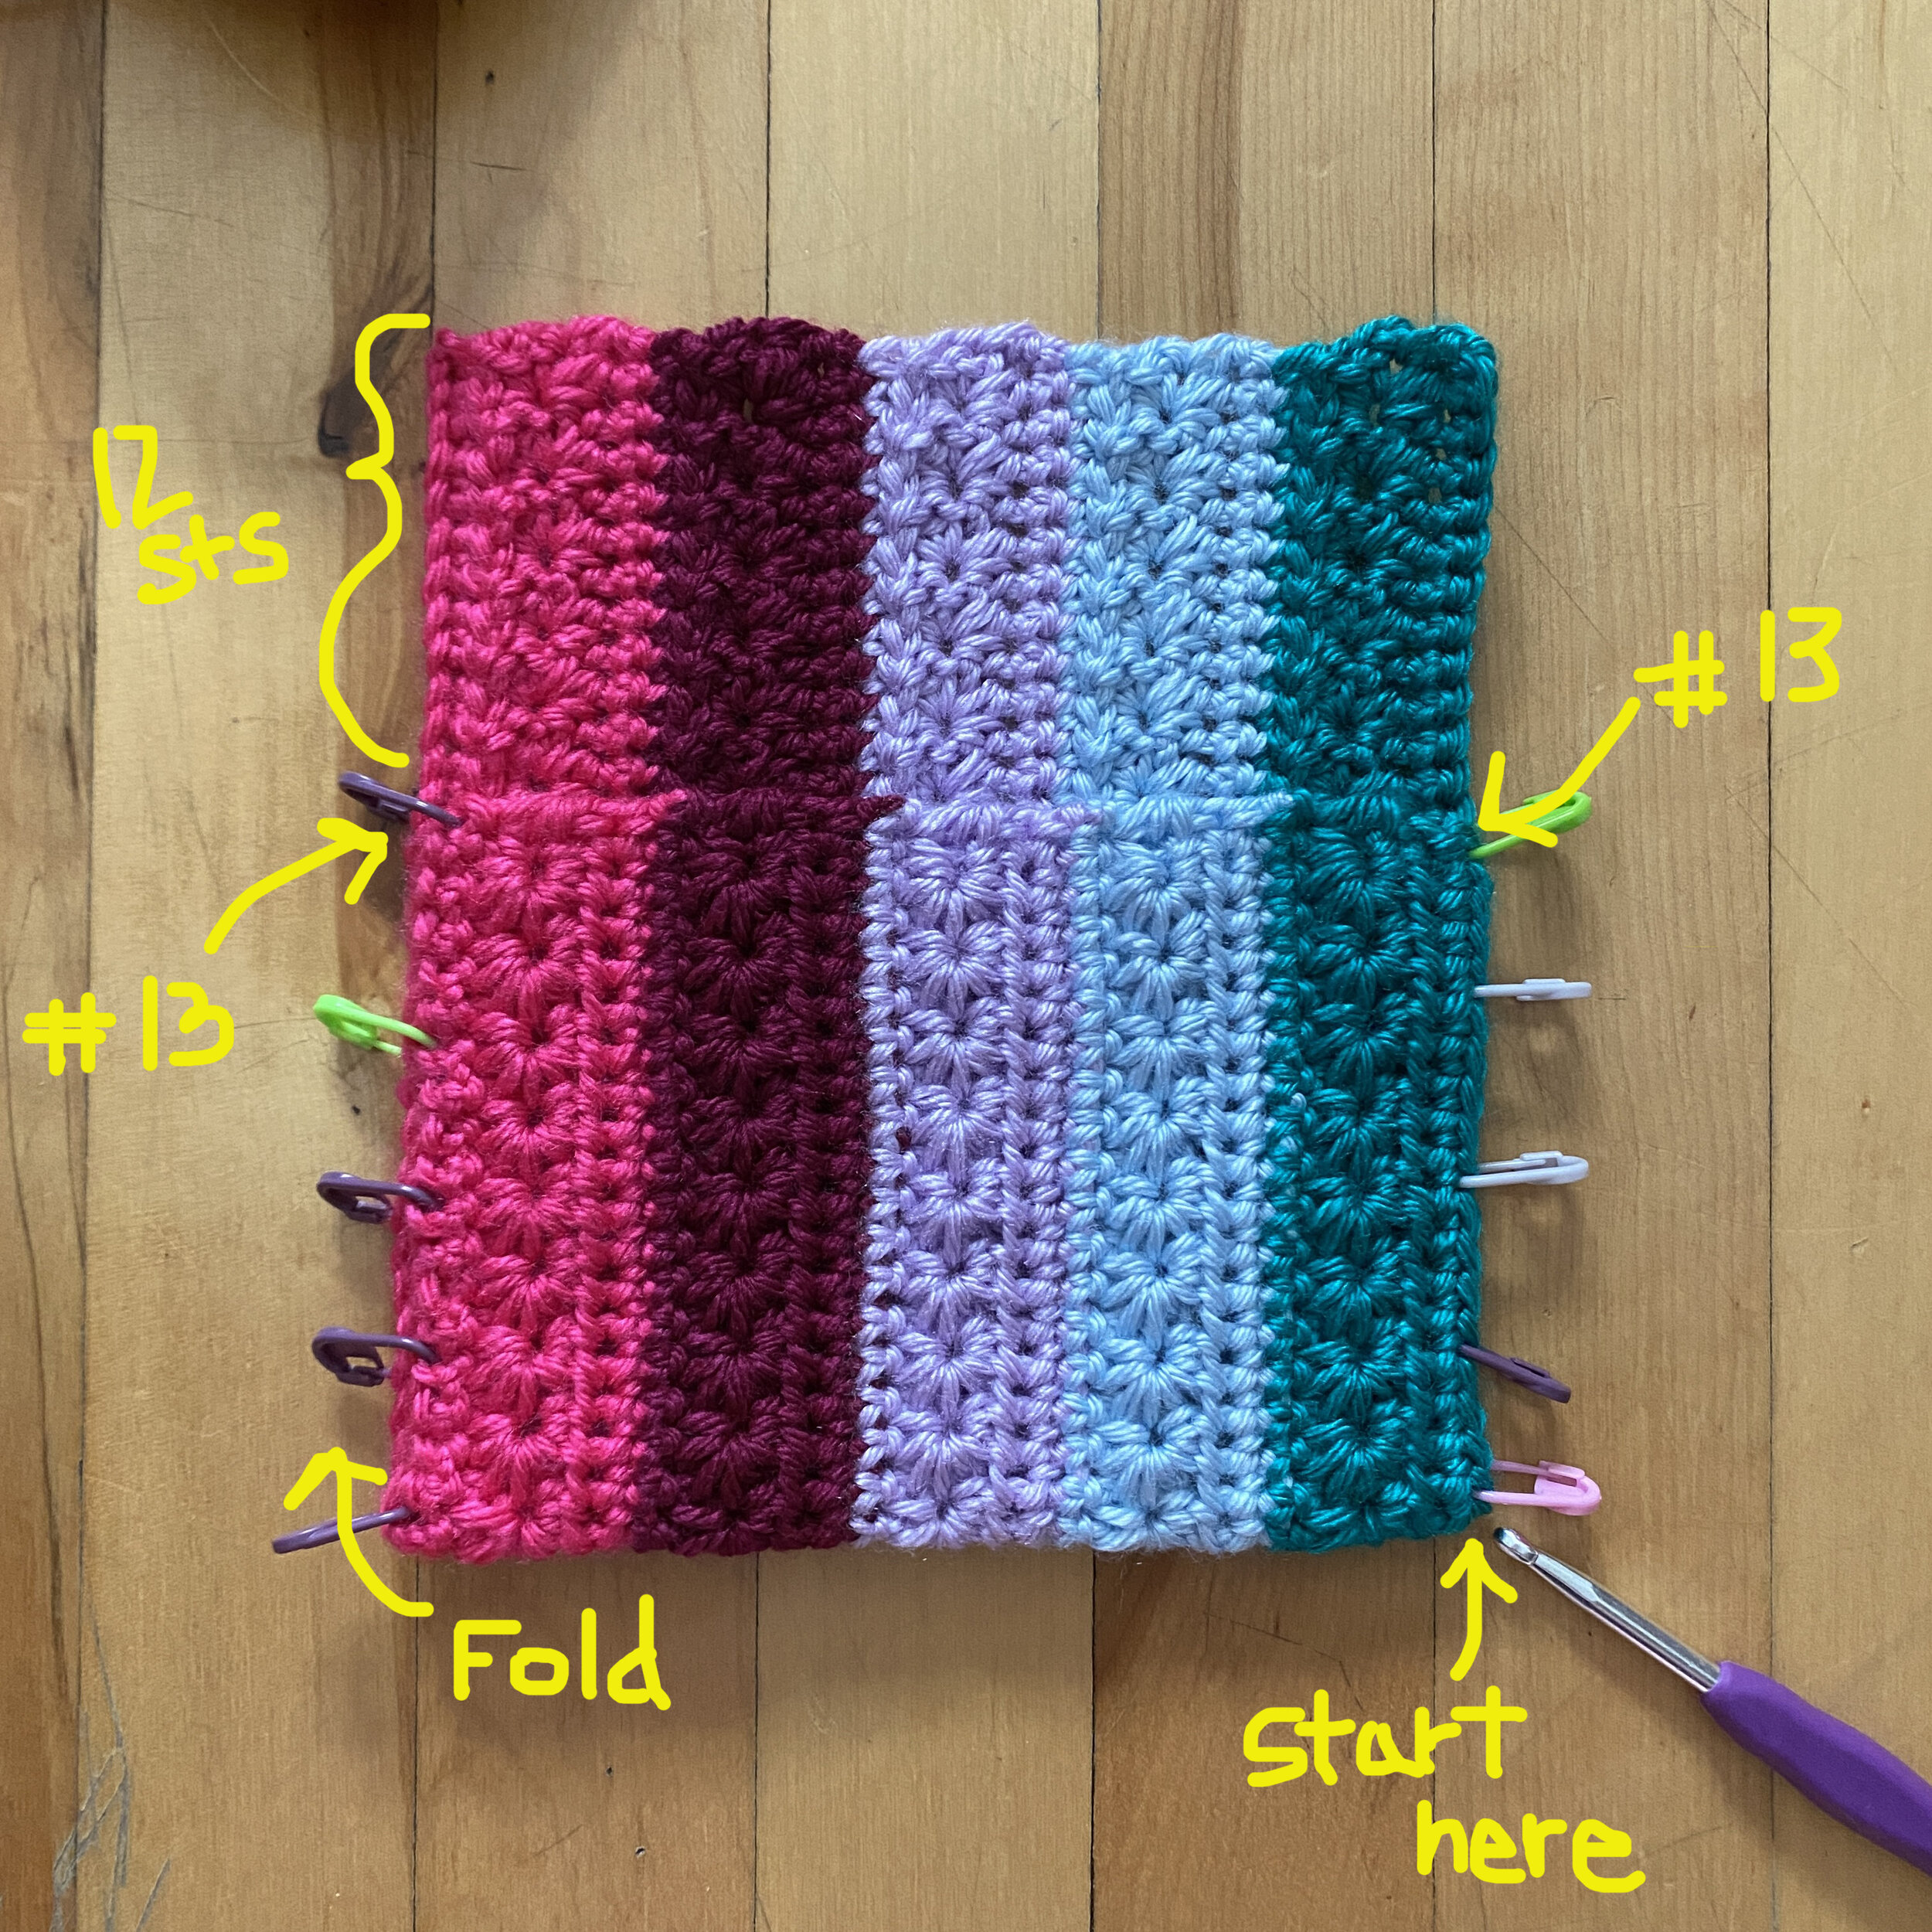
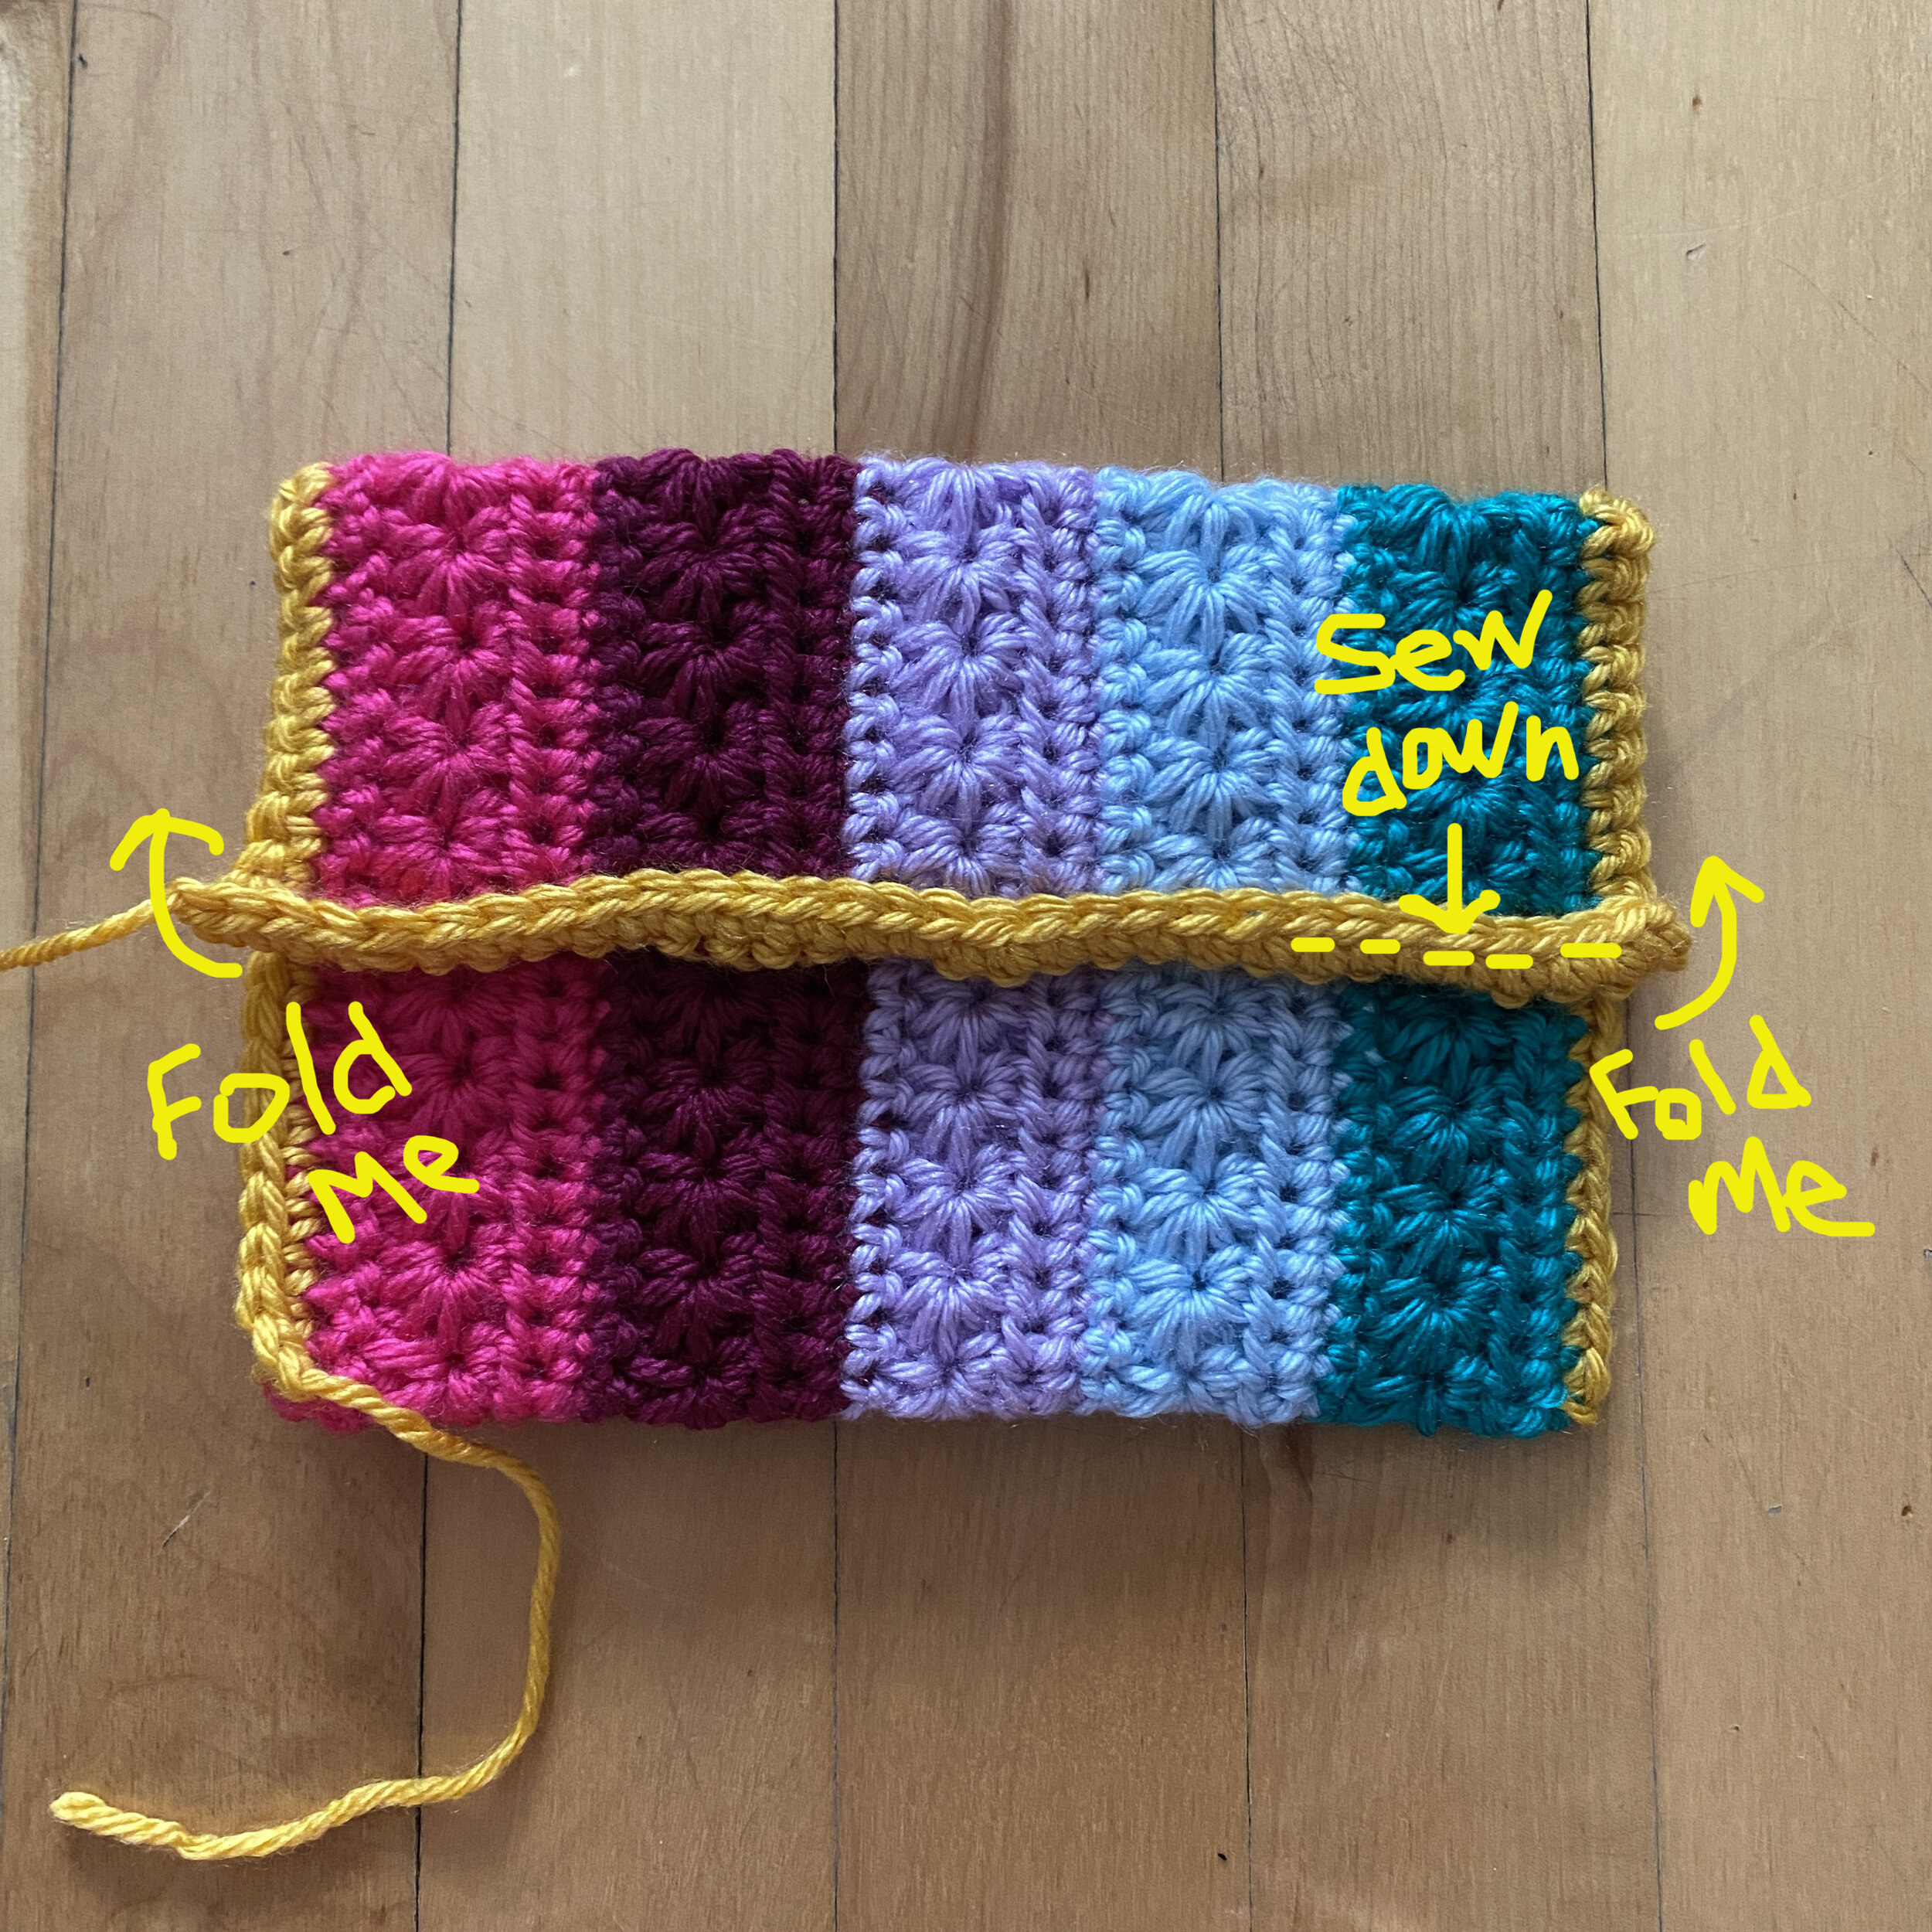
1. Lay the piece down with WS facing, fold the bottom side up so that it is about 4.5”, leaving a 2.75-3” flap. Place a SM to pin the folded piece together to make the pouch. My SM are on the 13th st from the top.
2. Attach C6 with a sl st going through both the front and back panel of the pouch at the st indicated so that the 2 sides are attached together. Sc back through the same place. Cont. sc up the side, attaching the front and back together to make the pouch, and up to the end of the 1st size. FO yarn.
3. Rep. Step 2 on the other side, starting at the top this time, and working down, attaching the front and back panels of the pouch together when you reach the 13th st. FO.
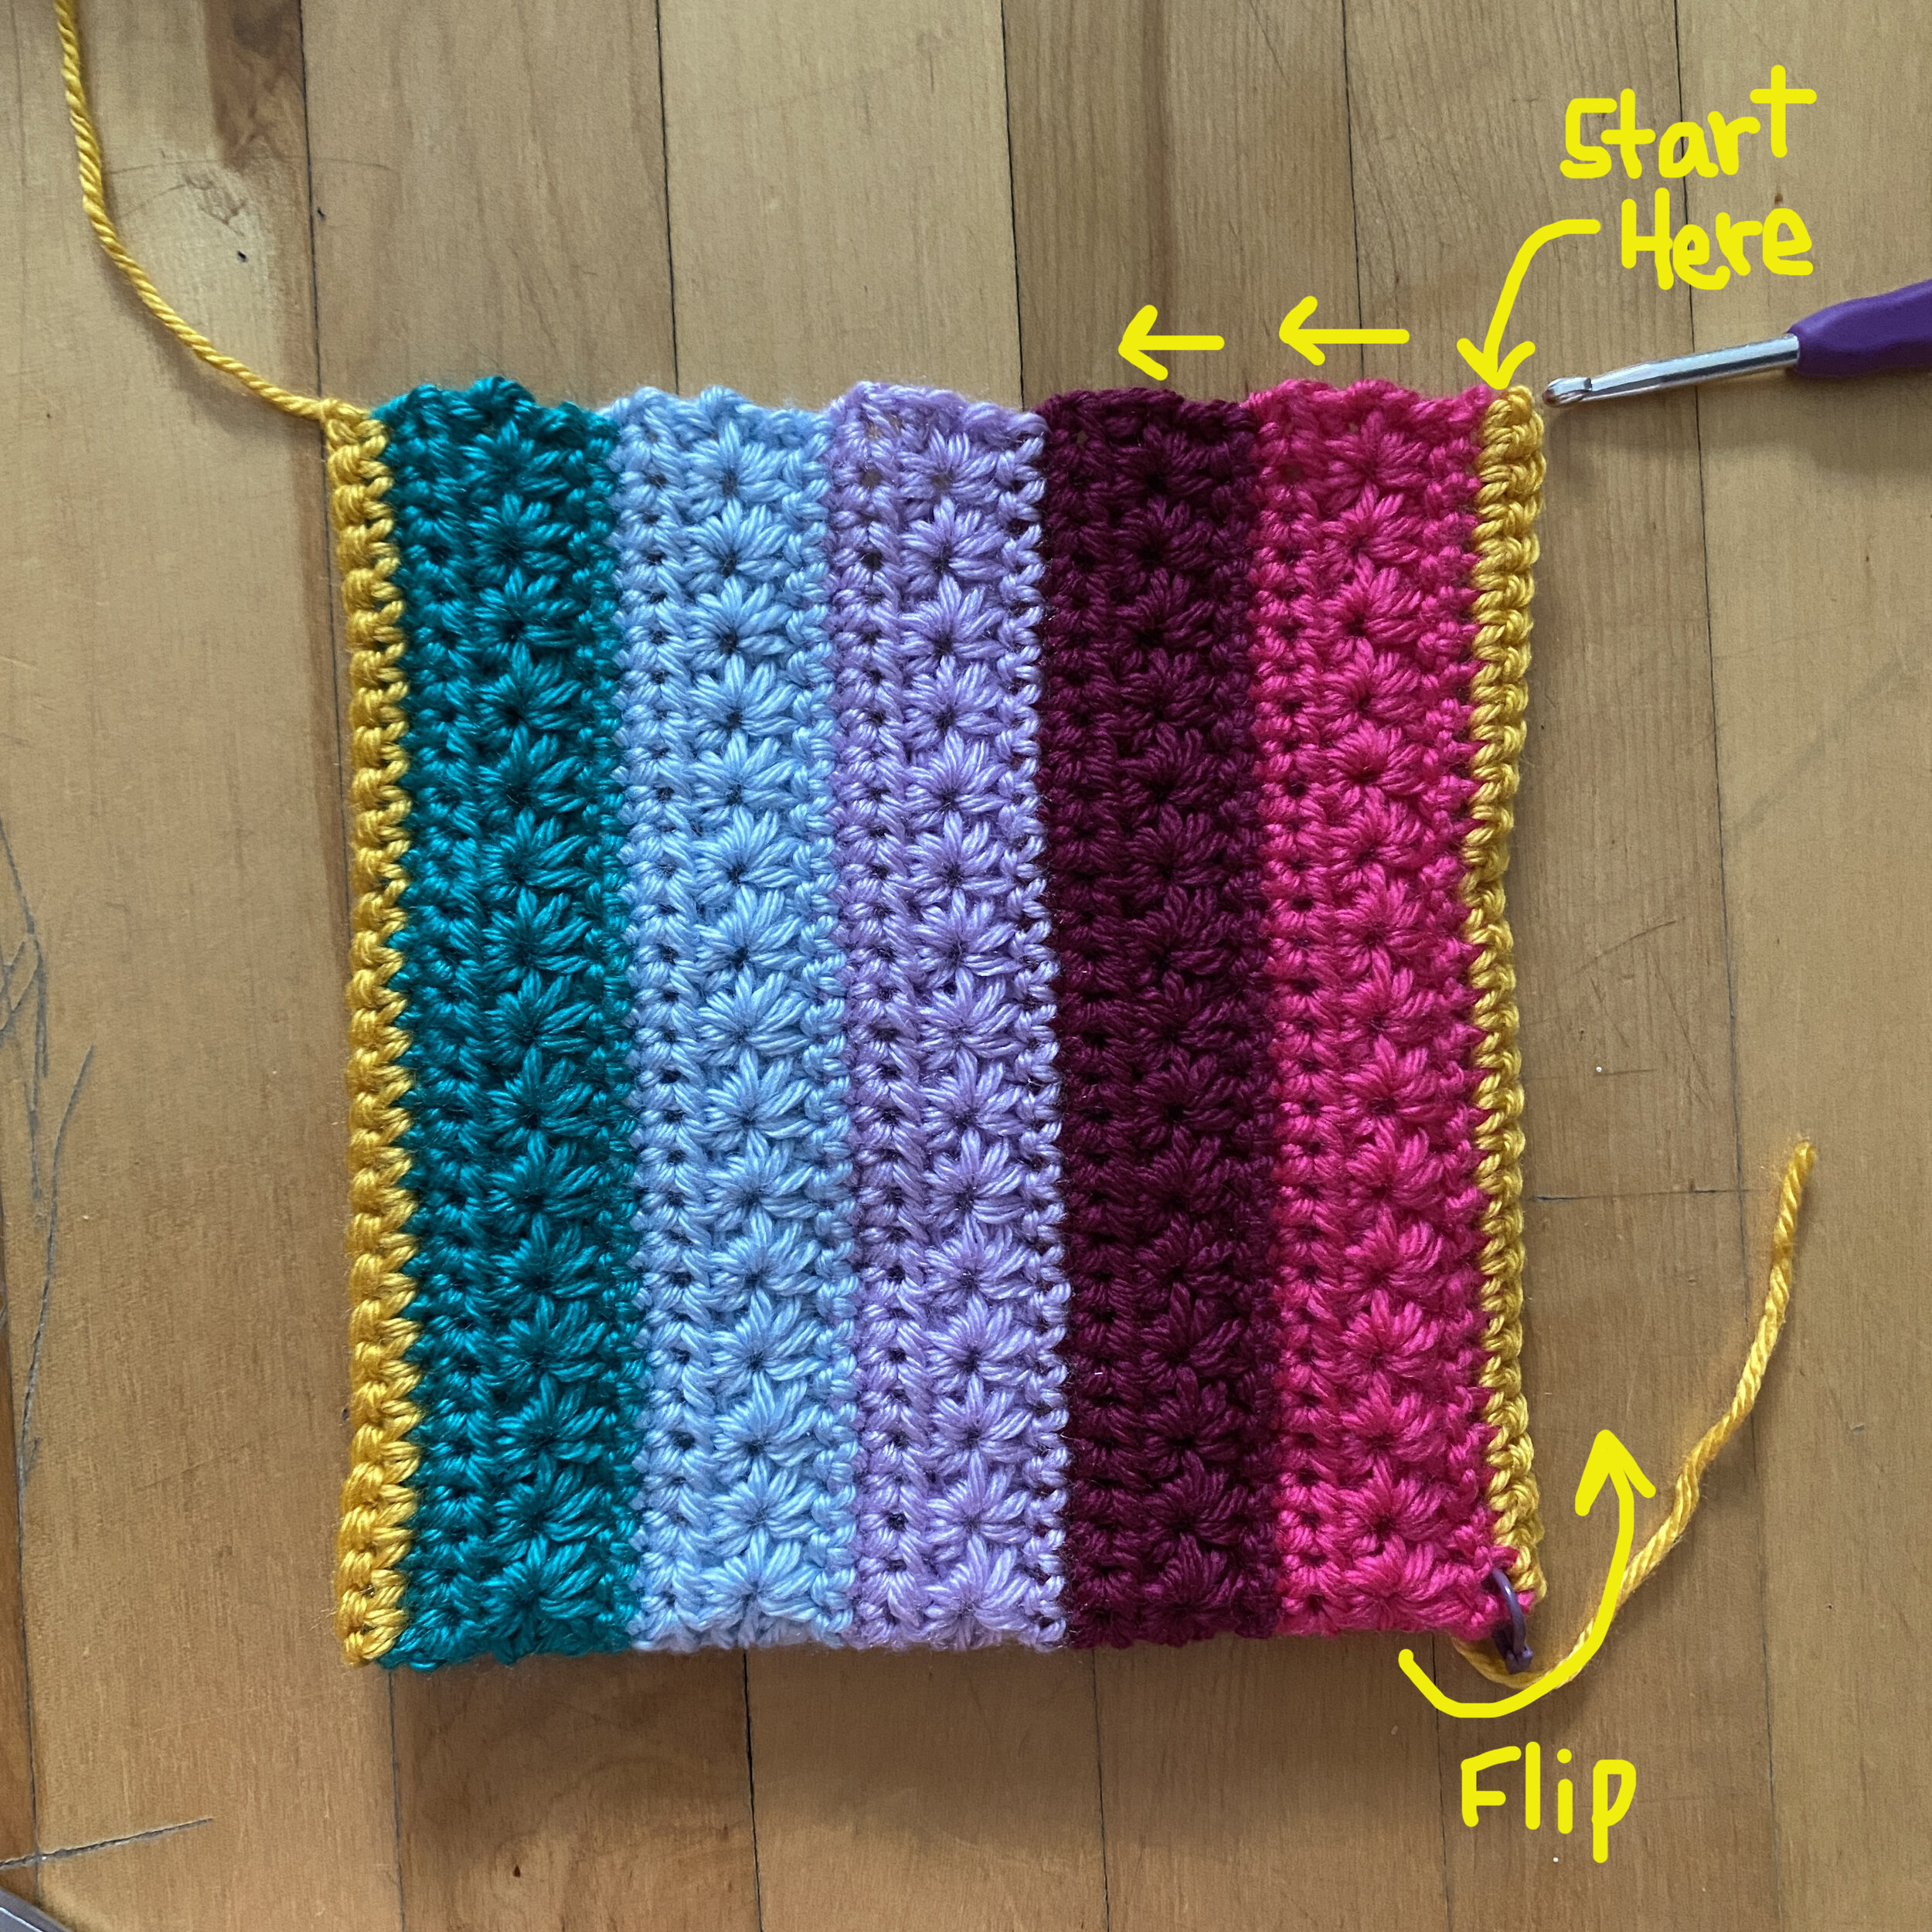
4. Flip the pouch over to have the RS facing up and the pocket facing down. Reattach yarn with a sl st to the side of the sc st indicated in the picture (yellow sc of side border), sc again in the same space and evenly along the top of the flap (I made 29sc). Turn.
5. Ch 1, sc back across and leave a long tail to sew the border down. Fold the top border upwards and sew it down to create a neater border line.
Fastening:
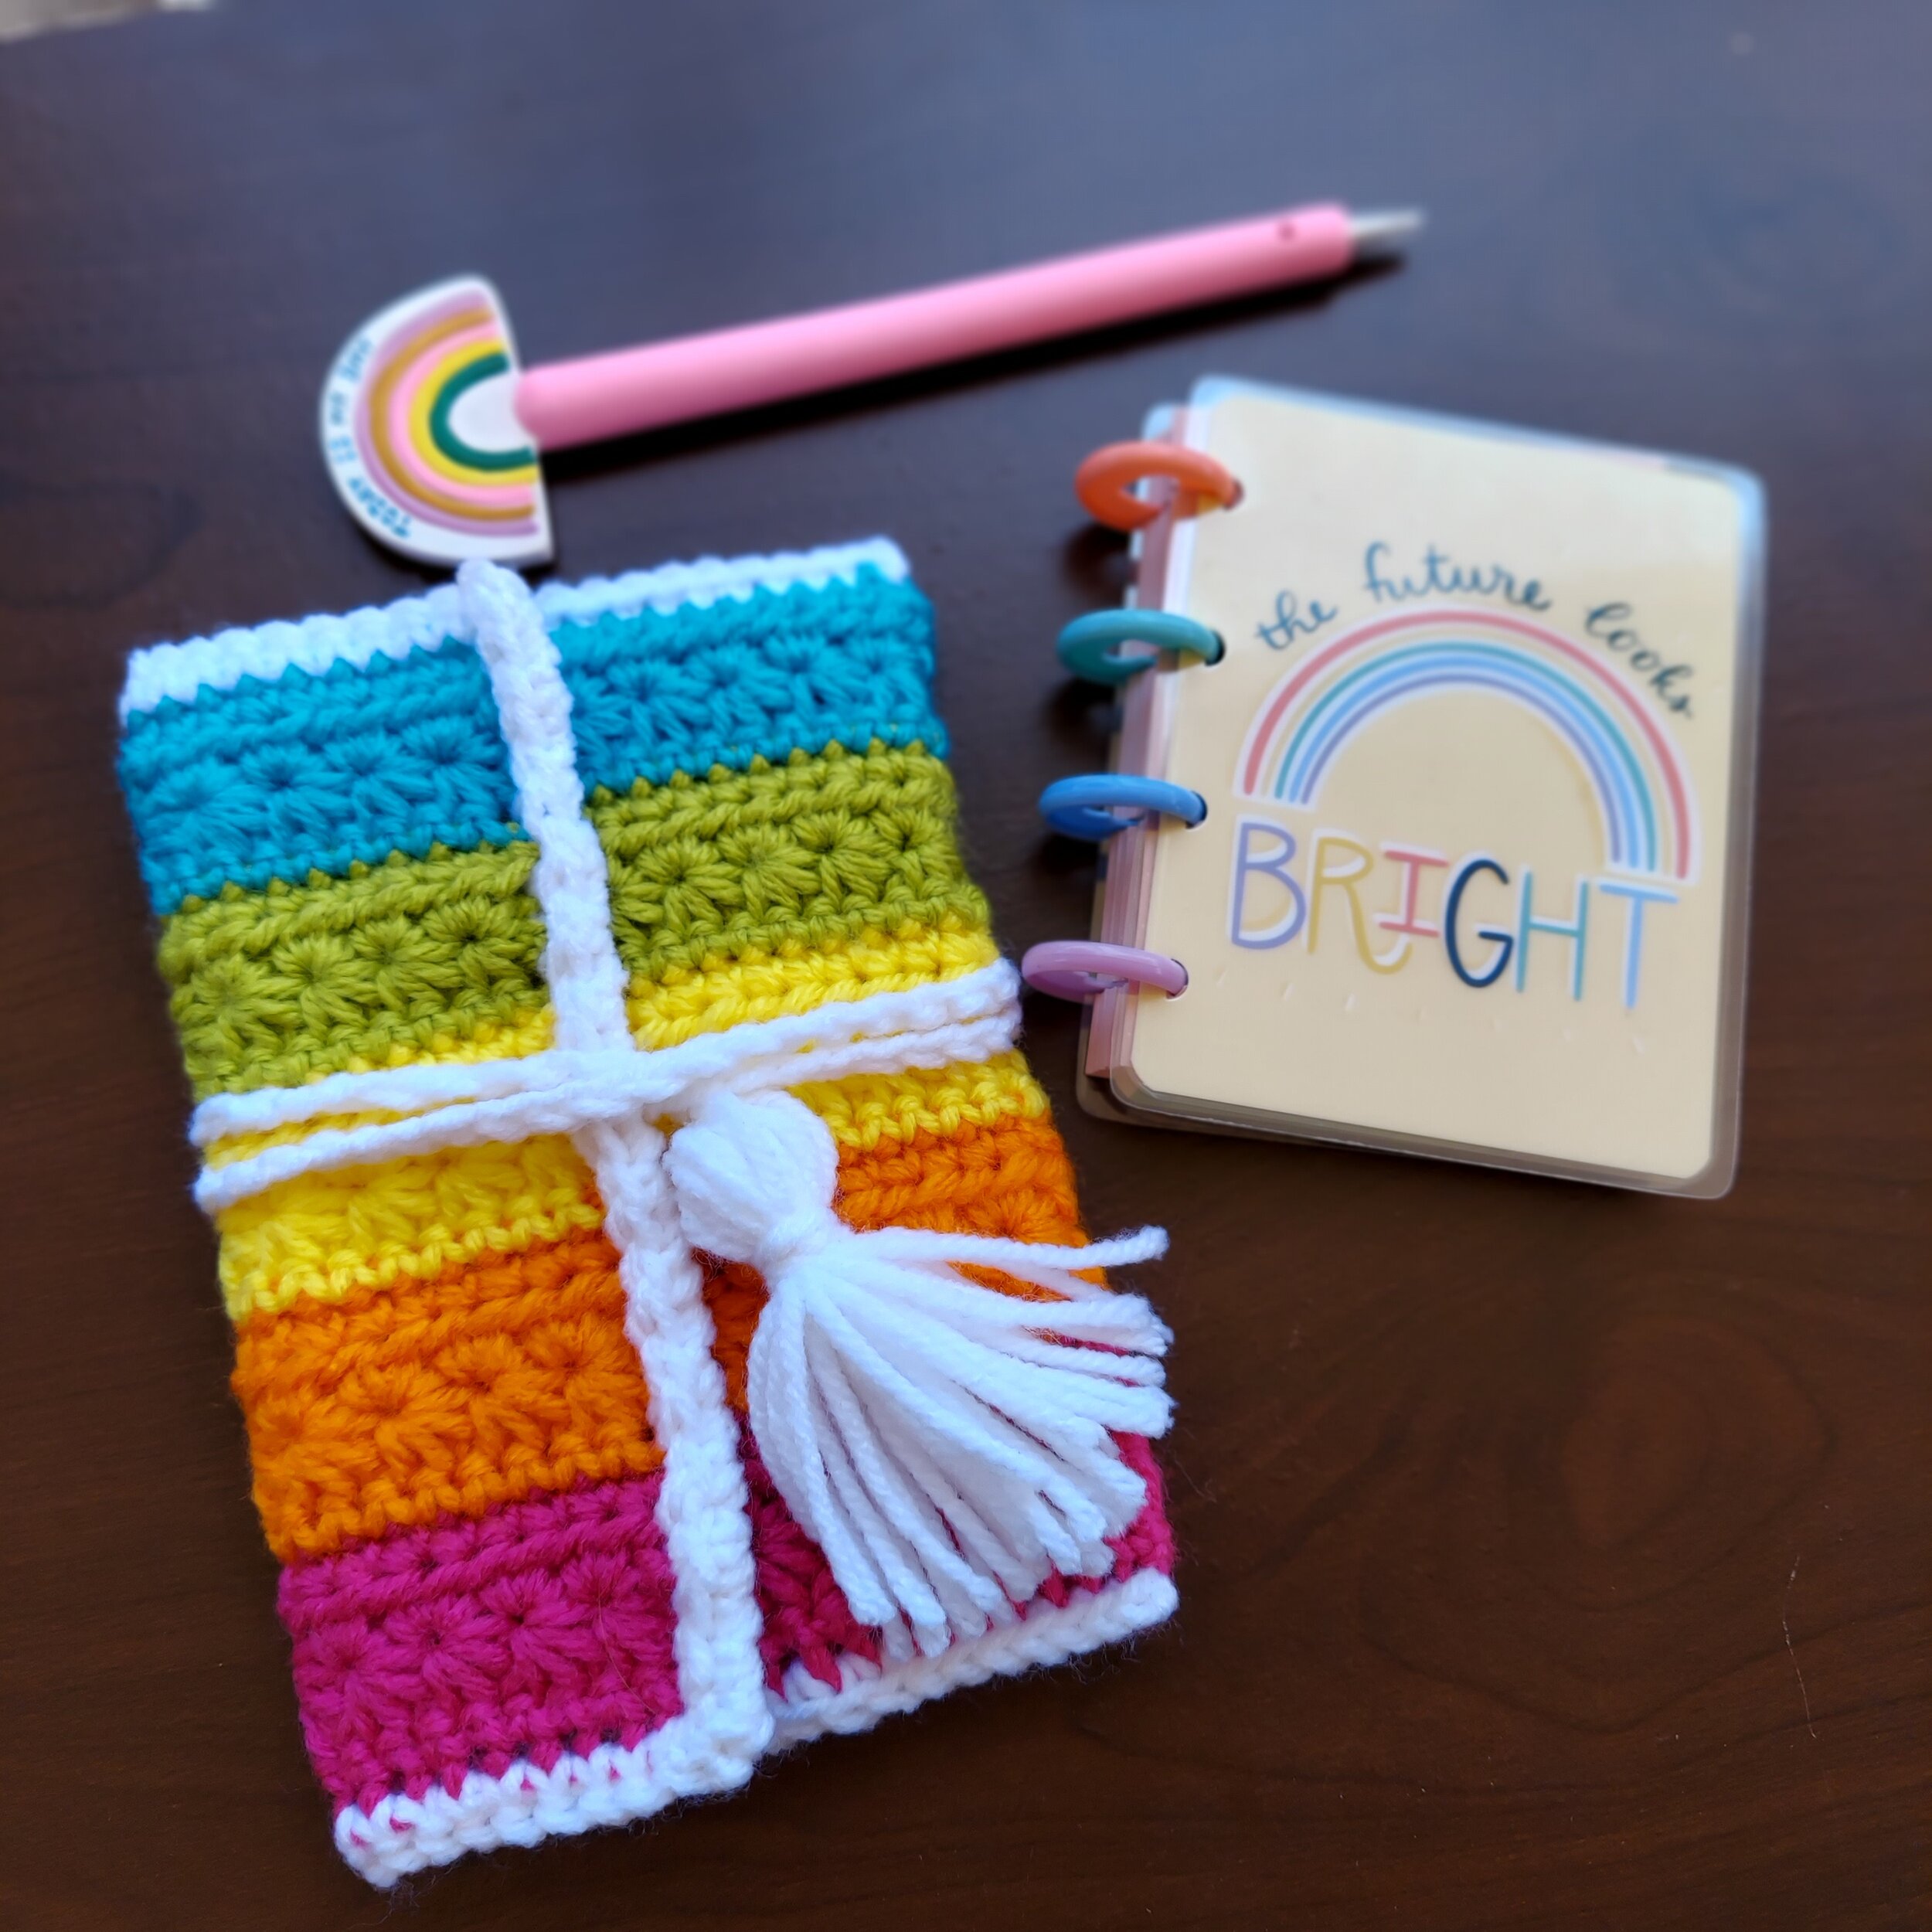
1. Attach yarn with a sl st at the center of the WS of the flap.
2. Ch80 then FO.
3. Make a tassel (I used my cell phone to make my tassel. It was a pretty good size for the length I needed)
4. Sew the tassel to the end of your ch.
5. Sew the initial sl st down more securely to the inside of the bag.
Weave in all ends and enjoy.
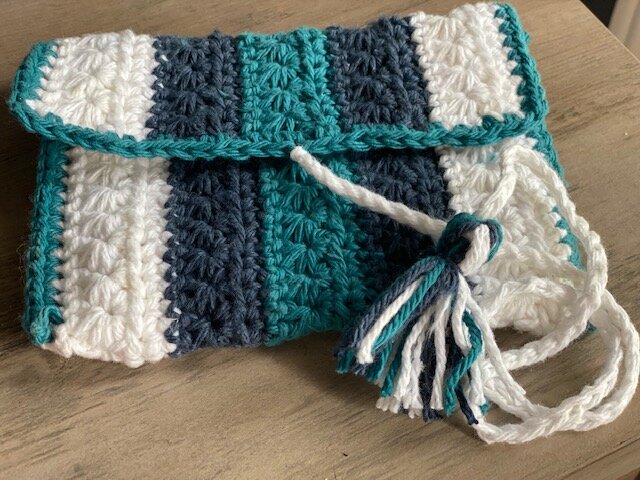
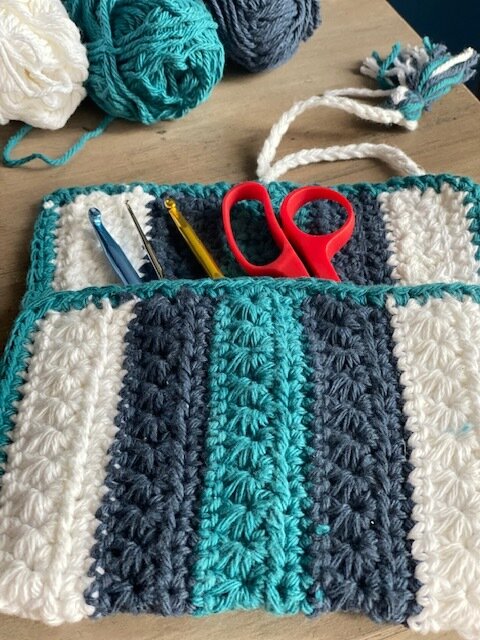
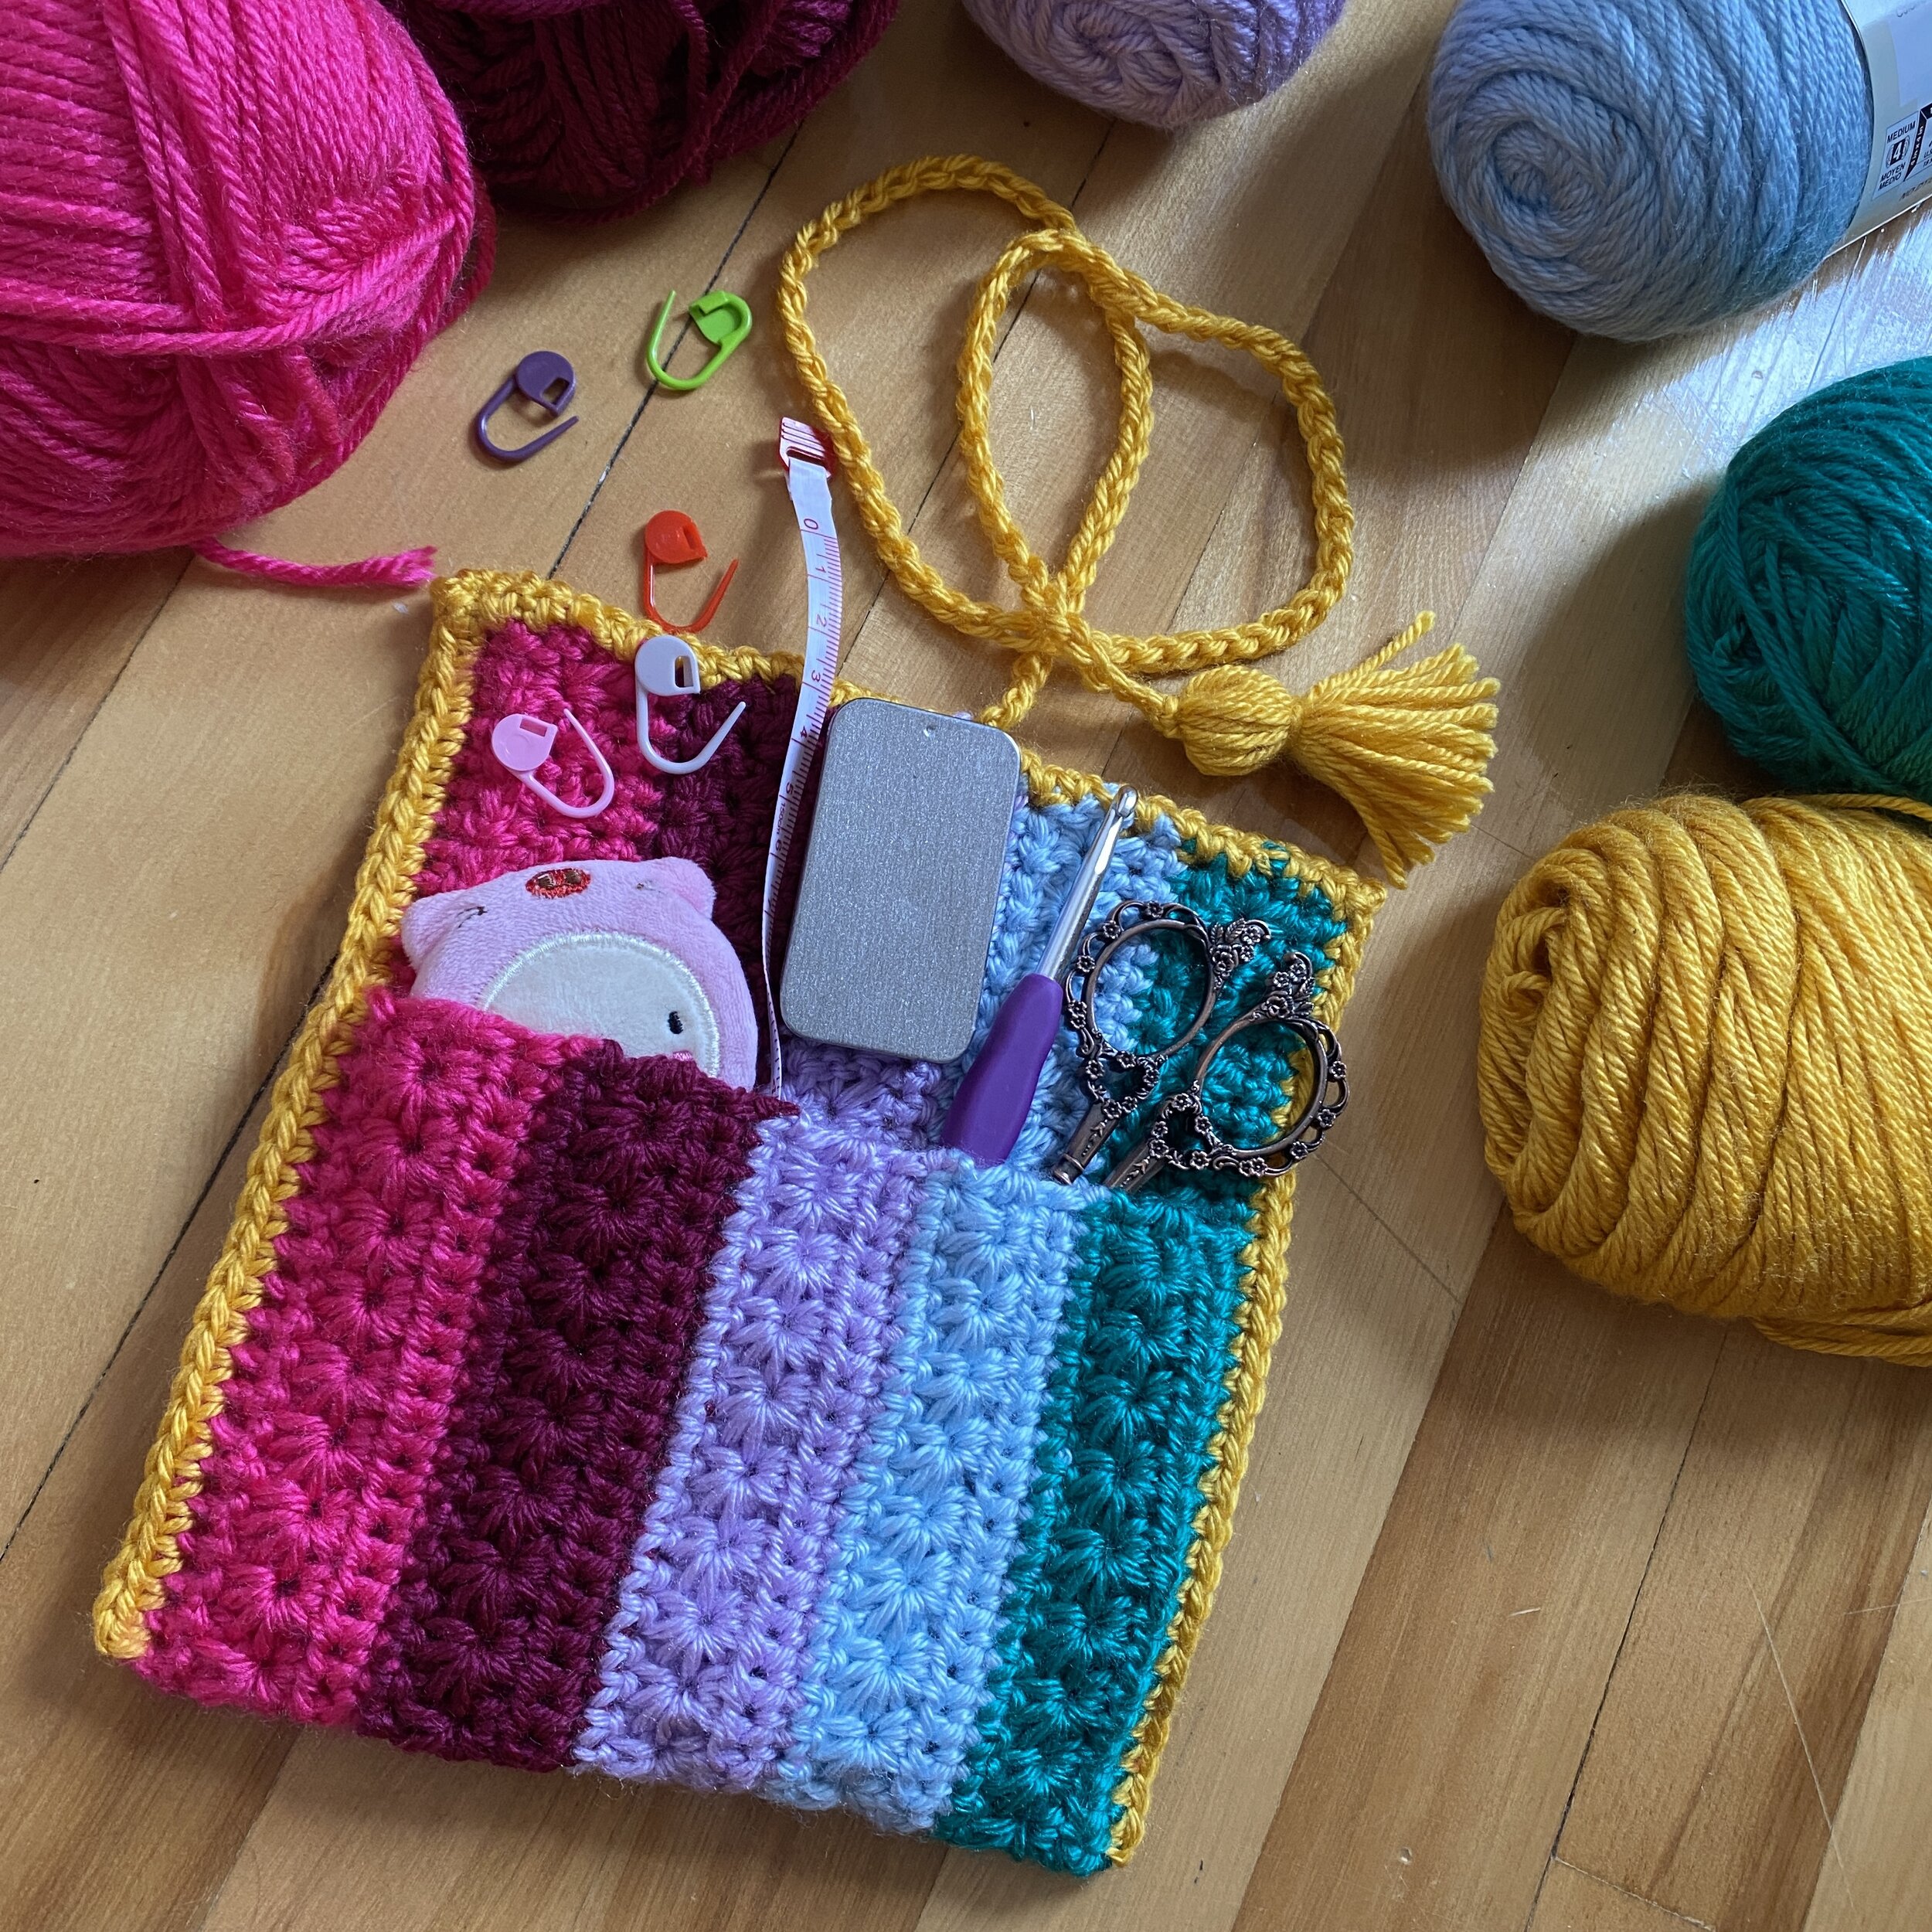
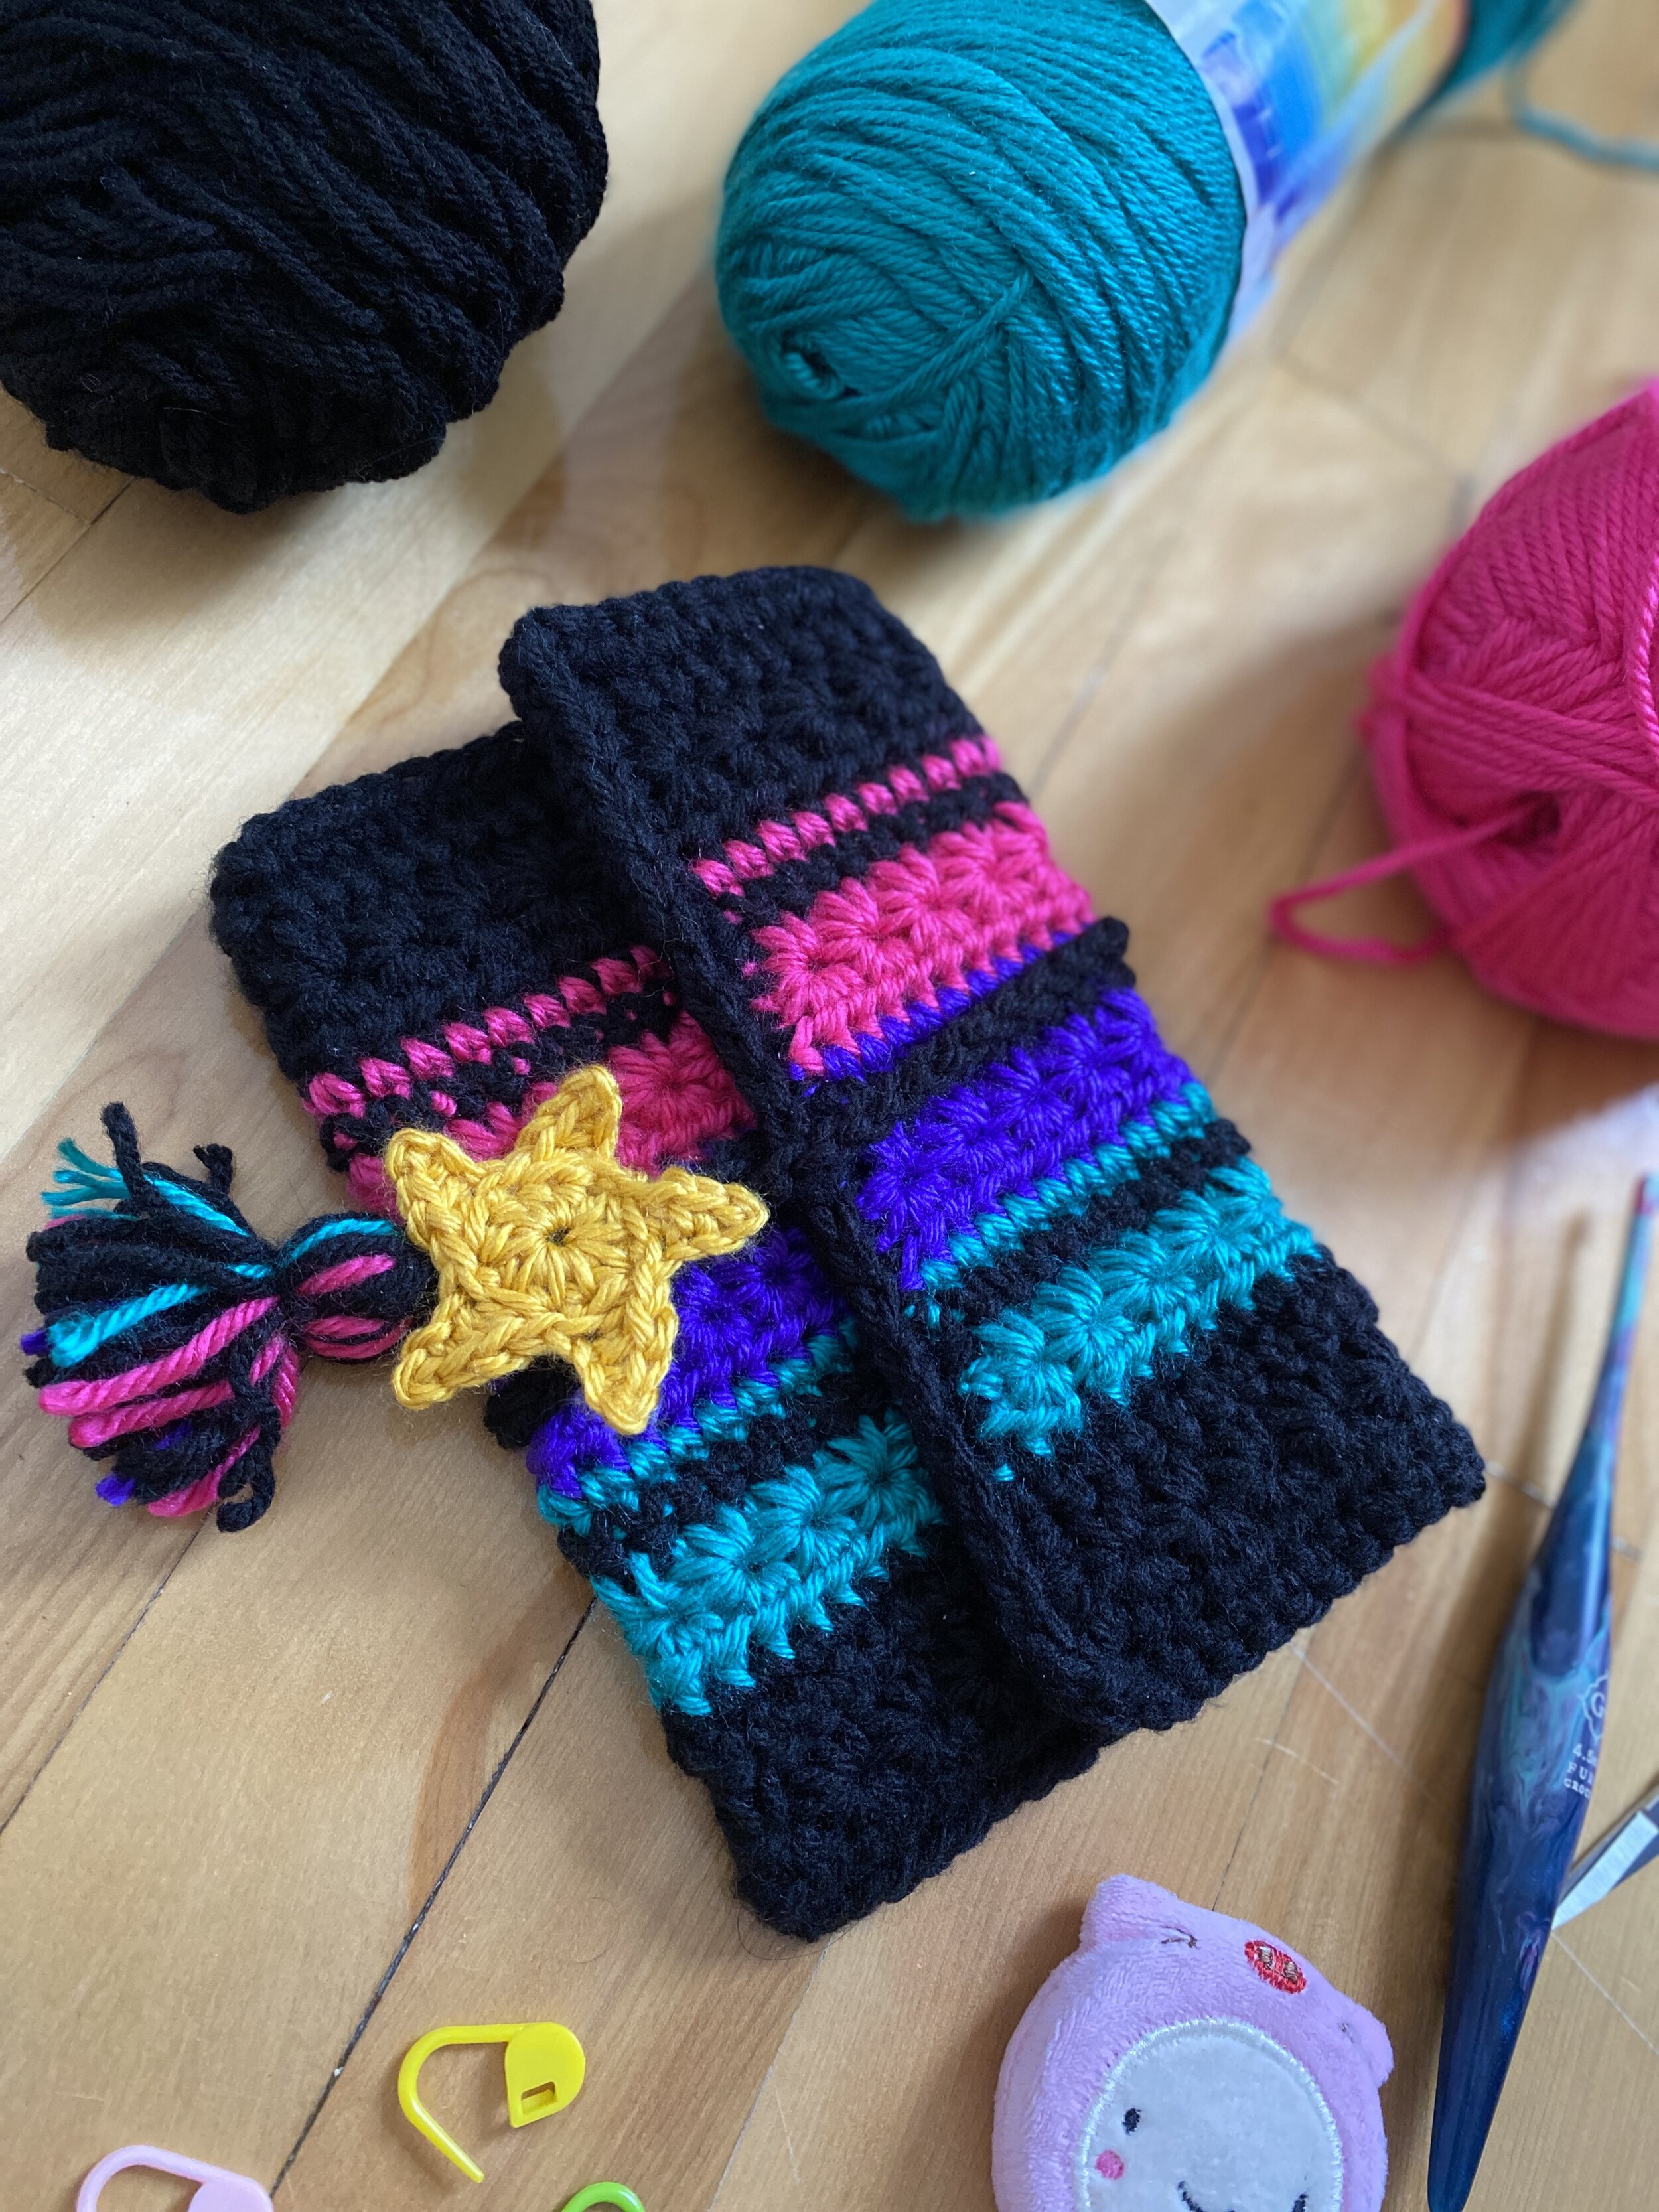
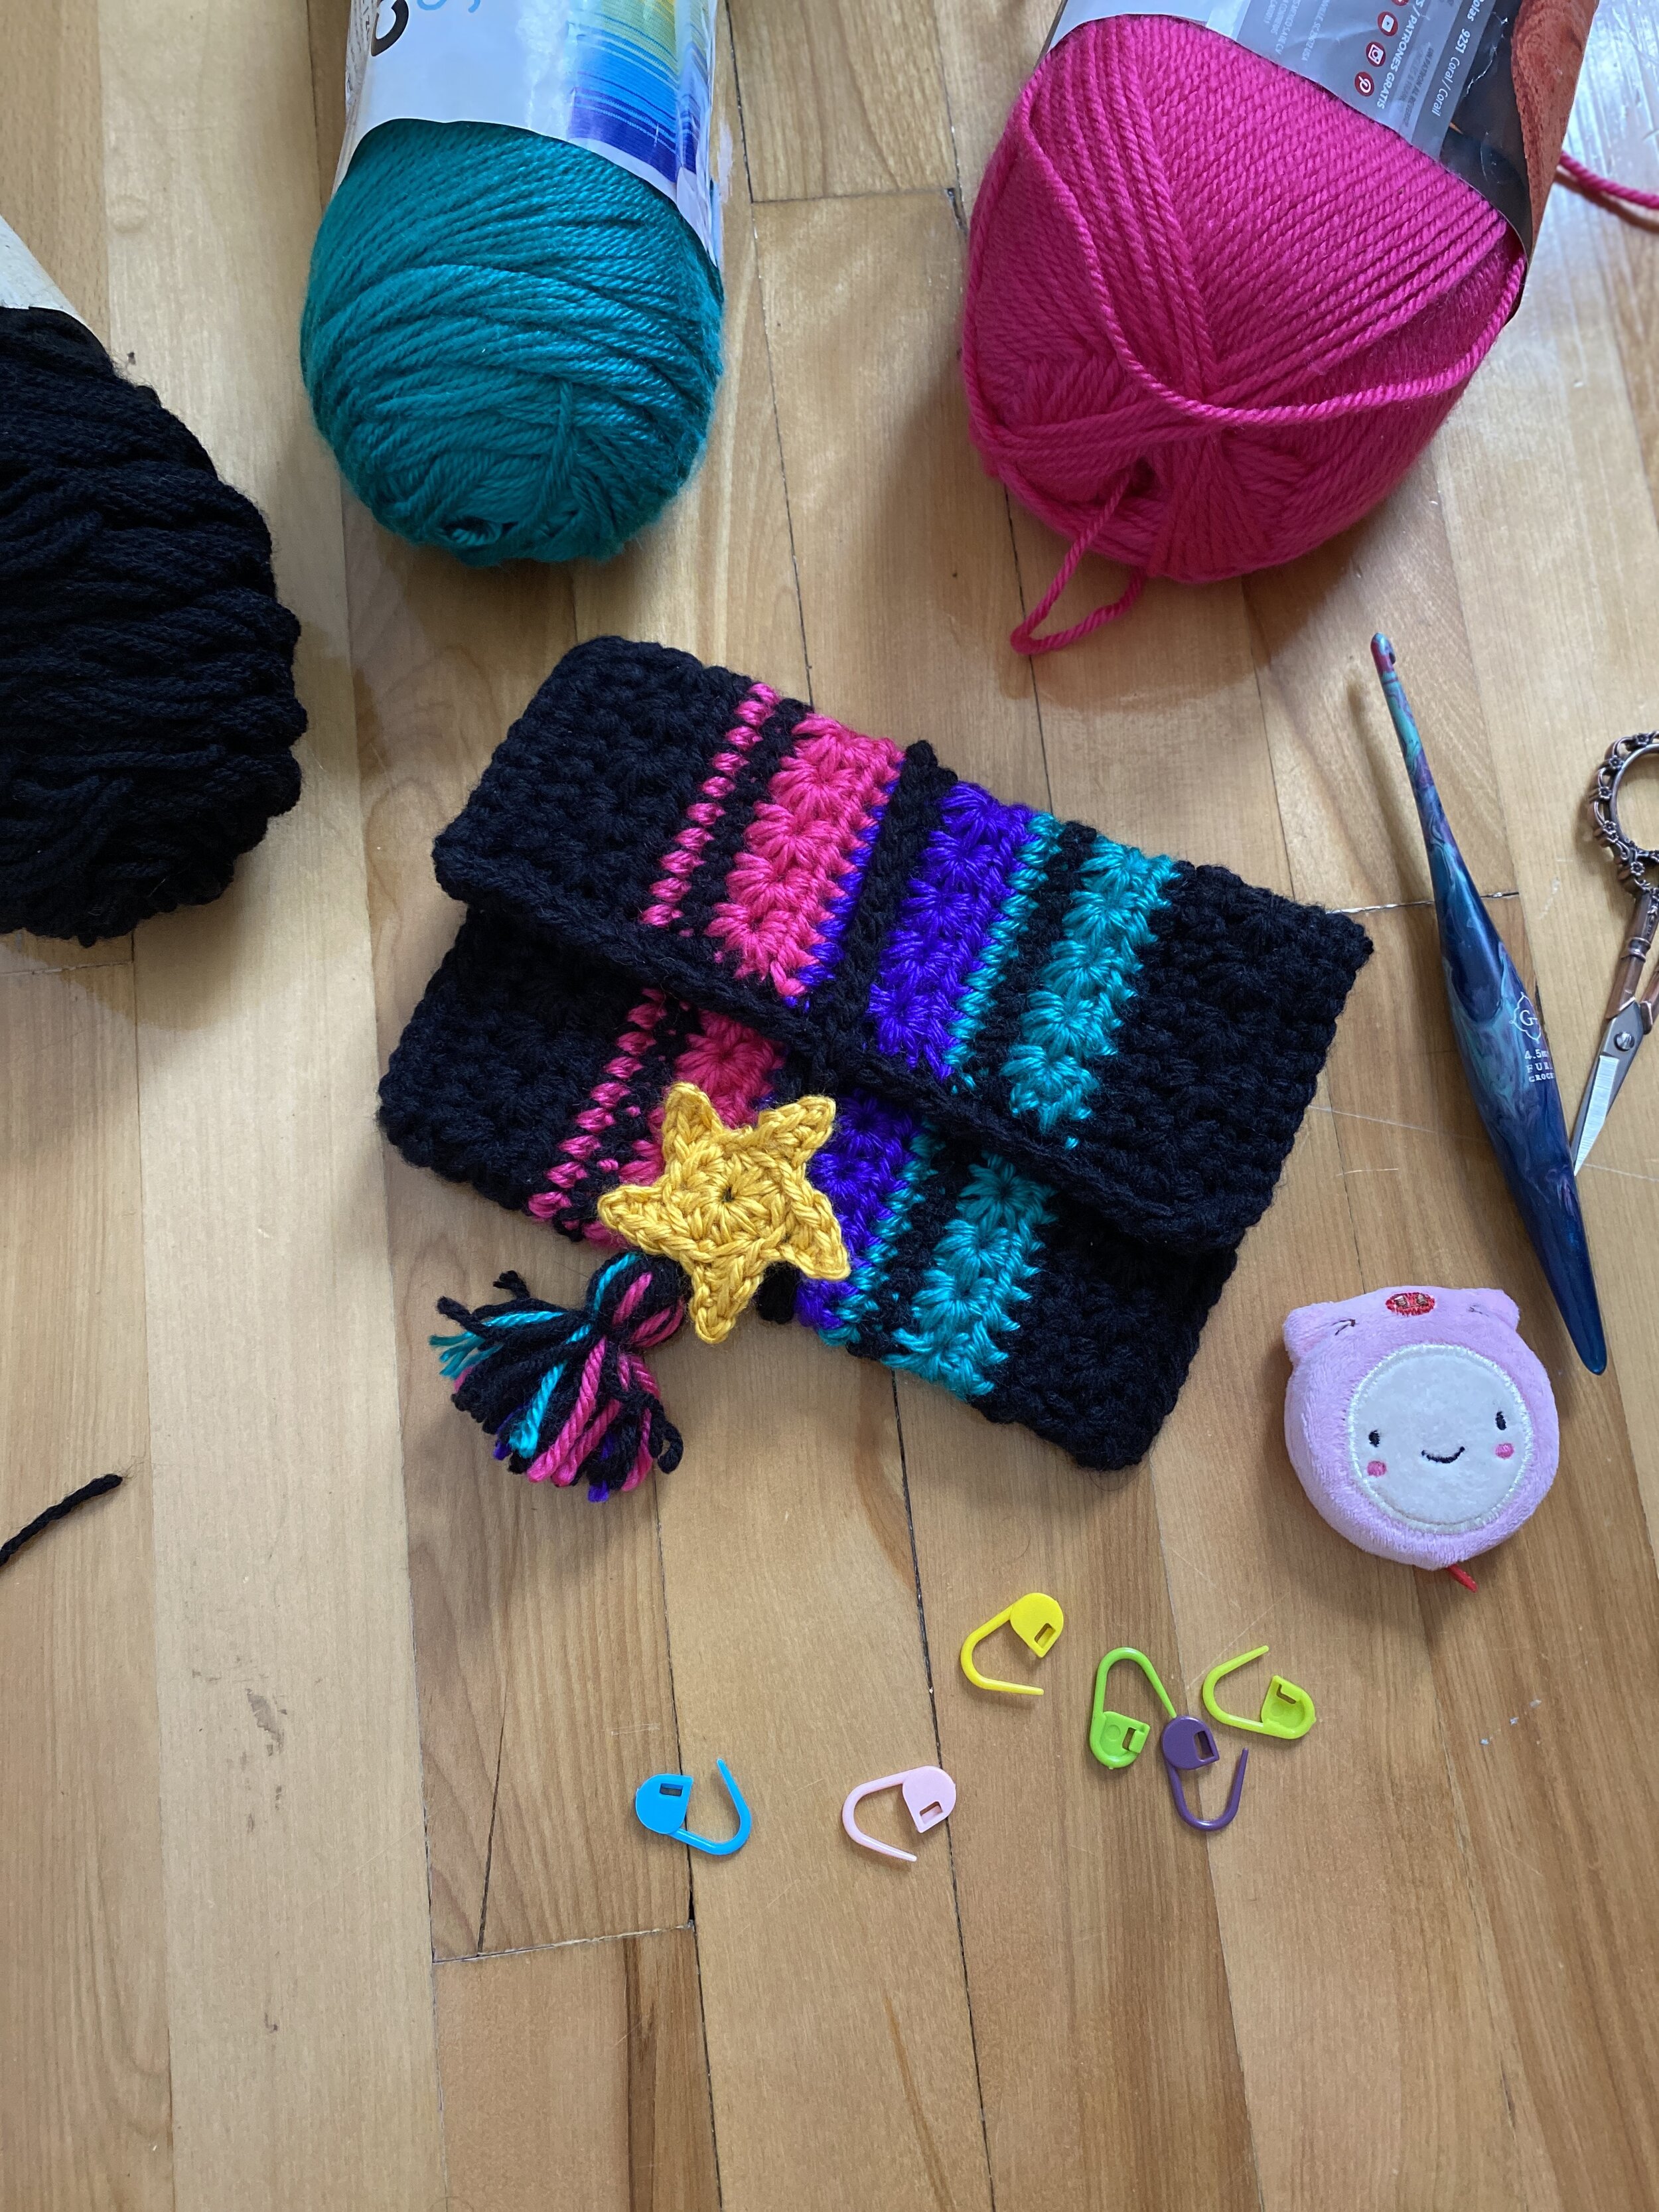
You can style this bag in many different ways. You can make it all in one color, or change up the stripes however you like. Here are some pictures of the second bag I made.
Happy Crocheting!
IF YOU LIKED THIS PATTERN, PLEASE SUPPORT ME ON PATREON OR BUY ME A COFFEE!

BUY ME A COFFEE
SUPPORT ME ON PATREON
I LOVE TO SEE WHAT YOU CREATE!
Please share your creations with the community on social media tagging @ravinsekaidesigns and hashtag #magiccarpetclutch
I can’t wait to see the beautiful things you come up with!
FOLLOW ME ON SOCIAL MEDIA
Facebook: Ravin Sekai Designs
Ravelry: RavinSekai
Instagram: @ravinsekaidesigns
Pinterest: Ravin Sekai Designs
Patreon: Ravin Sekai Designs


Hi! I’m Rachel.
I’m a quirky world traveller, avid knitter, crochet lover, pattern maker, and all around nerd! I spend a lot of time clowning around, and I often have the goofiest smile on my face. This website is the landing place for my new patterns, random thoughts, and general craziness. I hope you enjoy my randomness and my yarnie goodness!
Archive
- LGBTQ+
- PRIDE
- accessories
- accessory
- asymmetrical
- autumn
- backpack
- bag
- beach
- beanie
- bias shawl
- blanket
- blog hop
- blue
- bobble
- bookbag
- boyfriend
- cardigan
- case
- celtic weave stitch
- clutch
- clutch bag
- collaboration
- color block
- color work
- cover
- cover-up
- cowl
- crochet
- crochet pattern
- crochetpattern
- crop top
- croptop
- decor
- diy
- dress
- ds case
- duster
- earwarmer
- easy
- fall
- festivaltop
- free pattern
- gauge
- ghost
- granny squares
- halloween
- handbag
- hat
- headband


