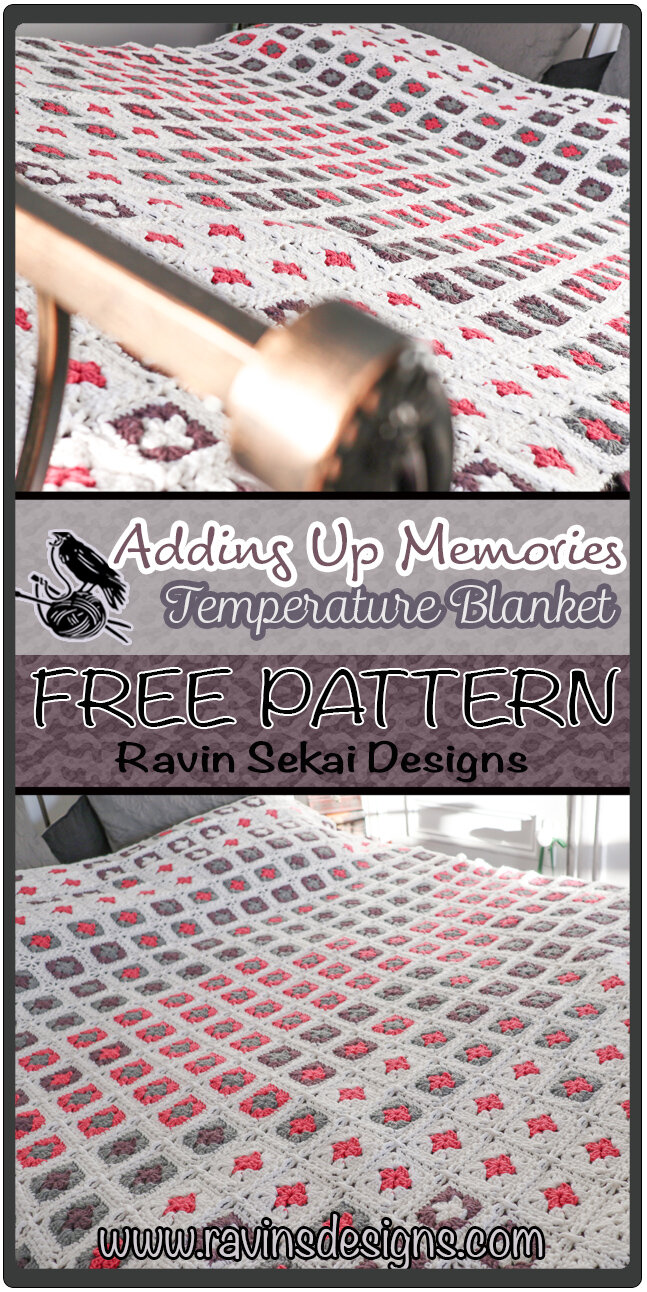
Adding Up Memories Temperature Blanket
For the free pattern of this garment please continue on this page. Please consider supporting me by purchasing the 100% ad-free PDF with full schematic, charts, and picture tutorials for this pattern on my Ravelry or ETSY pages. Or consider joining my Patreon for member perks.
Happy New Year everyone! I hope everyone had a fun New Years Eve! This year was crazy, right!? and I think sitting at home last night and realizing that there wasn’t going to be a ball drop in New York and no fireworks in the UK…. was just another reminder of how 2020 was so very atypical. That said, 2021 is here and now it’s time to make our resolutions and to do our best to make the next year as great as possible! And, I wanted to start this year out STRONG. And what better way than to come out with a project that will be a constant companion for the entirety of 2021? So, here’s the Adding Up Memories Temperature Blanket.
ABOUT THIS Blanket:

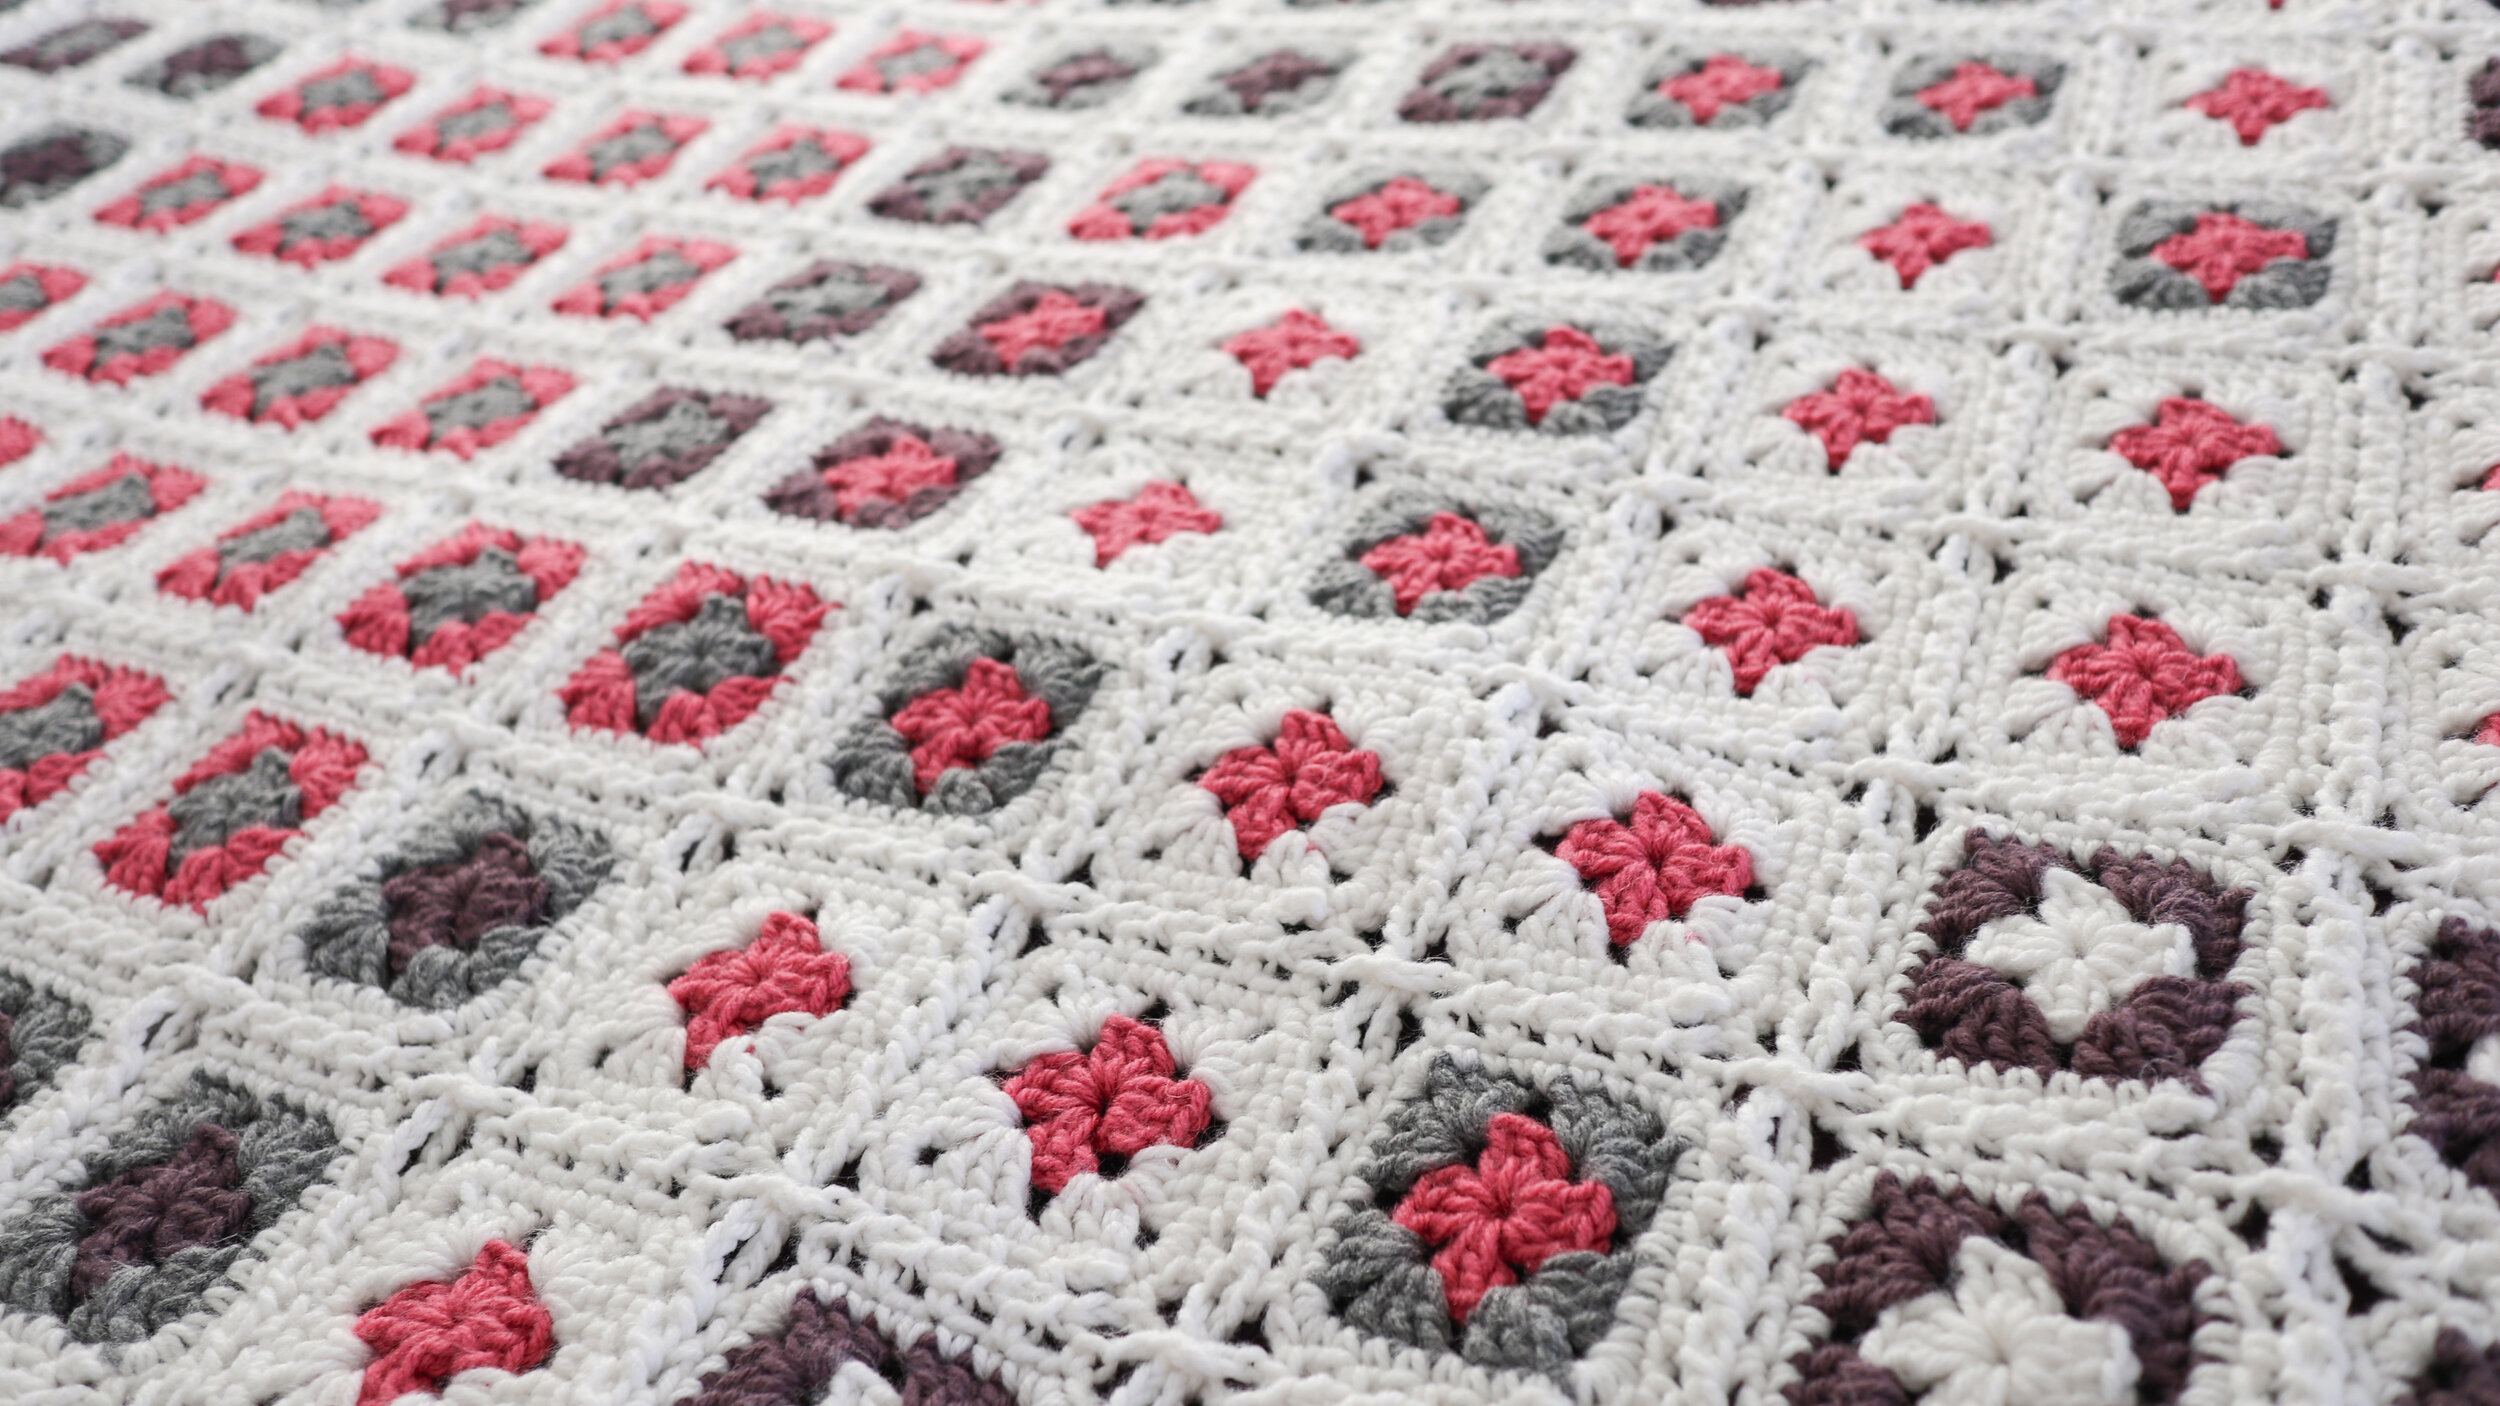
Each day brings a new memory and each day brings a new granny square! And when each square looks like a plus sign, it’s like we’re just adding them all up!
I really enjoy temperature blankets! They’re so fun to make, and you never really know how they’re going to turn out until they’re done. With each day possibly bringing a new color combination, they’re always an adventure.
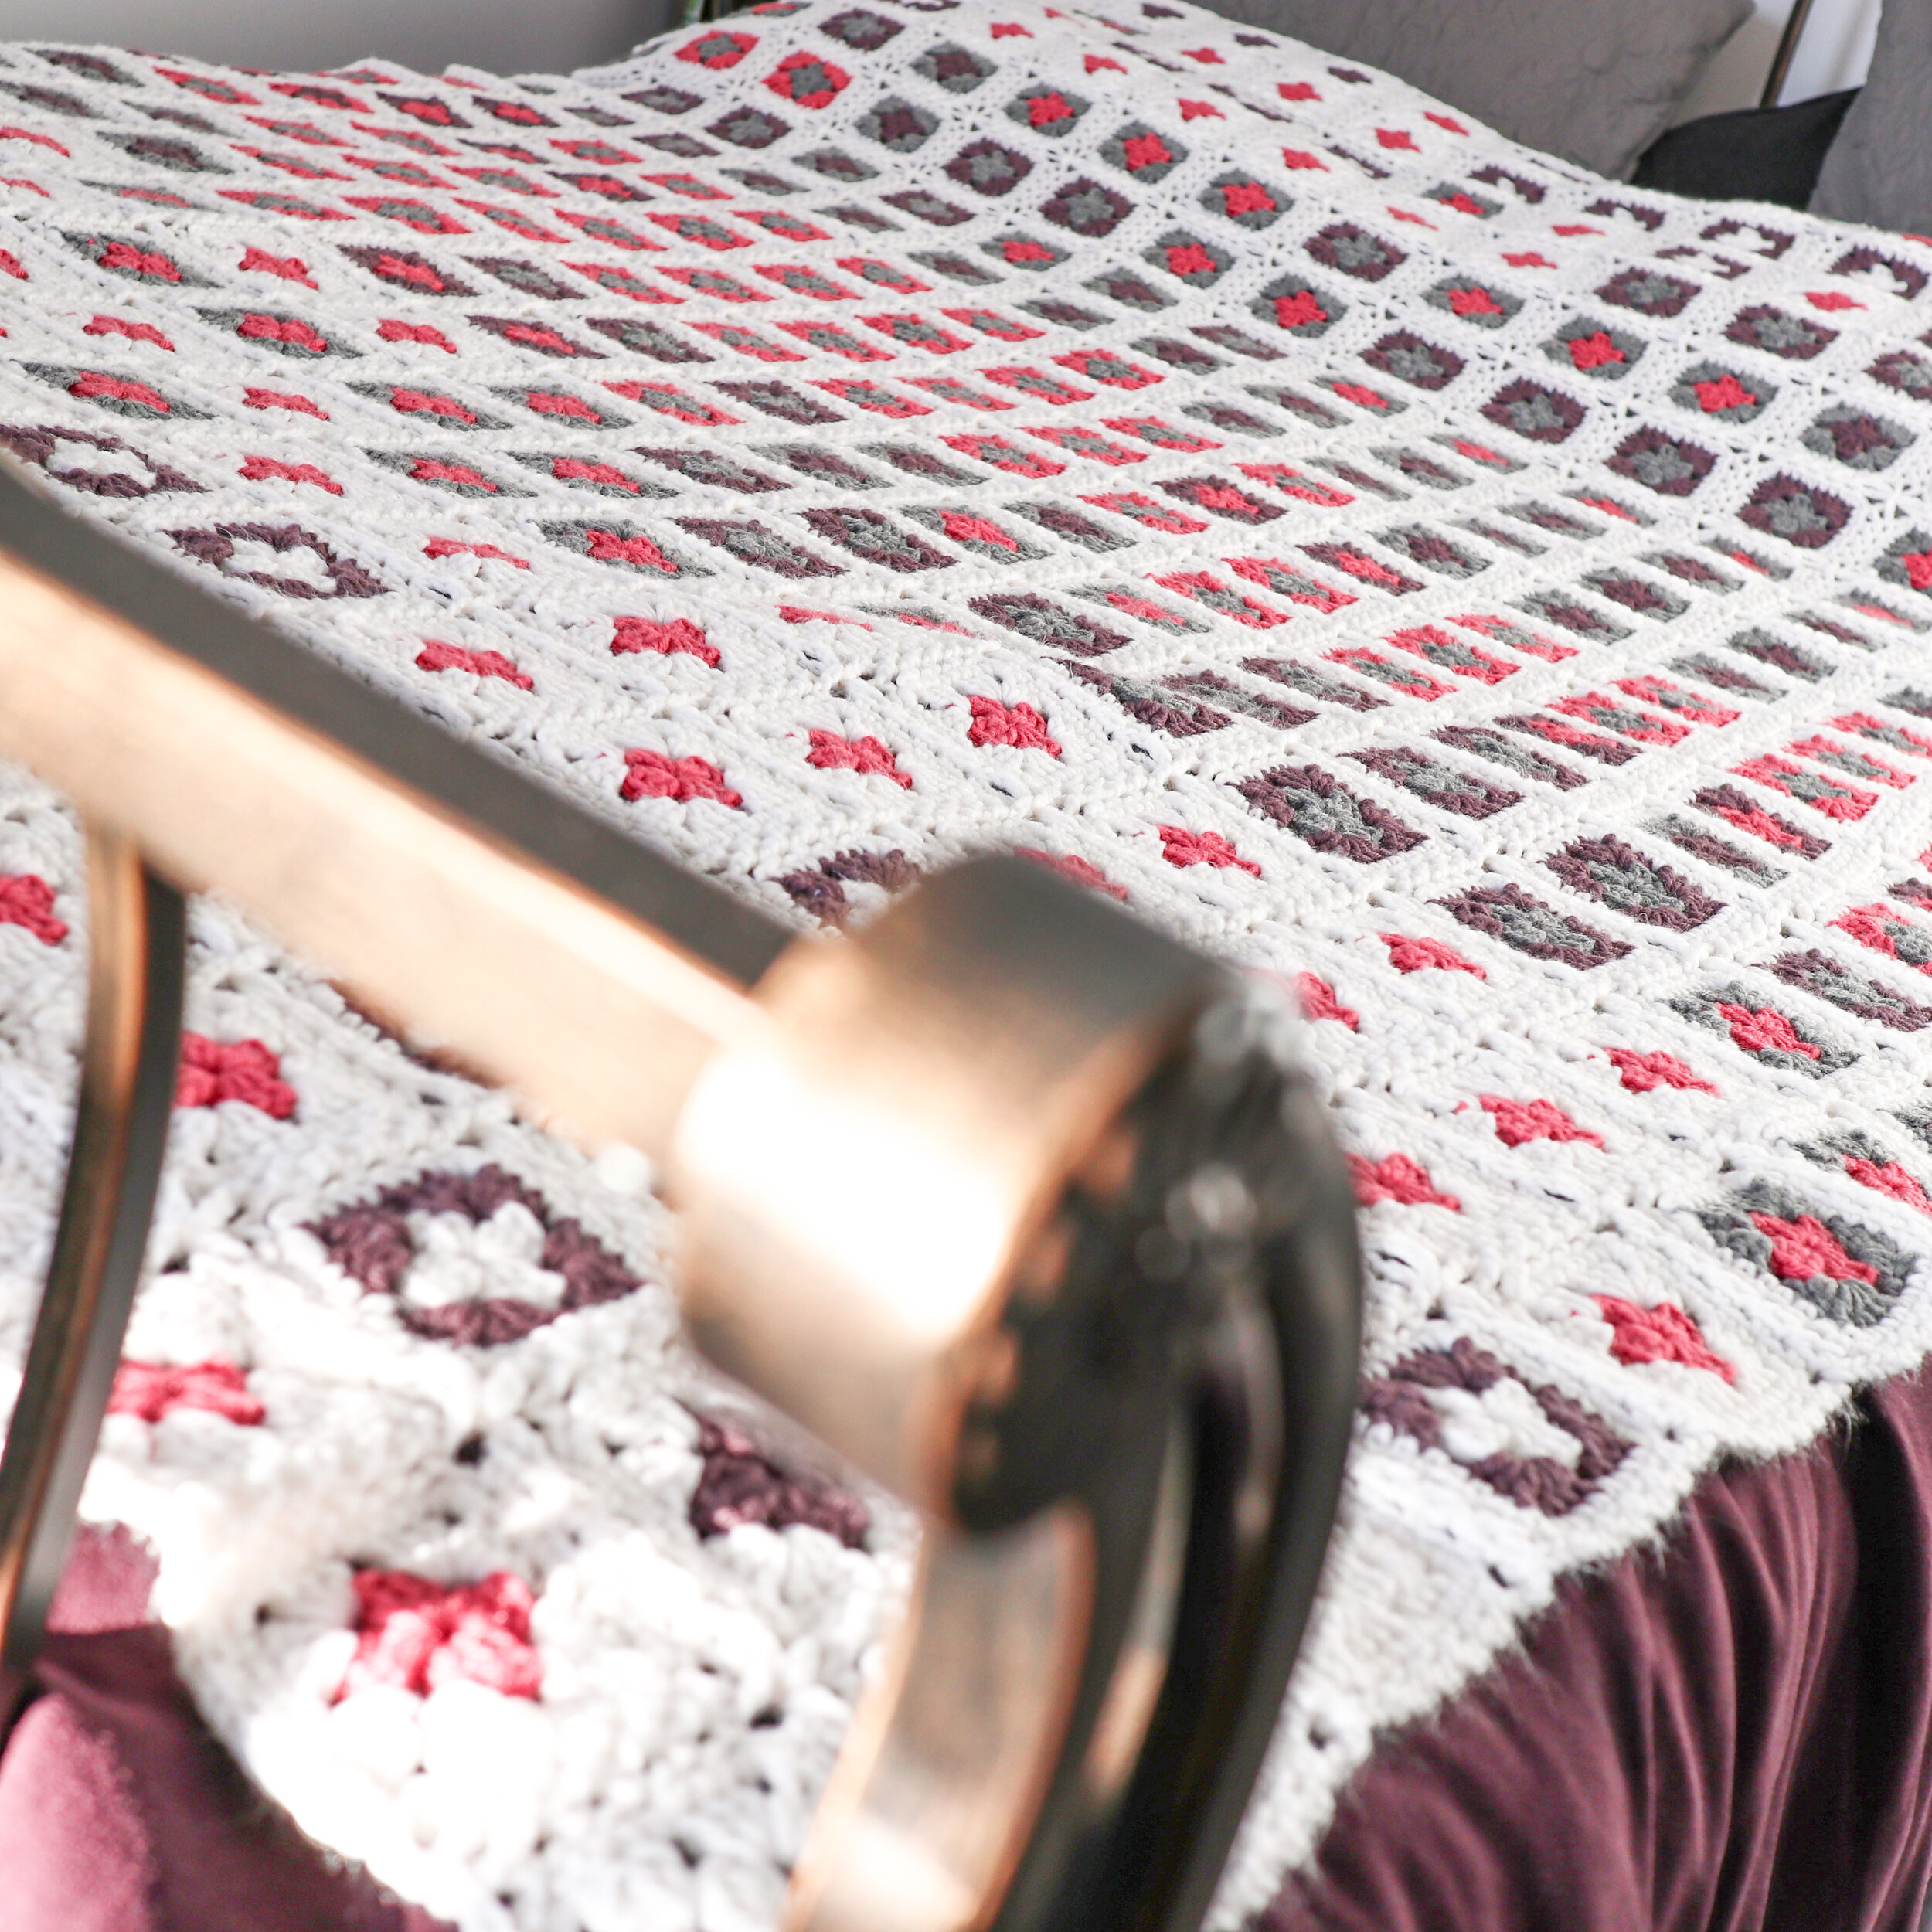
This is my version of a temperature blanket! Using the basic granny square and pairing it with different color combos depending on the temperature and you get this adorable queen sized blanket. It’s perfect for snuggling up under on cold nights, and with the Continuous Flat Braid Join, it really has a gorgeous heirloom feel to it.
For this blanket, I used Caron One Pound, which is an aran weight 4 yarn. This yarn works up quickly and gets so squishy and soft after washing it. But, you can use any type of yarn for this blanket. Pick a DK weight for a smaller and lighter blanket or go all out on the squish factor with bulky weight yarn to get an extra huge extra snuggly one!
Gauge isn’t super important for this one, but make sure you check how large your squares PLUS border are coming out to so you can get a good feel of how large your final blanket will be!
I hope you love this blanket as much as I do! Happy Crocheting!
FOLLOW ME ON SOCIAL MEDIA
Facebook: Ravin Sekai Designs
Ravelry: RavinSekai
Instagram: @ravinsekaidesigns
Pinterest: Ravin Sekai Designs
Patreon: Ravin Sekai Designs
WHAT YOU NEED:
Needle Size: 5 mm hook or size needed to obtain gauge
Yarn: medium weight 4 yarn. Sample made with 4 colors of Caron One Pound. 622 grams border color, 1649 grams others. 2271 grams total. (I used approx 310 grams each of 3 of the other colors to make my blanket (pink, grey, and purple). Then, the white I needed approx 772 grams as Canada has more cold days than not. But, the amount of grams you use for each color will be entirely dependant on the temperatures in your area for the year.)
Gauge: 13 st/ 14 rows in sc = 4” (gauge isn’t super important)
Size: 60.5” x 84” Queen Sized Quilt (16 squares x 23 squares)
ABBREVIATIONS:
Abbreviations in US terms
BC: border color
CC: center color
OC: outside color
Ch: chain
St: stitch
Sl st: slip stitch
Sc: single crochet
Dc: double crochet
Rep: repeat
Sk: skip
FO: fasten off
Notes:
1. I opted to only use 4 colors for my temperature blanket, but you can feasibly use as many colors as you’d like. I wanted both my border color and one of my lowest temperature colors to be the same (white) as I knew there would be a lot of it. But, if you want your border color to be totally different, it’s up to you!
2. The size of this blanket is approximate, and depending on your gauge, it could be slightly different. But, as this is a blanket, gauge isn’t necessarily important. You can also make this blanket in DK weight for a smaller blanket with a more delicate look or in Bulky weight for a larger, squishier blanket!
3. For your granny squares, Round 3 will always be your border color. Set Up - Round 2 will be decided by you depending on the temperature map you create below. Set Up and Round 1 are the center of the square(CC), Round 2 the outside (OC).
4. A year is only 365 or 366 days long, but the blanket contains 368 squares in order to be a complete blanket. For those extra 2 - 3 squares, choose whatever colors you would like.
THE PATTERN:
For the free pattern of this garment please continue on this page. Please consider supporting me by purchasing the 100% ad-free PDF with full schematic, charts, and picture tutorials for this pattern on my Ravelry or ETSY pages. Or consider joining my Patreon for member perks.
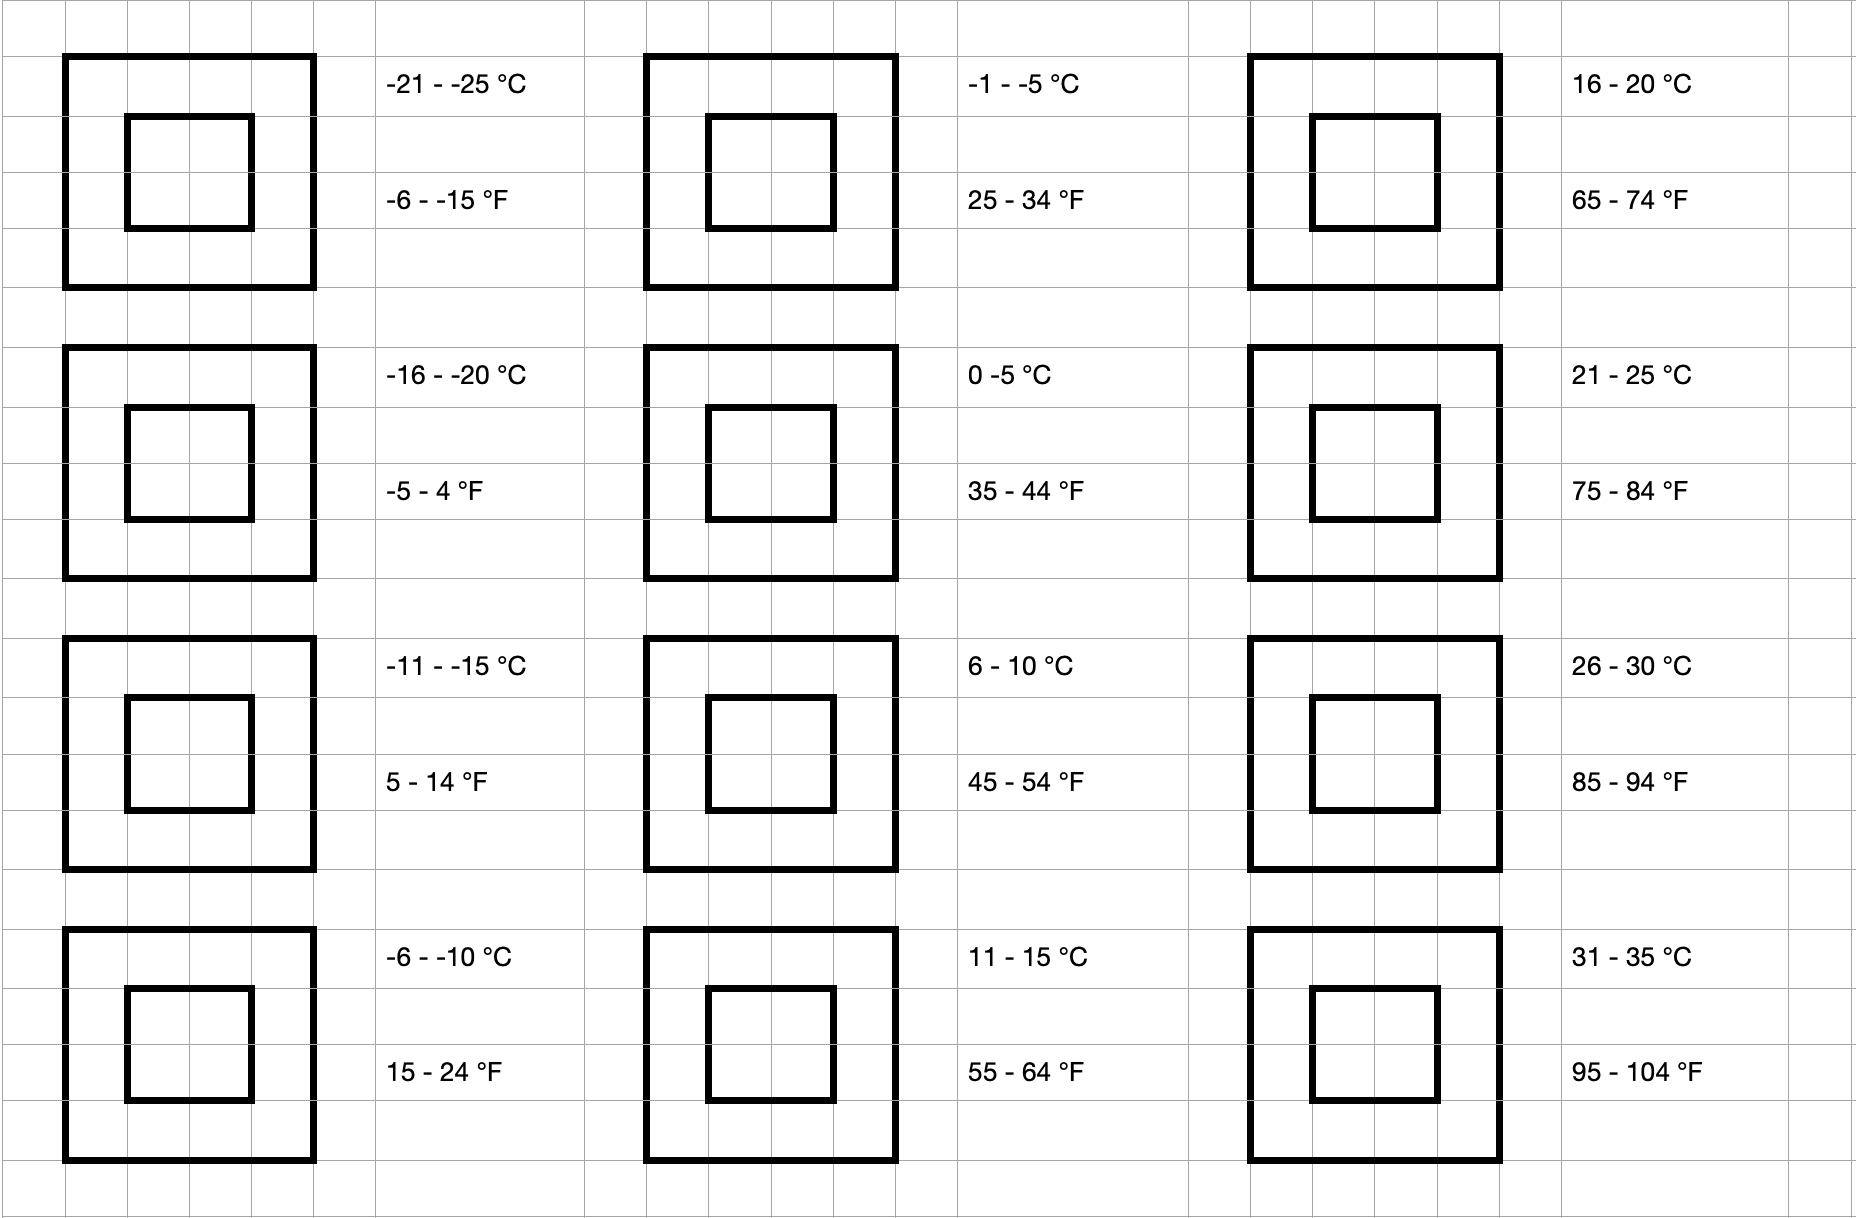
Temperature Map:
First things first, you need to decide what colors you want to use for your blanket, and how you want them to be arranged. Each temperature square is a 2 toned combo that you get to choose! So, for each temperature range below, choose 2 colors; the inner portion of the granny square (set up + round one) and the outside portion (round two). They can be any colors! It all depends on you!
For this purpose, I have created a little chart where you can mark in the colors you like and play with the arrangements and how they work together!
The temperatures in °C and °F for each square are not exactly the same, but they are laid out with the same temperature variance (for example: -21 - -25°C are basically the same temperatures as -6 - -15°F, it just depends on what your country uses, choose the temperature system your country uses). The chart below is the range of temperatures that occur the most in Montreal, Canada. If you are in a warmer or cooler climate, you can shift the temperatures to accommodate the range in your area! You can print this picture out and mark in the colors for each set of temperatures as you desire. Here is an example of the colors I used for my blanket.
Temperature Chart:
Next, you need a place to write down the temperatures each day, especially if you’re like me and sometimes don’t have time to make a new square each day. In this chart, you can make a list of the temperatures per day so that they’re all in a nice easy to locate place once you’re ready to sit down and get some squares done.

The Granny Square:
Set up: With CC, Ch 4, sl st into 1st ch (creates a circle)
Round 1: ch5, 3dc into circle, ch2, 3dc into center, ch2, 3dc into circle, ch2, 2dc into circle, sl st into 3rd ch of ch5
Round 2: Switch to OC, sl st a 2nd time into the same ch5 space as Row 1 , ch5, 3dc into same space again, ch1, *3dc into next ch2 space, ch2, 3dc in same ch2 space, ch1*, rep in remaining two ch2 spaces around, 2dc into same space as sl st at beginning of row, sl st into 3rd ch of ch5 at start of row.
Round 3: Switch to BC, ch1, sc in same st, *3 sc in ch2 space, 7 sc across* rep * * along next 2 sides, 3 sc in last ch2 space, 6 sc across, sl st into ch 1 from beginning of round.
FO

The Join:
For this blanket, I used the Continuous Flat Braid join method. This join as you go seam is a gorgeous way of connecting your squares and gives the blanket a beautiful heirloom quality. But, if this isn’t a method you like or you have another way of joining that you prefer, feel free to use that method instead!
However, I think it’s super important to decide if you will be making all of your granny squares then joining, or joining as you go. I suggest joining as you go, as it will make the process a little easier, you won’t have to keep track of a load of loose granny squares, and you won’t need to continuously look at your temperature chart while you’re putting the blanket together. But, remember, if you join as you go, you will need 2 different skeins of yarn for your border; one to finish each of your granny squares and one that will always be connected to the blanket as you join.
Complete picture tutorial: Continuous Flat Braid Join
Happy Crocheting!
IF YOU LIKED THIS PATTERN, PLEASE SUPPORT ME ON PATREON OR BUY ME A COFFEE!

BUY ME A COFFEE
SUPPORT ME ON PATREON

I LOVE TO SEE WHAT YOU CREATE!
Please share your creations with the community on social media tagging @ravinsekaidesigns and hashtag #addingupmemories
I can’t wait to see the beautiful things you come up with!
FOLLOW ME ON SOCIAL MEDIA
Facebook: Ravin Sekai Designs
Ravelry: RavinSekai
Instagram: @ravinsekaidesigns
Pinterest: Ravin Sekai Designs
Patreon: Ravin Sekai Designs