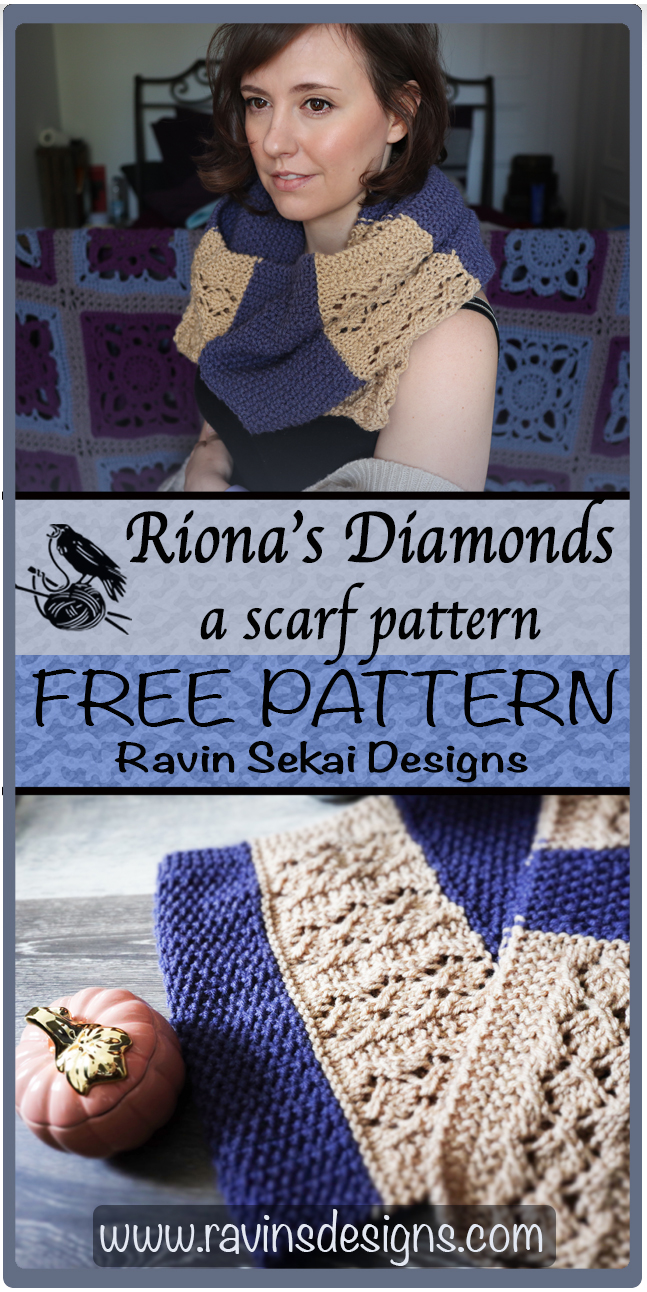
Riona's Diamonds a scarf pattern

What do we have here? Well, it’s a scarf pattern of course!
The last week or so, the weather has been just perfect in MTL. I’ve been really eating it up cause fall is 100% my time of year. I don’t think there is anything I don’t like about fall. It has the best holidays, the best weather, the best colors, the best food, the best smells. OHHHH! It’s just the BEST! Just let me have my pumpkin spice everything!!
With that in mind, I’ve started on some major fall/winter designs that I’m hoping to unveil, this scarf being the first of many!
The Riona’s Diamonds Scarf combines both delicate and simple elegance with it’s color blocks of diamond lace rib and sturdy seed stitch. It’s a perfect piece to spice up a simple fall outfit. Lovely over a cardigan on cool fall days, then transitioning perfectly to pair with your winter coat when it starts truly getting cold.
For this pattern, I just wanted the ends to look exactly the same. Since both ends of the scarf begin with lace, and casting on and binding off sometimes can cause the 2 ends to look very different where lace is concerned, I went with my gut and decided to knit both ends separately, then joined their live stitches together using the kitchener joining method. I figured what better way to dust off some of my little used knitting techniques than to make this pretty scarf?! It helps that the join is garter stitch. There’s nothing easier to join in my opinion! And, if you don’t know how to use the kitchener join, then this is the perfect scarf to learn it with!
But, if you’re not into kitchener (let’s be honest, we all have some techniques we wouldn’t touch with a 10 foot knitting needle), then that’s ok too. The scarf still looks lovely knit straight! And, of course there are instructions at the end on how to do just that.
With my scarf, I used Caron One Pound to create it. I have a ton of One Pound in my house. I think I bought something like 15 skeins when they were on sale one time. Believe me, I’m not complaining! I actually like it quite a bit. It works for so many projects, you get a ton in one skein (YAY less ends to weave in), and it’s soft! Great for knitting on a budget. BUT of course you don’t have to use this yarn for your scarf. You know me, I like my options! So, some substitutes for this yarn are Lion Brand Heartland, Wool-Ease or Vanna’s Choice, Red Heart With Love or Soft, and Paintbox Yarns Simply Aran. These are just the most affordable best matches, there are literally hundreds of yarns that you can use to make this lovely scarf! Any Weight 4 Aran/Worsted yarn will do nicely. Just, SWATCH! (I am not affiliated with Caron, Lion Brand, Love Crafts or Yarnspirations in any way, I just like the yarn).
I think that’s enough from me now! I’ll let you get knitting!
I love to see what you create!
Please share your creations with the community by tagging @ravinsekaidesigns and hashtag #rionasdiamonds
I can’t wait to see the beautiful things you come up with!
Follow me on social media
Facebook: Ravin Sekai Designs
Ravelry: RavinSekai
Instagram: @ravinsekaidesigns
Pinterest: Ravin Sekai Designs
Patreon: Ravin Sekai Designs

What You Need:
Needle Size: 5mm circular or straight needles
Yarn: Caron One Pound 100% acrylic Medium weight 4 yarn 812 yards per skein. 2 colors. I used Colorways Lace (C1) and Denim (C2) approx 200 - 250 yards each.
Gauge: 14.5 sts/25 rows = 4”
Finished Scarf Size: 12” width, 55” length
Skills Needed/Abbreviations:
RS: right side
WS: wrong side
St: stitch/stitches
CO: cast on
Sl1kw: slip 1 st knitwise. with yarn in back, insert right needle in first st as if to knit it, instead, simply slip the st onto the right needle, cont. knitting.
K: knit
P: purl
K2tog: knit 2 together
Ssk: slip, slip, knit. slip the first stitch as if to knit onto right-hand needles, slip the second stitch as if to knit, then slide the left-hand needle into the front part of both stitches and knit them together.
Sl1-k2tog-psso: slip one stitch to the right-hand needle knitwise, knit the next 2 stitches together, pass the previously slipped stitch over the k2tog and off the right-hand needle
C1 and C2: color 1 and color 2.
Yo: yarn over
Rep: repeat
BO: bind off
Kitchener Joining Method: a method of joining 2 pieces together using live stitches. Instructions on how to do this are below.

The Pattern:
For the free pattern to this scarf, continue on this page. For a 100% ad free, downloadable and printable pdf version of this pattern, containing a knitting chart, please purchase at my ravelry or ETSY pages. Or consider joining my Patreon for member perks. Thank you!
Side 1:
CO 44st with C1
Setup Row (WS): sl1kw, k43
Row 1 (RS): sl1kw, k2, *p2, k2tog, k1, yo, k1, yo, k1, ssk* rep * * 3 more times, p2, k3
Row 2: sl1kw, k2, p to last 3 sts, k3
Row 3: sl1kw, k2, *p2, k2tog, yo, k3, yo, ssk* rep * * 3 more times, p2, k3
Row 4: sl1kw, k2, p to last 3 sts, k3
Row 5: sl1kw, k2, *p2, k1, yo, ssk, k1, k2tog, yo, k1* rep * * 3 more times, p2, k3
Row 6: sl1kw, k2, p to last 3 sts, k3
Row 7: slkw, k2, *p2, k2, yo, sl1-k2tog-psso, yo, k2* rep * * 3 more times, p2, k3
Row 8: sl1kw, k2, p to last 3 sts, k3
Row 9 - Row 40: rep Row 1 - Row 8 4 more times.
Row 41 - Row 42: sl1kw, k all stitches
Change to C2
Row 43 - Row 44 : sl1kw, k all stitches
Row 45: sl1kw, k2, [k1, p1] x 19, k3
Row 46: sl1kw, k2, [p1, k1] x 19, k3
Row 47 - Row 56: rep Row 45 - Row 46 5 more times.
Row 57 - Row 58: sl1kw, k all stitches
Change to C1
Row 59 - Row 60: sl1kw, k all stitches
Row 61 (RS): sl1kw, k2, *p2, k2tog, k1, yo, k1, yo, k1, ssk* rep * * 3 more times, p2, k3
Row 62: sl1kw, k2, p to last 3 sts, k3
Row 63: sl1kw, k2, *p2, k2tog, yo, k3, yo, ssk* rep * * 3 more times, p2, k3
Row 64: sl1kw, k2, p to last 3 sts, k3
Row 65: sl1kw, k2, *p2, k1, yo, ssk, k1, k2tog, yo, k1* rep * * 3 more times, p2, k3
Row 66: sl1kw, k2, p to last 3 sts, k3
Row 67: slkw, k2, *p2, k2, yo, sl1-k2tog-psso, yo, k2* rep * * 3 more times, p2, k3
Row 68: sl1kw, k2, p to last 3 sts, k3
Row 69 - Row 76: rep Row 61 - Row 68 one more time.
Row 77 - Row 78: sl1kw, k all stitches

Change to C2
Row 79 - Row 80 : sl1kw, k all stitches
Row 81: sl1kw, k2, [k1, p1] x 19, k3
Row 82: sl1kw, k2, [p1, k1] x 19, k3
Row 83 - Row 130: rep Row 81 - Row 82 24 more times
Row 131 - Row 132: sl1kw, k all stitches
Change to C1
Row 133 - Row 134: sl1kw, k all stitches
Row 135 (RS): sl1kw, k2, *p2, k2tog, k1, yo, k1, yo, k1, ssk* rep * * 3 more times, p2, k3
Row 136: sl1kw, k2, p to last 3 sts, k3
Row 137: sl1kw, k2, *p2, k2tog, yo, k3, yo, ssk* rep * * 3 more times, p2, k3
Row 138: sl1kw, k2, p to last 3 sts, k3
Row 139: sl1kw, k2, *p2, k1, yo, ssk, k1, k2tog, yo, k1* rep * * 3 more times, p2, k3
Row 140: sl1kw, k2, p to last 3 sts, k3
Row 141: slkw, k2, *p2, k2, yo, sl1-k2tog-psso, yo, k2* rep * * 3 more times, p2, k3
Row 142: sl1kw, k2, p to last 3 sts, k3
Row 143 - Row 158: rep Row 133 - Row 142 two more time.
Row 159 - Row 160: sl1kw, k all stitches
Change to C2
Row 161 - Row 162: sl1kw, k all stitches
Row 163: sl1kw, k2, [k1, p1] x 19, k3
Row 164: sl1kw, k2, [p1, k1] x 19, k3
Row 165 - Row 198: rep Row 163- Row 164 17 more times
Row 199 - Row 200: sl1kw, k all stitches
Place all St on waste yarn
Side 2:
CO 44 st with C1
Rep Row 1 - Row 160
Assembly:
Attach sides using kitchener stitch:
Place Side 1 back onto needle with WS facing you and needle point facing to the right.
Place both sides of scarf together with WS facing out and RS facing in and both needle points facing to the right, Side 1 on top.
With C2 and a darning needle, insert yarn purlwise into the first st on front needle, pull length of yarn through st, and keep st on needle.
Thread darning needle purlwise through first st on back needle, leave on needle.
Thread darning needle knitwise into first st on front needle, let st drop off.
Thread needle through next st on front needle purlwise and leave it on needle.
Thread needle knitwise through first st on back needle, slip st off.
Thread needle purlwise through next st on back needle, leave on needle.
Rep steps 5 - 8 until all st are BO
Block Lace Sections and Weave in ends.
To Knit straight without using the Kitchener joining method, simply knit to Row 200, then knit the sections in reverse starting from Row 133. So, start by knitting Row 1 - 200, then Row 133 - 160, then Row 79 - 132, then Row 59 - 78, then Row 43 - 58, then finally Row 1 - 43 and BO.
IF YOU LIKED THIS PATTERN, PLEASE SUPPORT ME ON PATREON OR BUY ME A COFFEE!
BUY ME A COFFEE
Support me on Patreon
I love to see what you create!
Please share your creations with the community by tagging @ravinsekaidesigns and hashtag #rionasdiamonds
I can’t wait to see the beautiful things you come up with!
Follow me on social media
Facebook: Ravin Sekai Designs
Ravelry: RavinSekai
Instagram: @ravinsekaidesigns
Pinterest: Ravin Sekai Designs
Patreon: Ravin Sekai Designs