
Why Do We Use Gauge?

Seriously, why do we use gauge in crochet and knitting? I have had so many people ask me this question. Why is gauge so important? What is it? Why do we do it? How do we do it? Is it REALLY necessary? So, I’ve decided it was time for me to delve a little more into gauge and do my best to answer all of the questions I’ve gotten about it.
I’ve heard a lot of people tell me that they HATE making gauge swatches, or that just don’t see the importance of them. And, others who have never come across the concept of making a gauge swatch, or understood why it would be useful. In this blog post, I’m going to give you all the reasons why finding your gauge is vitally important to making garments that fit, and why you should ALWAYS make a gauge swatch when creating clothing items! Also, I’m going to give you the run down of how to make and interpret your swatch after you have it worked up! Let’s get started!
First off, What Is Gauge?
Gauge for either knitting or crochet, at its most basic level, is how many stitches horizontally and how many rows of stitches vertically you have per 1”. Most patterns will use the most basic stitches (ie. stockinette for knitting/single crochet for crochet) for their gauge and have this calculated by however many (stitches x rows) you need to make in order to have a 4 x 4 inch square in whatever stitch they have indicated. For Example:
A pattern says your gauge is 16 st/21 rows = 4” in stockinette/single crochet stitch.
This means to make a 4” square using the stockinette/single crochet stitch, you must make 16 stitches width-wise(horizontally) and 21 stitches lengthwise (vertically).
That’s pretty simple right?
But, gauge is a little more complicated than that.
To really understand gauge, you have to understand what other factors will affect your gauge. The yarn you use, the size of your needles or hook, and your personal tension all have an effect on the size of your gauge. This is why the designers of patterns will always tell you (or should) what weight yarn to use, the size needles or hooks you need, and what EXACT yarn they used to create the garment in their pattern. So…
Why is Gauge so important?
I would say, in creating garments that fit right, finding your gauge/matching the gauge of the designer is the most vital and important information you need. The designer of the pattern will tell you which yarns you can use and which size hook/needles needed; but, those two things are more strong suggestions than set in stone. You usually see something like: Use 3.5 mm hook(needles), or size needed to obtain gauge. That’s because gauge is more of the deciding factor of the size of your garment than anything else.
The gauge the designer includes in their pattern isn’t just there for random information. That gauge is the roadmap to creating the garment you see EXACTLY like it looks in pictures instead of you making something you might end up hiding in the bottom of a drawer (or under your bed). If you don’t meet the gauge the designer has set for you, you have no idea how big or small your finished item is going to end up! You could spend a handful of months creating a beautiful sweater only to find that the garment fits you like a tent! Or that an oversized item you loved on the model is now a fitted blouse on you!
You need to know what your personal gauge is when you’re working with any yarn, as well. Even when you’re working with the exact yarn a pattern calls for, you need to make sure that your gauge is the gauge of the pattern. Every person knits/crochets differently. You might work tighter or looser than the designer, which could have drastic consequences to your finished items.
Let me give you an example using our previous gauge of 16st=4” or 4st=1 inch:
So, you don’t check your gauge, and you’ve actually got 17.5 stitches every 4 inches instead of the correct gauge. That gives you 4.375 stitches per inch. Doesn’t seem like such a big deal, does it?
But, if you’re, say, working in the round, and your sweater is supposed to have 160 stitches for a 40” bust, but your gauge is 4.375st/inch, then the bust you are making will only actually have a 36.6 inch bust. That’s almost an entire size difference!! (160 stitches/4.375st per inch = 36.6”)
Finding your gauge will keep you from having sizing errors like this and tell you if you need to use a different size hook/needles, and what size tool you’ll ultimately need.
Which brings me to…
How Do You Calculate Gauge?
First, you have to make a Gauge Swatch.
So, basically, a gauge swatch is a square of knitted or crocheted fabric that you have made to see how your tension (the way you hold the yarn), the yarn you are using, and needles/hook you’ve chosen all work together. This is going to determine if the yarn you have chosen for a project paired with the needle/hook size the designer has given is going to work for that pattern, or if you are going to need to make some adjustments.
Making a gauge swatch is the easiest part of calculating your gauge. Simply take your chosen yarn and the needle/hook size the pattern calls for, then knit/crochet up a 4x4 square based on what their gauge is. Using my previous example, you’ll see something like this:
Needles/Hook: 5.5 mm, Or size needed to achieve gauge.
Yarn: Weight 3 DK Yarn. Sample knit in Lion Brand Comfy Cotton.
Gauge: 16 st/21 rows = 4” in stockinette stitch/sc.
So, you’d take your chosen yarn and 5.5 mm needles/hook and make a square that is AT LEAST 16 sts wide and 21 stitches (rows) long using the stockinette/single crochet stitch. I say at least, because I usually add a few more sts and a few more rows because it makes it easier to “read” and measure your stitches.
Once you finish, you will usually want to BLOCK that swatch if you ever plan on washing your garment. (That way you’ll know if your yarn will expand or stretch when it gets wet. I’ll explain blocking in another post).
Finally, you’ll take a ruler and measure how many stitches fit in 4 inches both width-wise and lengthwise.
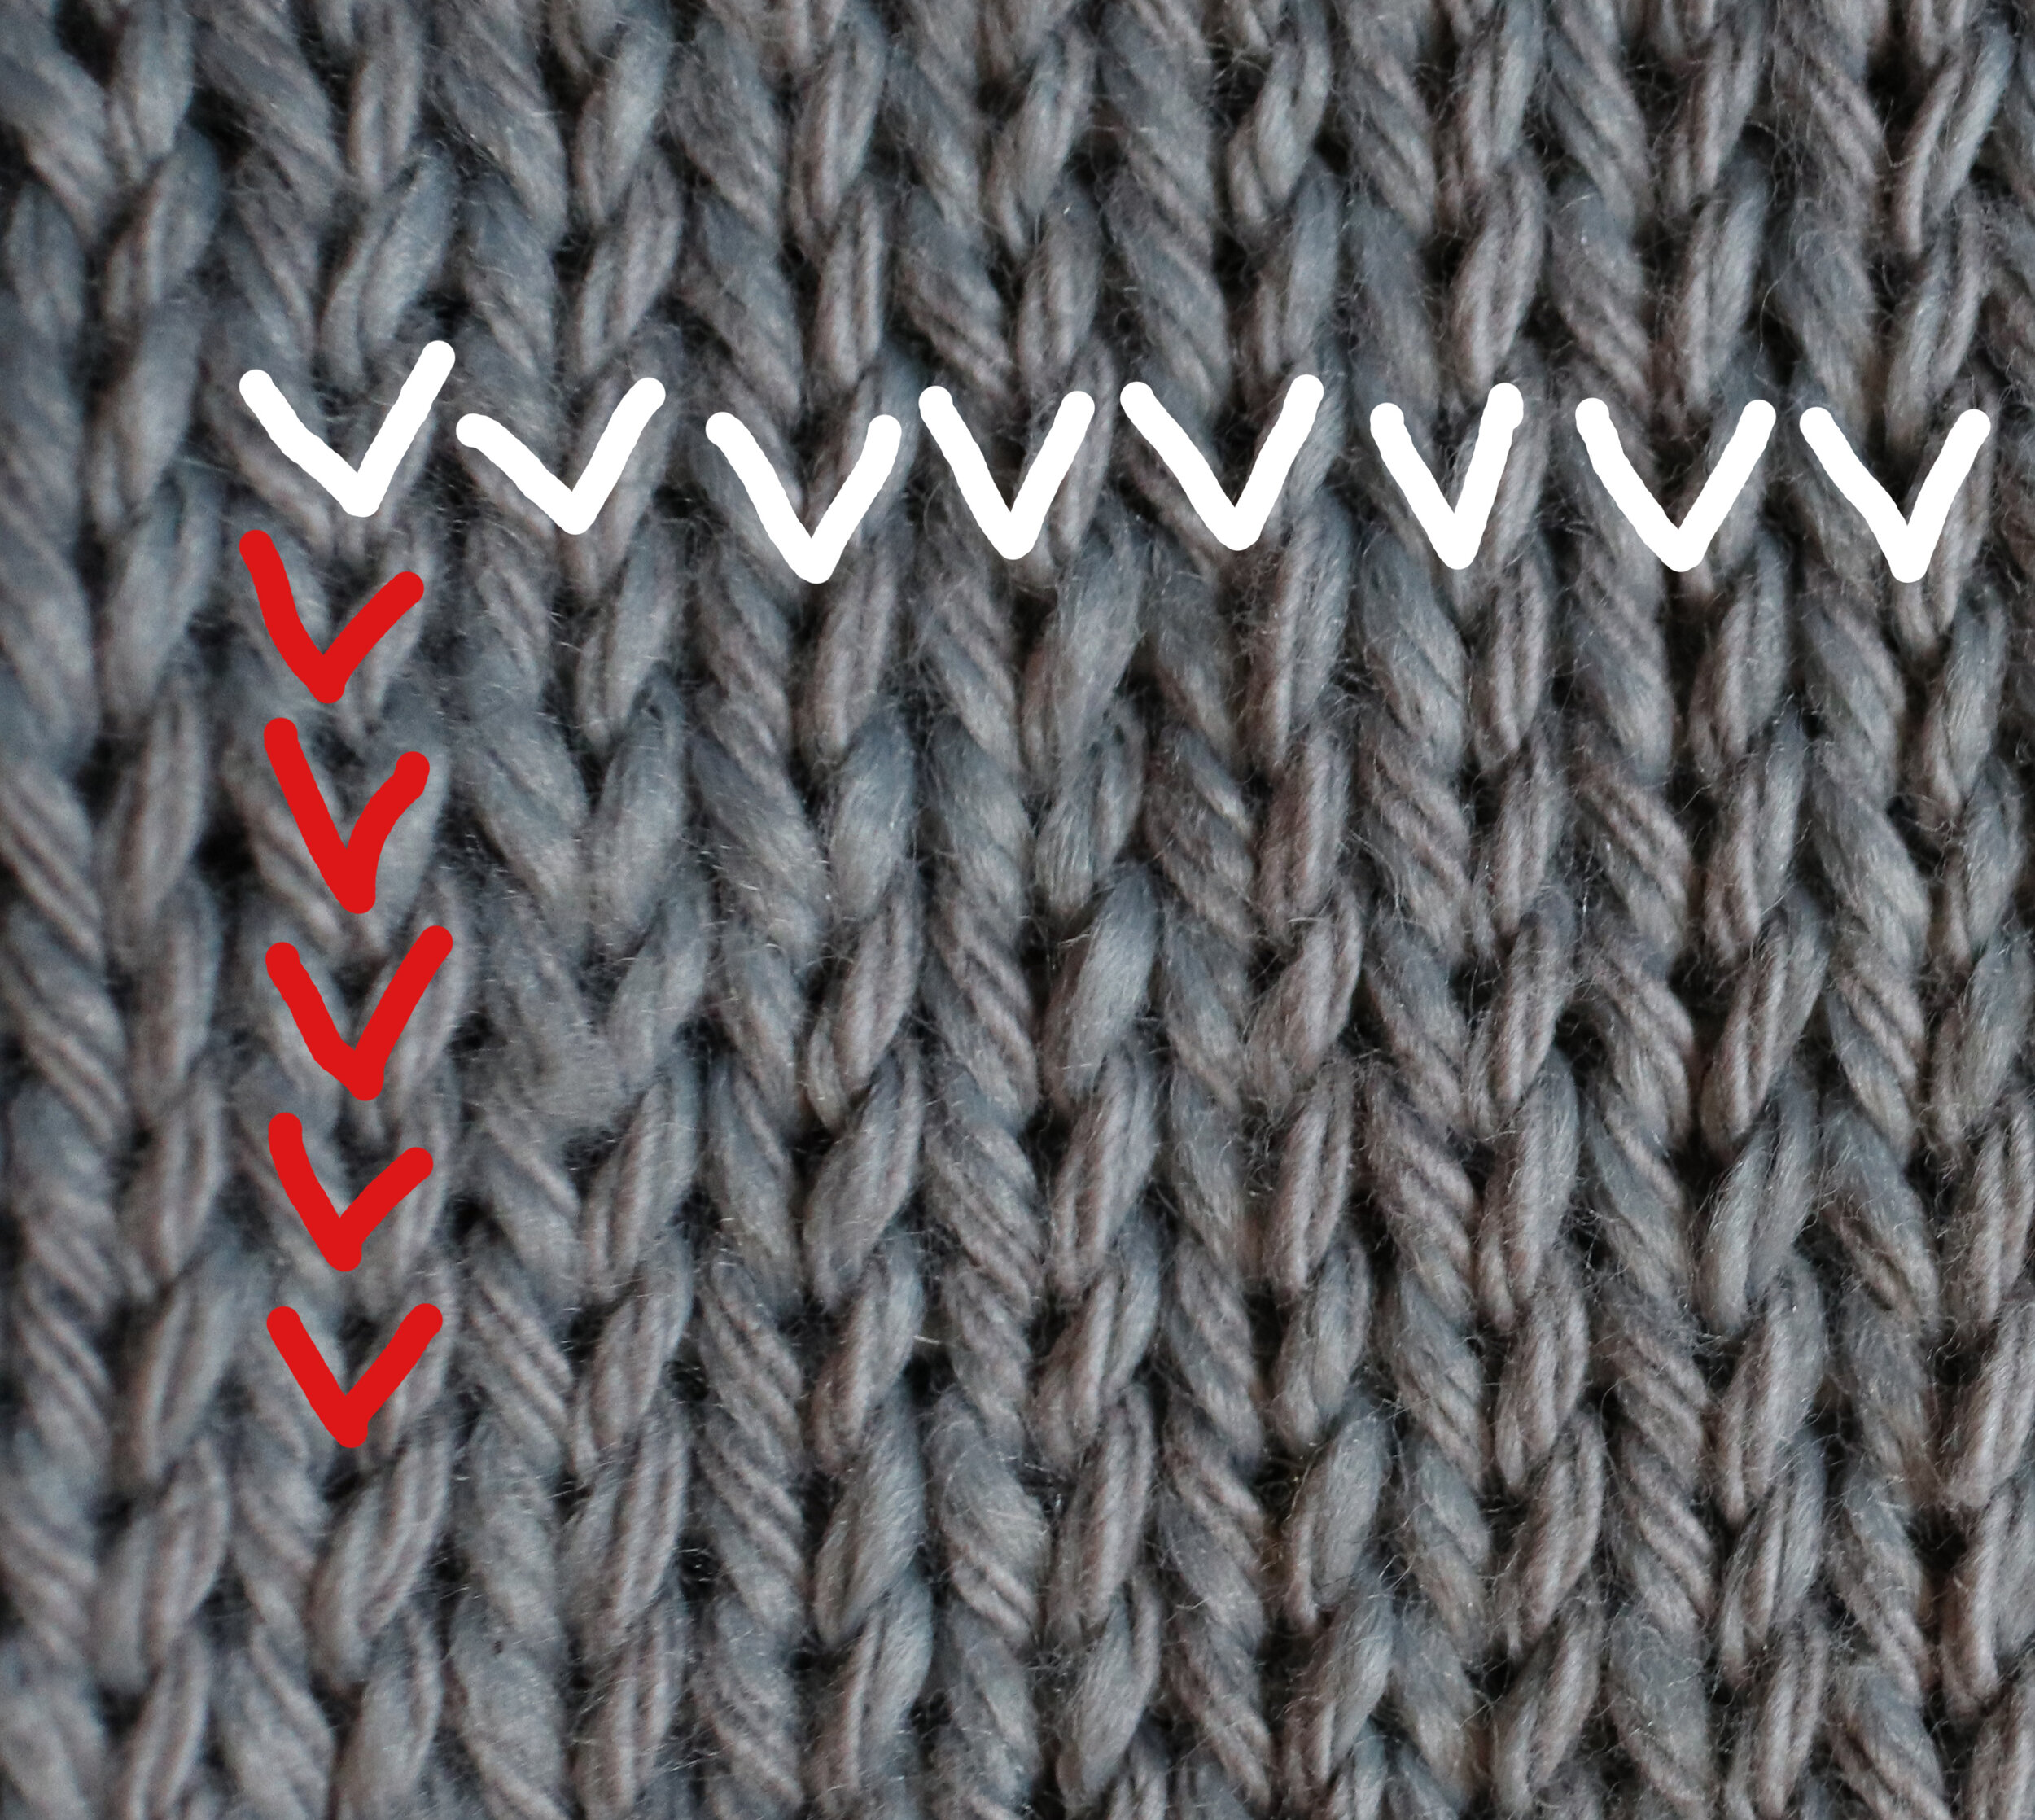
How to Count Your Stitches:
With making a gauge swatch, you’ll have to be able to know where one stitch ends and another begins. A good way to know this is to pay attention to your swatch as you create it. Make sure you take note of what a complete stitch looks like as sometimes a designer will use a special stitch in their gauge measurement when appropriate (this happens more often in crochet with the use of HDC and DC stitches).
For Stockinette stitch in knitting, it is pretty easy to see where each stitch begins and ends. You count the v’s.
For crochet, it is a little more difficult. There are a few methods of counting stitches. For counting stitches widthwise, you count the posts or you can count the v’s. Lengthwise, there is a few ways to count. You can either count the crochet “bumps” and then times that number by 2 (left side), OR you can count each row as alternating rightside up and upside down v’s.
If that’s hard to see/understand, you can watch this simple YouTube video that shows where those rows are!

If your gauge is spot on when you take out your ruler and measure, then it’s time to get working!
But, what if your gauge is off?
How to Make Basic Adjustments:
If you have TOO MANY stitches per inch, your stitches are too small and you should try GOING UP a needle/hook size and remake your swatch to check. (for example: you have 17-18 stitches in 4” instead of 16 with a 5.5mm tool, then you need to try using a 6-6.5mm)
If you have TOO FEW stitches per inch, your stitches are too big and you should try GOING DOWN a needle/hook size and remake your swatch to check. (for example: you have 15-14 stitches in 4” instead of 16 with a 5.5mm tool, then you need to try using a 5-4.5mm)
What else can you do with gauge?
As you might have guessed, knowing how to make a gauge swatch isn’t just great for following someone else’s pattern exactly! What if, say, you love a certain pattern, but really want to make it in a different weight yarn? Sometimes, going up and down a hook size is just NEVER going to cut it when you’re changing up your yarn that much. What can you do?
Well, if you know the designers gauge, and you know your gauge with your desired yarn, you can modify the pattern to get the exact garment you desire! It’s all about math to get to the correct measurements for each garment! Cool, right!
So…
That’s pretty much it! I hope I answered for you what gauge is, why it’s important, and how to calculate it! If you have any other questions, feel free to leave me a comment or send me a message!
Happy Creating!
Pin to Pinterest
I LOVE TO SEE WHAT YOU CREATE!
Please share your creations with the community on social media tagging @ravinsekaidesigns. I can’t wait to see the beautiful things you come up with!
FOLLOW ME ON SOCIAL MEDIA
Facebook: Ravin Sekai Designs
Ravelry: RavinSekai
Instagram: @ravinsekaidesigns
Pinterest: Ravin Sekai Designs
Patreon: Ravin Sekai Designs
IF YOU LIKED THIS Post, PLEASE SUPPORT ME ON PATREON OR BUY ME A COFFEE!

BUY ME A COFFEE
SUPPORT ME ON PATREON