Eternal Summer Bandeau
So, here in Montreal, we’re still waiting for summer to arrive. I feel like I say that every time I talk to people, but it’s so true! I never imagined I would live somewhere that spring and summer start so late! It’s nearly June and it’s still barely 15°C (59°F) Which is still crazy to me! Every day, I’m still in sweaters and jackets. You’d think that would be awesome for a knitter/crocheter, but, if you couldn’t tell from my previous posts, I’m ready for something a little different. I mean, I love you sweaters, but you’re boring me right now!
For the next pattern I was working on, I had planned on giving you guys a nice scarf pattern. And, don’t worry, that one is still very much on the way. But, I was halfway through creating the pattern for the scarf when the inspiration bug bit me hard! While dreaming of summer sun and ice cream, popsicles and poolsides, I’ve been trying to summon the summer weather by creating summer tops! I figure working my mojo on something summery would kick-start the powers that be into giving me a little more warmth and sun. It hasn’t worked so far, but I’m gonna keep trying!
With that in mind, this week I have a real treat for you guys. A new bandeau style crop top!
I wanted to make something that was simple, but had some nice details to make it stand out. What’s better than a corsetted crop top!?
This top is simple enough that you can finish it in only a couple hours, then head out to the beach to enjoy some fun!
I also used a little bit sturdier yarn for this one. I went with 100% acrylic Caron One Pound yarn for the top. It makes a little bit thicker material than, say, cotton, but that’s exactly what I wanted for this piece.
Directions below are written up for 3 sizes that should fit a most small, medium, and large sized T-shirt wearers. In the pictures, I am wearing the medium size, but the small fits nicely as well. That’s the beauty of a corset back. You can easily adjust the top to fit you. I am a B cup typically, but this top is great for many bust sizes!! Even my bustier ladies!
I hope you enjoy it as much as I do.
I love to see what you create!
Please share your creations with the community on social media tagging @ravinsekaidesigns and hashtag #eternalsummerbandeau
I can’t wait to see the beautiful things you come up with!
Follow me on social media
Facebook: Ravin Sekai Designs
Ravelry: RavinSekai
Instagram: @ravinsekaidesigns
Pinterest: Ravin Sekai Designs
Patreon: Ravin Sekai Designs
What You Need:
Hook Size: 4.5 mm or size needed to obtain gauge.
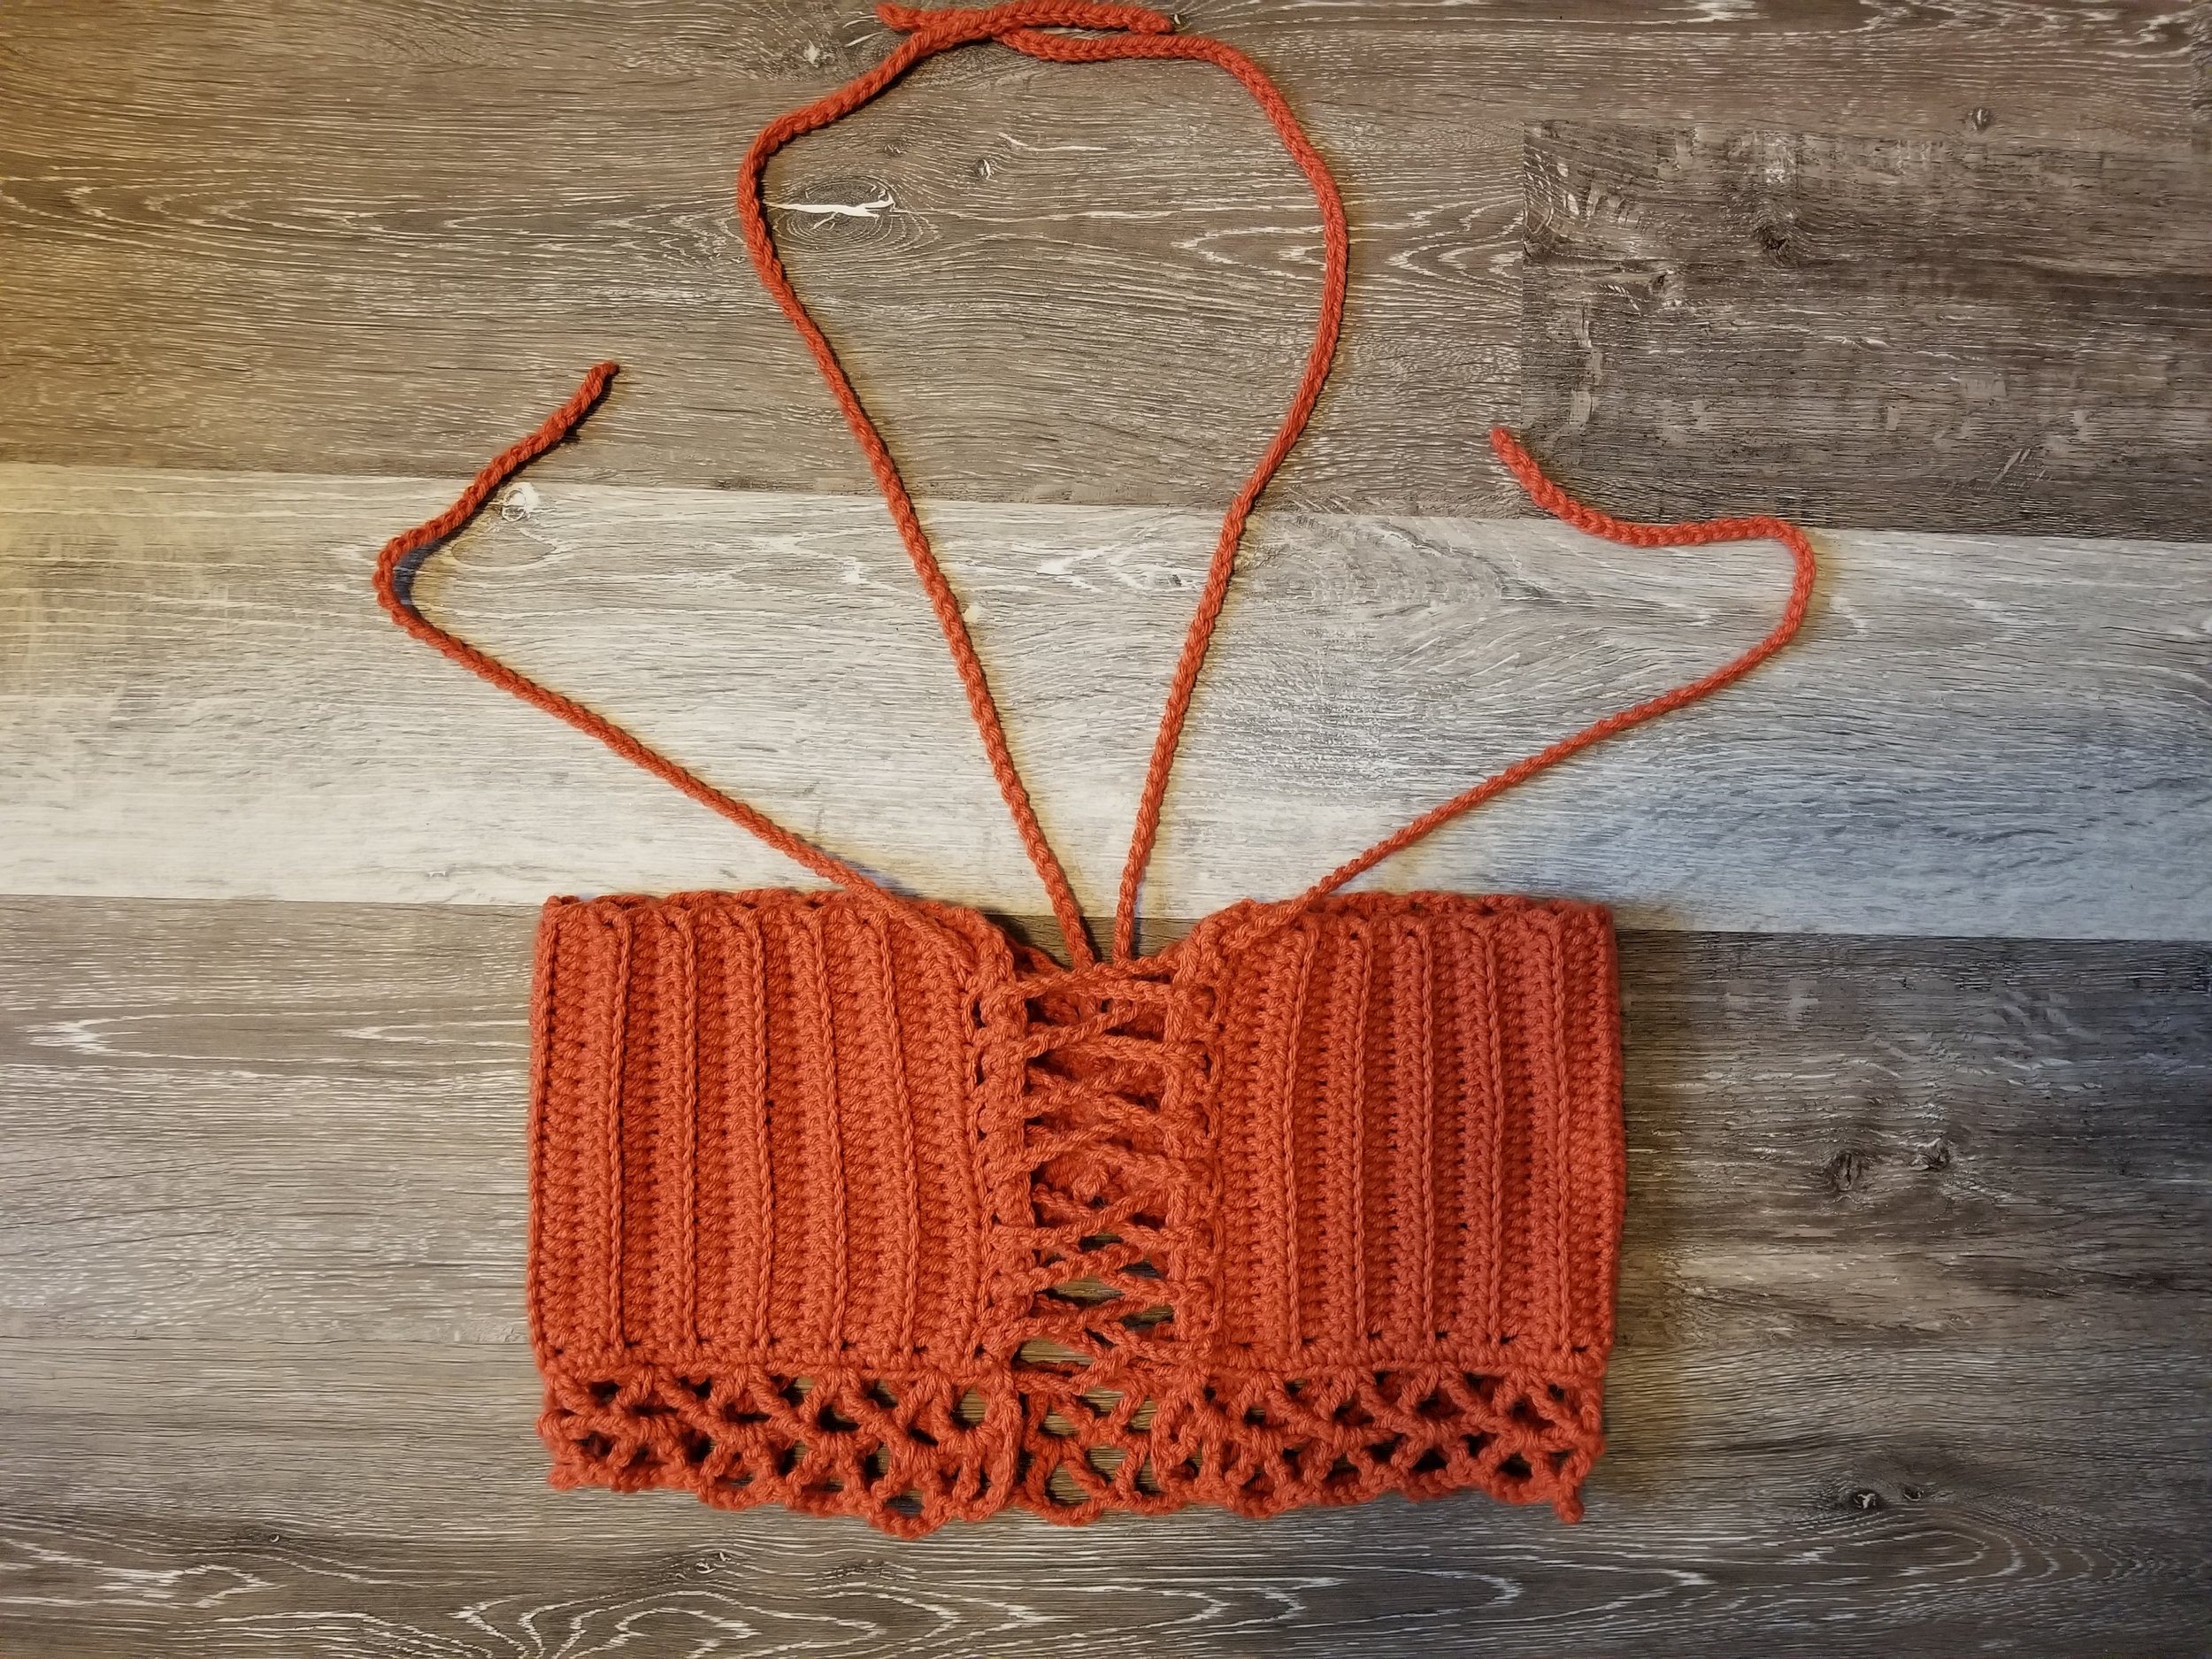
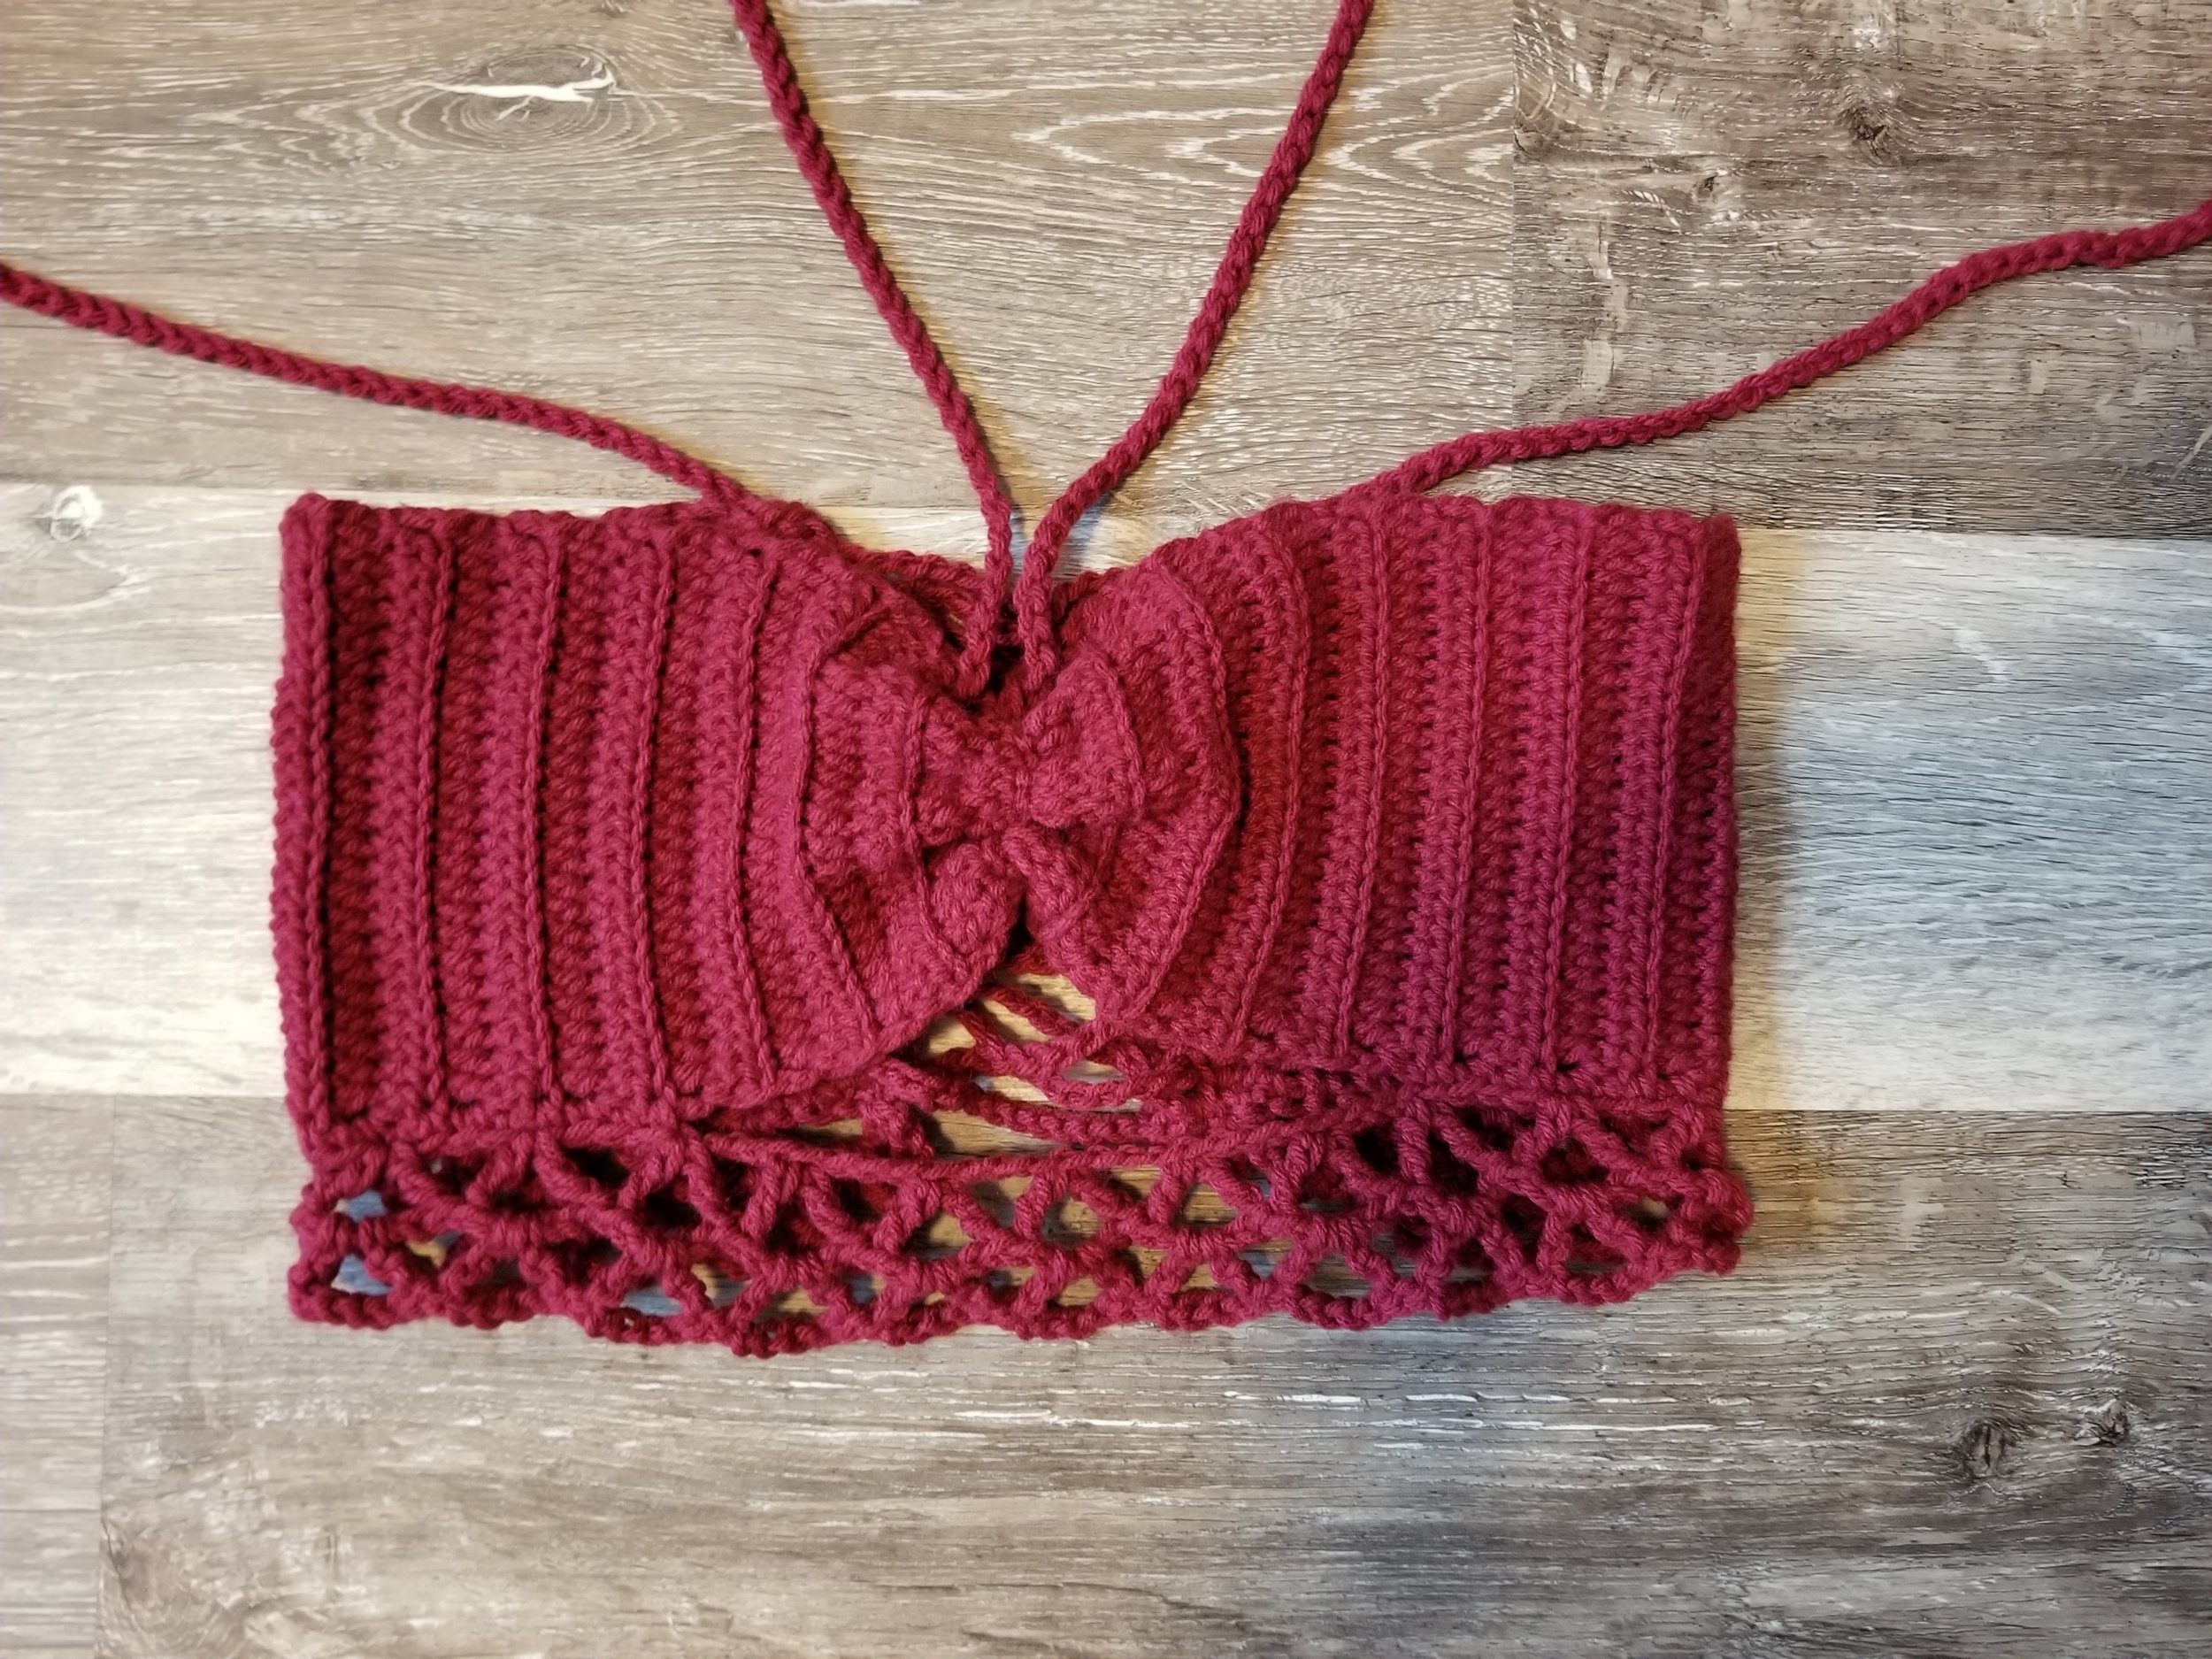
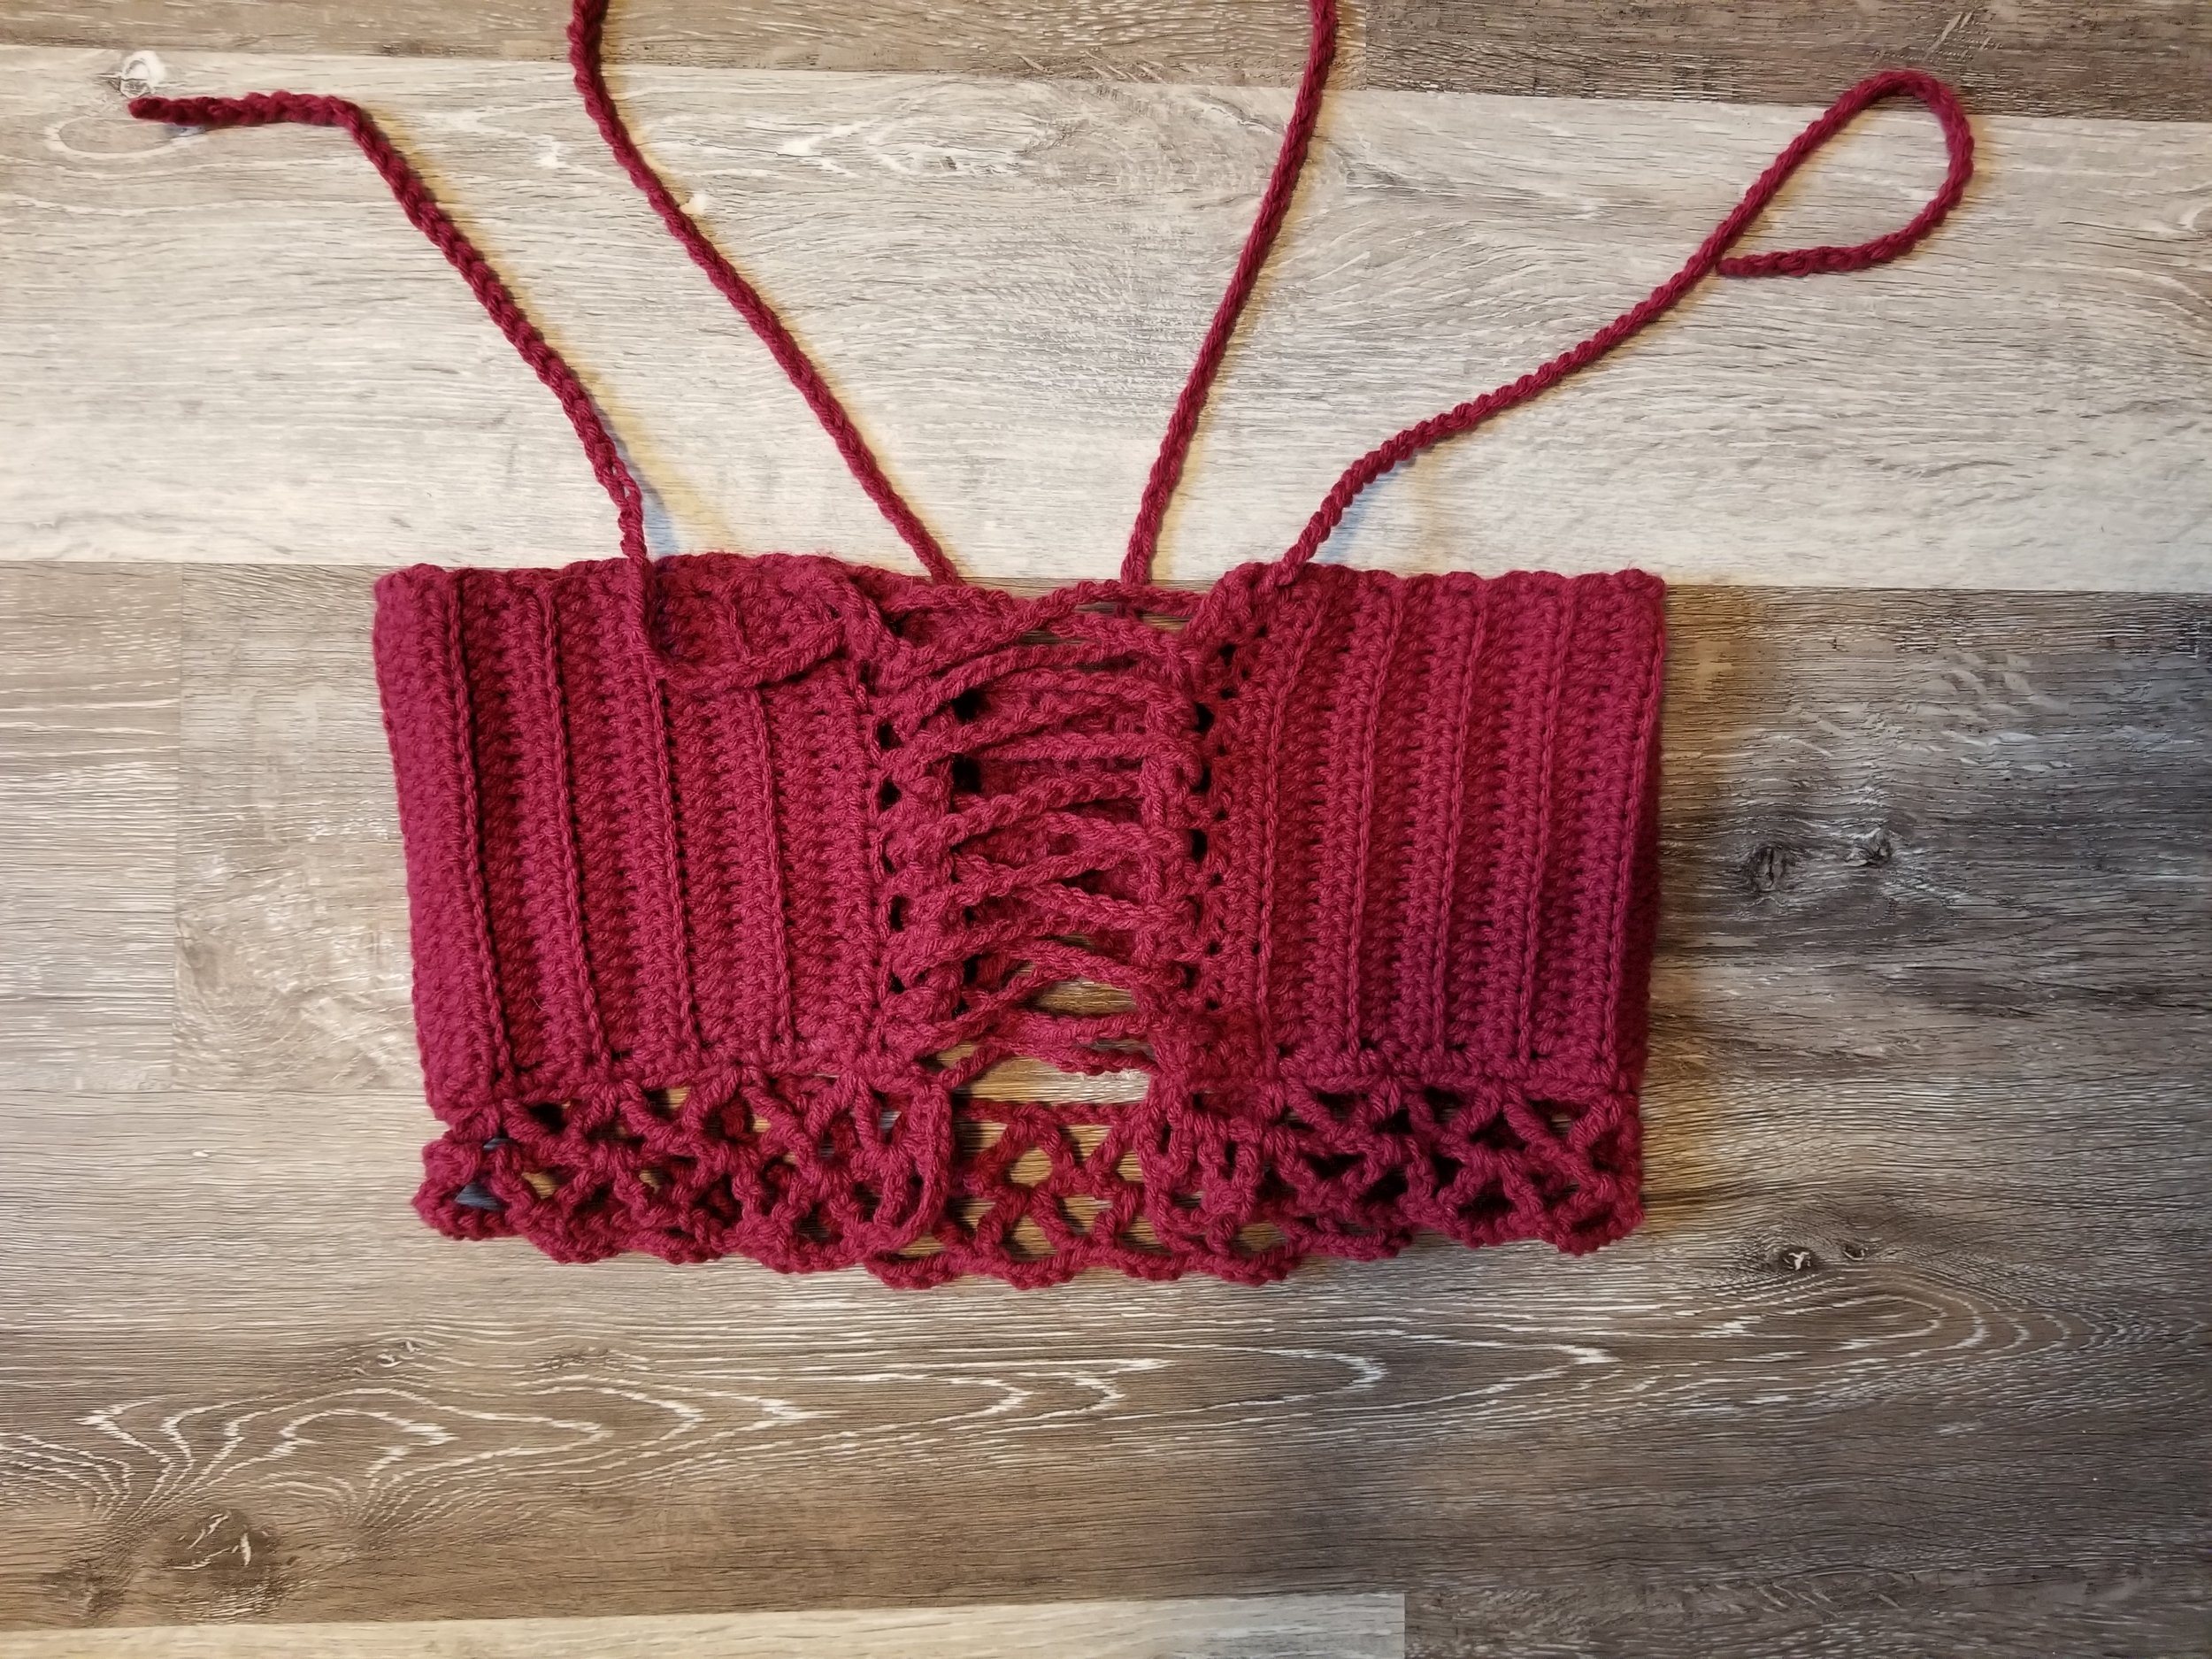
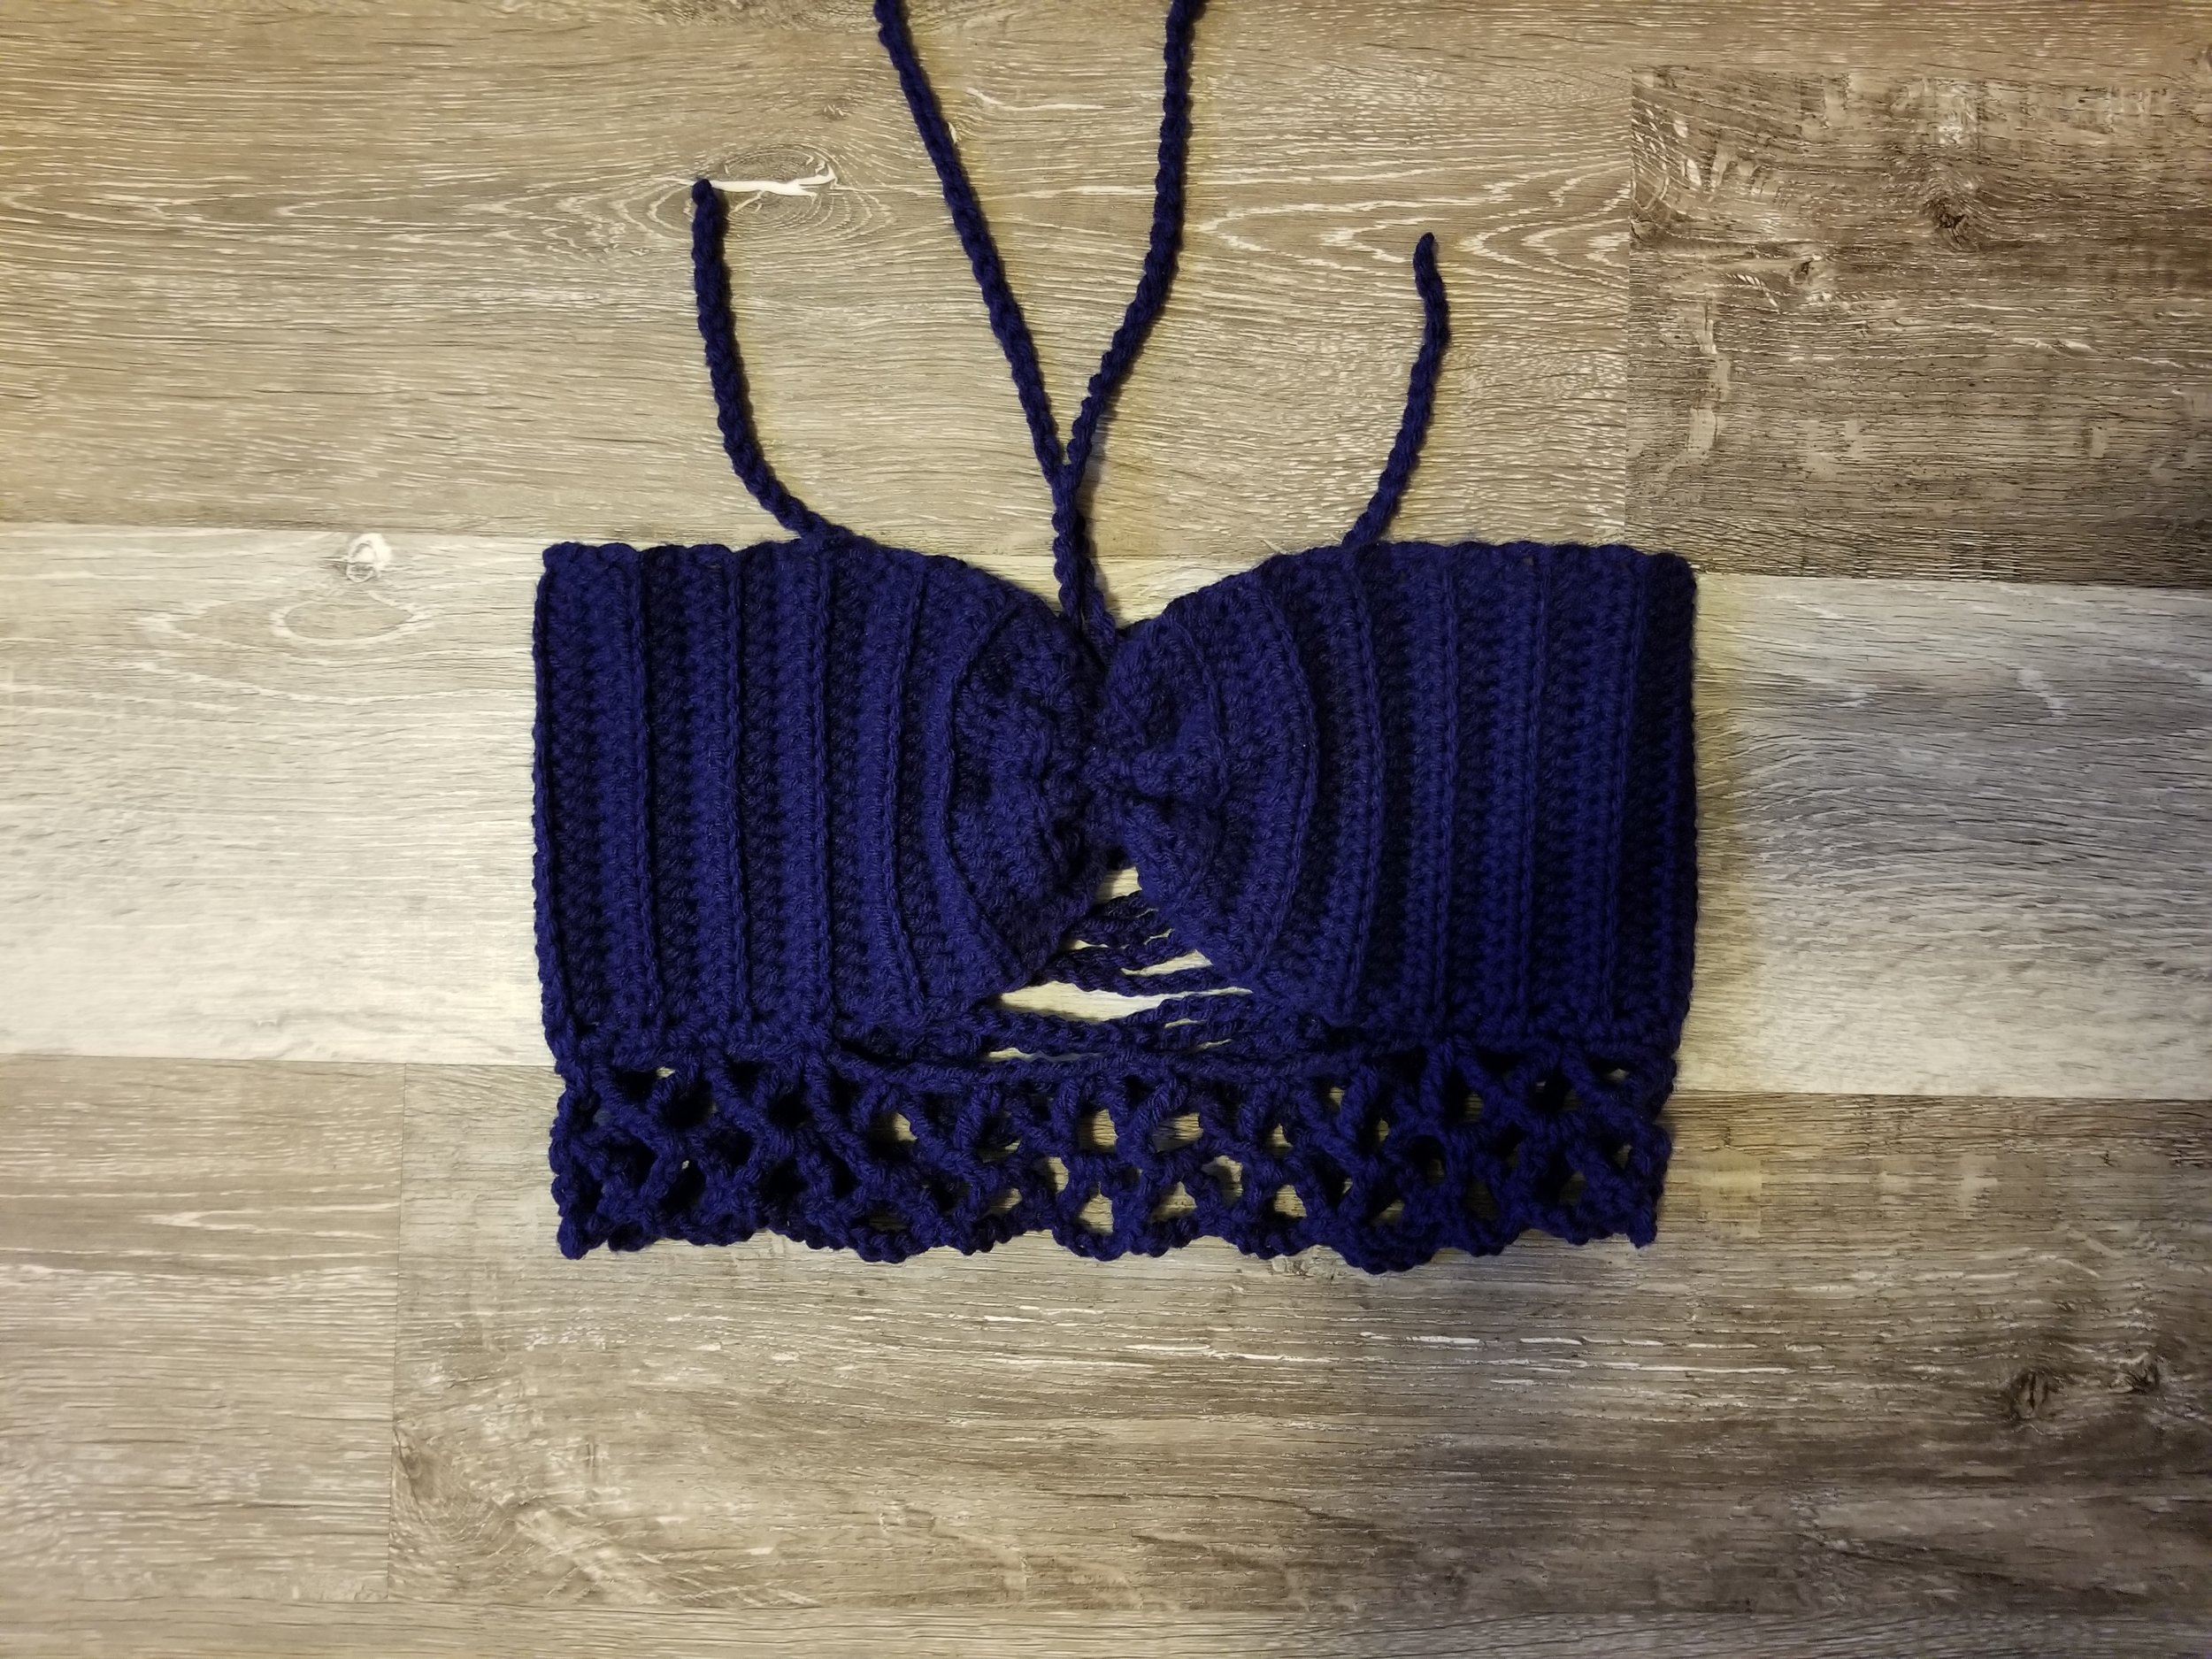
Yarn: 150 - 200 yards Caron One Pound Yarn, (one skein will make 2 or more tops. I used colorways midnight blue - small, Claret - medium, and Pumpkin - large) or any weight 4 yarn.
Gauge: 20 st x 8 rows = 4 inches hdcblo.
Ideal Bust Measurements: S: 34 - 38in bust, M: 38 - 42in bust, L: 42 - 46in bust
Model: wearing size M for more coverage. Bust size 35”. Usually wears size S top.

Skills Needed/Abbreviations:
St - stitch
Ch - chain
Sc - single crochet
Hdc - half double crochet
Hdcblo - half double crochet in the back loop only
Tc - treble crochet
Cont. - continue
Notes
Number of st for each size are written as follows small (medium) large
If you are a bustier girl, you may need to ch a few more to get the coverage you desire. Chaining more sts doesn’t affect the constriction of the bralette greatly.
If you need to make the top longer for a larger bust measurement, crochet more rows in multiples of 4.
As is the nature of bandeau tops, as the size of the top becomes larger the less support it will have. That is why I opted to only make this top for sizes S, M, and L. With some modifications, this top can be more supportive (addition of straps, additional dc reinforcement on the underside of bralette, etc), but as of right now, the top is only written for sizes S, M, and L. Thank you!
The Pattern
For the free pattern of this garment please continue on this page. Please consider supporting me by purchasing the 100% ad free PDF download for this pattern on my Ravelry or ETSY pages. Or consider joining my Patreon for member perks.
Bralette
Ch 24(26)28
Row 1: hdc in 3rd ch from hook. Hdc across. 23(25)27 st
Row 2: ch2, hdcblo back across. Make sure to place your last st in ch2 space below.
Cont. Row 2 until piece reaches 45(51)57 rows, about 22.5(25.5)28.5 inches when gently stretched.
Do not fasten off.
**If you need a larger circumference top, you can continue for as many rows as necessary for the top to reach around.**
Corset Eyelets
This part isn’t exact. My tops all have 8 eyelets, but you might need to fiddle your stitches a little. I just tried to keep them evenly spaced.
Row 1: *Ch3, skip 2 st, sc in next st* cont. across. Sc in last st.
Row 2: ch1, sc in 1st st below, sc across placing 1 sc in each sc below and 2 sc in each ch3 space. Fasten off.
REATTACH yarn onto opposite side and repeat Row 1 - 2.

Bralette Bust Shaping
Find the center of piece. Taking a darning needle, weave up through middle of piece, then back down and pull tight cinching in middle as much as possible. Fasten off. Make sure you pull it as tight as possible.
Corset Ties
Ch 150, turning piece with RS facing, attach yarn to top right side of piece with sc, 24(27)29 sc across top (25(28)30 in total), ch 26 across center of top (all sizes) and reattach with sc on opposite side. Make sure you place the sc the same distance from center as the other side. 24(27)29 sc across the opposite side (25(28)30 in total). Ch 150. Fasten off. (if you’re between sizes like I am, if you choose to make the next size up, ch 10-20 less for your ties unless you want them longer)
Bralette Netting Detail
Row 1: Reattach yarn at right side bottom of cup, ch 4, *(skip 3 st, tc in next st, ch4, tc in same st* repeat * * 5(6)7 more times (6(7)8 in all). Make * * 6(5)6 more times across central ch, repeat * * 6(7)8 times across the opposite side. Ch4, sc in last sc at end of bralette.
Row 2: ch4, (tc, ch4, tc) al in each ch4 below across piece. 20(21)23 times in total. Ch4, sc in the same sc below where you attached yarn before. Fasten off.
Neck Tie
Ch120, fasten off. Pull chain through middle of bralette.

Lace up the back by threading ties through eyelets. I lace mine through each eyelet, however you can lace through every other eyelet if you so desire. Be aware that ties may be rather long if you don’t lace every eyelet, so you might want to ch less for corset ties.
Now you have a cute top! Go on to the beach with your bad self now!
Size and yardage needed clarifications made June 13th, 2020
IF YOU LIKED THIS PATTERN, PLEASE SUPPORT ME ON PATREON OR BUY ME A COFFEE!

BUY ME A COFFEE
Support me on Patreon
I love to see what you create!
Please share your creations with the community on social media tagging @ravinsekaidesigns and hashtag #eternalsummerbandeau
I can’t wait to see the beautiful things you come up with!
Follow me on social media
Facebook: Ravin Sekai Designs
Ravelry: RavinSekai
Instagram: @ravinsekaidesigns
Pinterest: Ravin Sekai Designs
Patreon: Ravin Sekai Designs